Blingdenstone, once called the City of Speaking Stones, is a deep gnome settlement founded more than two millennia ago. The deep gnomes, insular and secretive by nature, care little about histories and legacies, and thus most of the ruined city’s past is lost to time.
For centuries, Blingdenstone remained hidden and isolated from the rest of the Underdark, thanks to a combination of misdirection and magic. It wasn’t until they provided shelter to a drow exile named Drizzt Do’Urden that the deep gnomes began to take a more active interest in the world outside their caverns. Perceiving the threat the drow represented to all the peoples of the Underdark, the deep gnomes abandoned their isolation when they came to the defense of the dwarves of Mithral Hall, defeating an invading drow force from Menzoberranzan.
This alliance, however, would spell Blingdenstone’s doom. The vengeful drow bided their time, rebuilt their forces, and sent their armies out to strike back hard against the svirfneblin, returning in great force to lay siege to Blingdenstone. The deep gnomes were no match for the drow army. Thousands of svirfneblin were slaughtered, and those survivors who didn’t escape to Mithral Hall or the surface world were dragged back in chains to Menzoberranzan as slaves.
Within the past decade or so, the deep gnomes have returned to reclaim, resettle, and rebuild their city. The ultimate success of their efforts, however, hangs by a slender thread. Most of the ruined city is a dangerous place and remains closed off, with tunnels and chambers barricaded with gates or deliberately caused cave-ins. The svirfneblin must contend with incursions by wererat squatters, insane elementals, ghosts, and a plague of invading oozes controlled by the Pudding King-a mad deep gnome under the influence of the demon lord Juiblex. Before they can offer the party any help, the deep gnomes likely need some themselves.
Going to Blingdenstone
Blingdenstone is an obvious destination for characters seeking refuge from their drow pursuers and a way out of the Underdark. The deep gnomes continue to have regular dealings with the surface world.
Among the party’s fellow escapees, the deep gnome Jimjar is the most enthusiastic about visiting Blingdenstone, and he can lead the adventurers there. Topsy and Turvy also know the way, but they are noticeably less willing to go to the settlement because of the fear and shame they feel regarding their lycanthropic affliction. The shield dwarf scout Eldeth Feldrun isn’t sure how to reach the gnome settlement, but is in favor of going there if it offers a route to the surface or to Gauntlgrym. If the characters allow Glabbagool (the sentient gelatinous cube from “The Oozing Temple” in chapter 2) to accompany them, it feels a certain pull toward Blingdenstone, and is curious enough to guide the characters there.
Drow Pursuers
The svirfneblin settlement is a haven for the characters. For good reason, the deep gnomes rarely allow drow into Blingdenstone, and only then with a heavily armed escort. A drow character must succeed on a DC 15 Charisma (Persuasion) check to enter escorted. However, if any deep gnomes are traveling with the party, having them vouch for the drow allows the escort to be waived at your discretion.
The party’s drow pursuers won’t attempt to follow the characters into Blingdenstone. The party’s pursuit level (see “Drow Pursuit” in chapter 2) doesn’t change while they are in the svirfneblin settlement.
If the party’s pursuit level is 3 or higher when they arrive at Blingdenstone, Ilvara and her party are watching the tunnels leaving the settlement. The pursuit level increases to 5 when the characters leave Blingdenstone, possibly leading to a chase or straight into chapter 7, “Escape From the Underdark.”
Arriving at Blingdenstone
Blingdenstone has a reputation for being a dangerous ruin inhabited only by monsters and other undesirables. Others think of it as a budding settlement well on its way to recovery. Once the characters reach the gates, they can see that the truth lies somewhere in between.
The characters must prove their goodwill to the deep gnomes before they are allowed inside. Once the characters win the gnomes' trust, they are welcomed into Inner Blingdenstone, and to what food and comfort the locals can readily provide.
Changing Svirfneblin Attitudes
The general attitude of deep gnomes toward strangers is hostile-not necessarily opposed, but deeply suspicious. This attitude can be shifted to indifferent and then friendly as the characters help the svirfneblin openly (see “Social Interaction” in chapter 8 of the Dungeon Master’s Guide).
Some deeds in Blingdenstone reward the characters with an automatic attitude shift, while others require a DC 15 group Charisma (Persuasion) check. If the group check succeeds, the attitude of the svirfneblin shifts by one. If characters are rude or act in a way to make the deep gnomes more suspicious toward them, they must also make another group check. If this group check fails, the deep gnomes' attitude worsens by one.
Random Encounters in Blingdenstone
Once per day while the characters are exploring the deep gnome settlement, roll a d20 and consult the Blingdenstone Encounters table to determine what, if anything, they encounter.
Blingdenstone Encounters
| d20 | Encounter |
|---|---|
| 1-10 | No encounter |
| 11 | 1d4+1 animated drow statues |
| 12 | 1d4+2 cave badgers |
| 13 | Dungeon hazard |
| 14 | Elemental vagabonds |
| 15 | 1d4+2 fiendish giant spiders |
| 16 | 1 ghost |
| 17 | Mephit gang |
| 18 | Roaming ooze |
| 19 | 1d4+1 svirfneblin wererats |
| 20 | 1 xorn |
Animated Drow Statues
Once part of a expedition from Menzoberranzan, these drow were petrified by a medusa and later animated by Ogrémoch’s Bane (see “Settlers, Squatters, and Invaders” later in this chapter). They have the statistics of animated armor, except they are elementals instead of constructs.
Cave Badgers
The svirfneblin use these beasts as part of their digging workforce. Cave badgers are giant badger with AC 12 (natural armor), tremorsense out to a range of 60 feet, and a burrowing speed of 15 feet. When they burrow, they leave tunnels behind them.
Dungeon Hazard
The characters approach a section of Blingdenstone in horrible disrepair. If they explore the area, roll a d6 and consult the Dungeon Hazards table to determine what the characters encounter. See “Dungeon Hazards” in chapter 5 of the Dungeon Master’s Guide for more information on each hazard.
Dungeon Hazards
| d6 | Hazard |
|---|---|
| 1-3 | Patch of brown mold |
| 4-5 | Patch of green slime |
| 6 | Patch of yellow mold |
Elemental Vagabonds
A dust mephit guides an earth elemental through the caverns and passages of Blingdenstone. If approached peacefully, they can point the way to Entemoch’s Boon (see “Blingdenstone Outskirts” later in this chapter).
Fiendish Giant Spiders
Former servants of the drow, these spiders burn with baleful energy. Treat them as giant wolf spider with a challenge rating of 1/2 (100 XP), resistance to cold, fire, and lightning damage, and immunity to poison damage. They are also immune to the poisoned condition.
Ghost
Some of the svirfneblin who perished during the drow invasion didn’t go easily, and their ghosts linger. When the characters encounter one of these ghosts, roll a d20 and consult the Ghost’s Attitude table to determine the attitude of the ghost.
Ghost’s Attitude
| d20 | Attitude |
|---|---|
| 1-6 | Indifferent and unaware of the characters until it is attacked by them |
| 7-12 | Indifferent but aware of the characters |
| 13-17 | Friendly |
| 18-20 | Hostile |
Mephit Gang
A mephit gang consists of 1d4 dust mephit and 1d4 mud mephit. If encountered in Inner Blingdenstone or Rockblight, they are insane and attack immediately. Otherwise, they mock the party but don’t fight except in self-defense.
Roaming Ooze
The presence of the Pudding King (see “The Pudding Court” later in this chapter) is drawing oozes to Blingdenstone. Roll a d4 and consult the Roaming Ooze table to determine what appears.
Roaming Ooze
| d4 | Encounter |
|---|---|
| 1 | 1 black pudding |
| 2 | 1 gelatinous cube |
| 3 | 1d4+1 gray oozes, one of which is a psychic gray ooze variant (as described in the Monster Manual) |
| 4 | 1d2 ochre jellies |
Svirfneblin Wererats
These wererats belong to Clan Goldwhisker and are searching for new places to settle within the ruins of the former city. They’re always hostile and attack the party if they can’t flee. Use the wererat stat block in the Monster Manual with a few modifications: svirfneblin wererats are Small and have the following additional features.
Gnome Cunning. The wererat has advantage on Intelligence, Wisdom, and Charisma saving throws against magic.
Innate Spellcasting. The wererat’s innate spellcasting ability is Intelligence (spell save DC 11). It can innately cast the following spells, requiring no material components:
At will: nondetection (self only)
1/day each: blindness/deafness, blur, disguise self
Stone Camouflage. The wererat has advantage on Dexterity (Stealth) checks made to hide in rocky terrain.
Xorn
This creature leaves the characters alone if they feed it as least 50 gp worth of gems or precious metals. Otherwise, it follows them around Blingdenstone, hoping that they leave behind something it can eat. The xorn is antisocial and doesn’t help the party in any way.
Important NPCs
When the characters visit Blingdenstone, they can meet one or more of the following svirfneblin.
| Blingdenstone NPCs | |
|---|---|
| Dorbo Diggermattock | Leader of the mining expeditions |
| Senni Diggermattock | Leader of the settlers |
| Nomi Pathshutter | Earth elemental wrangler with a task for the party |
| Gurnik Tapfinger | Priest of Callarduran Smoothhands with a task for the party |
| Kazook Pickshine | Alchemist and ore specialist who receives and gives quests |
| Chipgrin Goldwhisker | Leader of the wererat colony |
| Burrow Warden Jadger | Undead leader of the burrow wardens |
| The Pudding King | Insane deep gnome enthralled by the demon lord Juiblex |
Roleplaying the Svirfneblin
Deep gnomes are a dour lot, reserved and careful in their dealings with outsiders. They make the assumption that every non-svirfneblin means to do them harm-which is understandable given their history. They speak softly in caves and tunnels where sound carries, eyes darting furtively, looking for signs of danger.
Despite their harsh outlook, svirfneblin are still gnomes, and many are as benevolent and joyful as their surface cousins. They reveal these aspects most easily among their own kind, and to those they come to trust.
The svirfneblin assign defined roles to each gender but hold females and males in equal standing. It is ancient custom for there to be both a king and a queen with equal responsibilities. Svirfneblin males are hunters, explorers, laborers, and warriors, while females are managers, judges, politicians, and caretakers. Deep gnomes sometimes forget this is not the case with other races, and that males are capable of careful thought just as much as females can fight.
Cornered Rats
If they are with the party, Topsy and Turvy do their best to conceal and resist their lycanthropic curse if the adventurers have not already learned of it. In the time since they were imprisoned in Velkynvelve, the two have likely undergone their wererat transformation at least once. When the decision is made to go to Blingdenstone, the twins might come clean about leaving home because of their curse, or they could abandon the adventurers and strike out on their own. In any event, they might fall in with the Goldwhisker clan of wererats, either on their own or with the adventurers' help.
Problems Cubed
If the gelatinous cube Glabbagool travels with the party (see chapter 4), its presence poses a few challenges in Blingdenstone. The recent ooze attacks have the deep gnomes rattled, and an intelligent, telepathic gelatinous cube is something beyond their understanding. The characters have to convince the svirfneblin to allow their unusual companion inside, or tell it to remain outside the settlement. If left outside, Glabbagool might eventually find its way in through the wererat warrens, giving the characters insight into how the other oozes are getting in, or appearing in the nick of time to help the characters if they find themselves in peril.
Settlers, Squatters, and Invaders
The current citizens of Blingdenstone are a different breed than their forebears. They aren’t simply hard workers and resourceful miners, but also settlers, explorers, and-above all-survivors.
Leaders of Blingdenstone
By deep gnome tradition, Blingdenstone is governed jointly by a king and queen, but the svirfneblin have had no true sovereigns while living as refugees for the good part of a century. Dorbo and Senni Diggermattock are talented miners, but they have become even more capable as community leaders. They spent years planning an expedition to Blingdenstone, paying adventurers to scout and keep an eye on the territory while they organized their people across the dwarven holds and surface-world cities that had received them.
After a decade of careful and determined planning, the Diggermattocks led a force back to Blingdenstone to reclaim it. While they have not yet been crowned, everybody treats them as the de facto rulers of the settlement.
Chief Dorbo oversees rebuilding industry, opening mines, and organizing patrols to explore parts of the ruined city that remain uninhabited by the svirfneblin. He is also responsible for rebuilding and commanding the new settlement’s defenses. Like most svirfneblin, Dorbo is serious and aggressive when dealing with outsiders; for all of that, however, he is also a loving and caring husband and a thoughtful leader of his people, devoted to the vision that he and his wife share of a Blingdenstone rebuilt and reborn.
Quartermaster Senni takes the count and measure of everything, ensuring her husband’s efforts are well supported and efficient. She oversees the trade efforts and caravans to Mithral Hall, Gauntlgrym, and Mantol-Derith. She manages and helps to maintain Blingdenstone’s magical infrastructure, and is intimately familiar with security conditions across the settlement. As quartermaster, she assigns homes to the ever-increasing numbers of svirfneblin returning to Blingdenstone.
Miners' Guild
The svirfneblin base most of their economic subsistence on their ability to mine ores and gems. The settlement is largely self-sufficient, but it still relies on the duergar of Mantol-Derith for tools, weapons, and supplies.
Because the Blingdenstone economy depends on mining, the Miners' Guild holds a lot of power in Blingdenstone. Led by the Pickshine family, the Miners' Guild oversees all of Blingdenstone’s mines, as well as the mining, cutting, and enchanting of spell gems, both for the settlement’s defense and for trade export.
Stoneheart Enclave
This group of svirfneblin spellcasters once trained under the Emerald Enclave but eventually splintered off, choosing to focus solely on earth elemental magic. After doing so, they absorbed the surviving priesthood serving the deep gnome deities Segojan Earthcaller (the god of deep earth and nature) and Callarduran Smoothhands (the god of stone and mining).
The Stoneheart Enclave is in charge of summoning earth elementals to help defend Blingdenstone. They also use their magic to aid in various engineering tasks, such as widening burrows, closing off tunnels, or establishing spell gem emplacements and defensive measures. When needed, the spellcasters of the Stoneheart Enclave serve as extraplanar diplomats, forging occasional agreements with xorn and galeb duhr to aid Blingdenstone.
The enclave’s leader is Yantha Coaxrock, a young female mage who splits her time and energy between conducting magical research in Blingdenstone, aiding the svirfneblin enclave in Mantol-Derith (see chapter 9), and working with the rest of the Stoneheart Enclave.
Burrow Wardens
Most of the honored protectors of the svirfneblin died during the drow invasion, and the rest perished while protecting their people during their flight from Blingdenstone to Mithral Hall. Only the memory of their valiant effort remains today-and even that is fading due to the deep gnomes' penchant for forgetting their own history.
In the last year, a handful of svirfneblin youths have been training in secret under the rather terrifying care of the veteran Burrow Warden Jadger, who lingers on as a ghost. In life, Jadger was an expert in the Underdark and its many denizens, as well as how to fight them. He is grooming his brightest student, Trisk Adamantelpiece, to command the new burrow wardens, who are preparing to announce their existence to the Diggermattocks and demand recognition as the new Burrow Wardens of Blingdenstone.
Ghosts of Blingdenstone
Although not truly organized, the ghosts of the svirfneblin killed during the drow attack are an undeniable presence. The settlers have been wise enough to mark haunted burrows off from their reclamation plans. But as new svirfneblin arrive and need accommodation, space is starting to become a problem. There are far more ghosts in the ruined settlement than anyone expected, and each ghost is different. Some are harmless, appearing only as echoes of the event that led to their deaths. Others are fully aware-and often hostile and dangerous.
Ogrémoch’s Bane
Ogrémoch’s Bane is a drifting cloud of transparent, magical dust that first appeared in Blingdenstone over a century ago. Believed to be sentient, it is found roaming the Rockblight section of the settlement. Elemental creatures touched by the cloud fall under its control.
The cloud’s origin remains a mystery, but it is known to have something to do with Ogrémoch, Prince of Evil Earth. A medusa named Neheedra serves Ogrémoch’s Bane and leads some of the elemental creatures that have become enslaved by the evil cloud (see the “Rockblight” section and area 19 in particular).
Clan Goldwhisker
After Blingdenstone’s fall, a gang of wererats tried to make a home in the ruined city. The last handful of svirfneblin hiding in Blingdenstone after the drow armies abandoned the city managed to kill or drive off the wererats, but many of the deep gnomes became infected with lycanthropy.
Today, deep gnome wererats claims a large chunk of the ruins under the name of Clan Goldwhisker, holding territory against new settlers and engaging in urban warfare against them. The pack leader is the cunning and charismatic Chipgrin, whose concern for his pack’s safety has him hoping to negotiate a truce with the Diggermattocks and stop his svirfneblin cousins from seeing his people as dangerous monsters fit only for extermination. Chipgrin is all too aware of the threat posed by Ogrémoch’s Bane and the oozes plaguing the settlement, and he hopes that making common cause against those threats will force the other svirfneblin to recognize Clan Goldwhisker’s right to remain in Blingdenstone.
The Pudding King’s “Court”
The so-called Pudding King holds court in the deepest sections of Blingdenstone. He was part of the first settler mission led by the Diggermattocks, but the other svirfneblin soon shunned him for his many disturbing habits, among them his preoccupation with capturing and studying oozes, and his penchant for stealing and hoarding food until it rotted… and then talking to it.
The shunned deep gnome eventually struck out on his own. He spent years living among the oozes of the region, eventually subjugating a black pudding he calls “Princess Ebonmire” and a gray ooze he calls “Prince Livid.” When the demon lords arrived in the Underdark, he followed the oozes drawn by Juiblex’s presence, immediately throwing himself down before the Faceless Lord and pledging his eternal loyalty. His previous name and existence ended in that moment, and now there is only the Pudding King.
Juiblex granted the Pudding King the power to summon and command oozes, then ordered him to return to Blingdenstone and claim it as part of the Faceless Lord’s new domain. The Pudding King slipped back into the closed-off areas of Blingdenstone and set up court, summoning all manner of oozes along the way and rendering portions of the ruined city uninhabitable and dangerous to outsiders.
Utterly insane and channeling a terrible power, the Pudding King sits upon his throne with his “children” at his side, summoning ever more loyal subjects with each passing day. When he is ready, he will send them forth to cover and devour everything, transforming Blingdenstone and its people into one giant mound of slime and goo formed in the image of his master, the Faceless Lord.
Blingdenstone Outskirts
The quarries, mines, mushroom fields, and forges of Blingdenstone are located outside the settlement, accessible by tunnels and passages beyond the main gate. Trade caravans headed toward Blingdenstone are either re-routed to the outlying mines, farms, and forges, or they are stopped at the city gate, where their cargo is searched, unloaded, and distributed by agents of Quartermaster Senni. This keeps unwanted riffraff out of the city proper and protects Blingdenstone’s security.
The deep gnomes working in the mines, farms, and forges outside the settlement spend less time enjoying the leisure and company of their kin and friends back home. The rising madness of the demon lords affects these brave pioneers more than those who live within the relative security of the reclaimed parts of Blingdenstone.
Svirfneblin in the outskirts are more curt with strangers, and a few might even try to steal from them. Taskmasters at each location are now feeling themselves driven to the point of near tyranny, demanding that their workers toil ever harder. Some miners pocket gemstones they dig out, while others are drawn to possess things the adventurers are carrying.
Entemoch’s Boon
This large cavern is located west of Blingdenstone (see the map of Underdark regions and locations in chapter 2) and has always been a closely guarded secret. Most svirfneblin who knew of it perished during the drow invasion of Blingdenstone. A few members of the Stoneheart Enclave have heard of its existence, but have either dismissed it as legend or have simply been too preoccupied with the reclaiming and rebuilding of Blingdenstone to search for it.
The cave is two days' walk of the settlement, its entrance a small tunnel leading to a ledge high above the cavern floor. The cave is lined with stalagmites and stalactites, but the dominant feature is the summoning circle at its center. The circle was once used by the svirfneblin to summon Entemoch, a prince of elemental earth, and his energies suffused the entire cavern, empowering elemental summoning within its confines.
If the circle is used to cast a spell that summons an earth elemental, the spell’s duration becomes 1d4+6 days and the spell requires no concentration. The summoned elemental never becomes hostile toward the spell’s caster or its companions. To gain these benefits, the caster must provide material components in the form of gems with a total value of 10 gp per Hit Die of the elemental summoned.
Finding Entemoch’s Boon
Locating the tunnel that leads to Entemoch’s Boon is a great service for the svirfneblin, and might be a quest set for the adventurers (see “Uniting Blingdenstone” later in this chapter). Despite how close the cavern is to Blingdenstone, finding it is no easy task.
Characters can search for the tunnel by traveling at a slow pace in its general vicinity. Each day they search, have the characters make a DC 20 group Intelligence (Investigation) or group Wisdom (Survival) check. If the group check succeeds, the characters find a curious waymarker: a small pyramid of carefully stacked stones next to the mouth of an otherwise unassuming tunnel.
After locating the waymarker and following the tunnel next to it, the party can make a DC 20 group Intelligence (Investigation) or Wisdom (Survival) check. On a failure, the party wastes a day searching for the next waymarker. If the group check succeeds, the characters find their next lead after 2d6 hours: a tunnel whose entrance is flanked by the sculpted faces of a male and female deep gnome. This tunnel features many side tunnels concealed by rock formations. The party must make a DC 20 group Intelligence (Investigation), Wisdom (Perception), or Wisdom (Survival) check. If this group check succeeds, the party finds Entemoch’s Boon; if the check fails, the characters waste a day of exploration searching for it.
Finding Entemoch’s Boon allows the characters to make a check to improve the attitude of the deep gnomes (see “Changing Svirfneblin Attitudes”).
Random Encounters. For each day of exploration, check for random encounters using the tables in chapter 2 and adjust the drow pursuit level as necessary.
The Beasts of Entemoch’s Boon
Characters who explore the cavern find shattered bits of statuary. A successful DC 17 Intelligence (Investigation) check confirms that the stone bits are the remains of petrified cave vermin. Unless they leave the cavern immediately, the characters are accosted by a mated pair of basilisk that call Entemoch’s Boon home.
Once the basilisks are defeated, characters can resume their exploration of the cave and find three basilisk eggs in a nest made of pulverized stone. Each egg is a 6-inch-diameter, 20-pound sphere with a pebbled-gray shell as hard as stone. Left alone, the eggs hatch in 1d4+1 months. An infant basilisk that emerges imprints on the first creature it sees. It thereafter follows that creature around like its parent, demanding to be fed. If the characters manage to keep the basilisk alive, it reaches adulthood after twelve months. Track its growth using the Basilisk Maturation table.
Basilisk Maturation
| Age | Size | Notes |
|---|---|---|
| Infant (up to 3 months) | Tiny | AC 11; 4 (1d4+2) hit points; speed 10 ft.; Str 10 (+0); no Petrifying Gaze; bite attack is +2 to hit and deals 1 piercing damage plus 1 poison damage on a hit; Challenge 0 (10 XP) |
| Young (3-12 months) | Small | AC 13; 22 (4d6+8) hit points; speed 15 ft.; Str 13 (+1); Petrifying Gaze has a range of 15 feet; bite attack is +3 to hit and deals 3 (1d4+1) piercing damage plus 2 (1d4) poison damage on a hit; Challenge 1 (200 XP) |
| Adult (12+ months) | Medium | See the Monster Manual |
Whiteshell Mine
Blingdenstone’s largest salt mine is half a day’s travel to the south. Like many of Blingdenstone’s resource sites, the road to the mine is easy to miss by casual travelers, but sentries hiding along the way can recognize friendly visitors (such as those in the company of Jimjar, Topsy, or Turvy) and guide them along the proper tunnels.
Whiteshell Mine is an interconnected network of small caverns dug into the vast salt veins lining this area of the Underdark. The mine produces enough salt to supply both the Blingdenstone settlers and sell in the market hub of Mantol-Derith. The mine has a cavern devoted to keeping the giant cave lizards the svirfneblin use as beasts of burden.
The deep gnome Perigrog Scrapedust runs the mine with a fair but demanding hand. He believes that the more the mine produces, the more he can export, and the quicker Blingdenstone can be returned to its former glory.
Pickshine Mines
Renamed after the largest and most influential family in the Miners' Guild, the Pickshine Mines comprise several mines scattered in a wide circle around Blingdenstone. The deep gnomes have engineered the access tunnels in such a way that only one known entrance leads to the mine complex, and this entrance is defended by four galeb duhr disguised to look like ordinary boulders and a dozen deep gnomes.
The largest mine shafts include veins of common metals such as iron and copper, as well as many veins of rarer minerals such as mithral and adamantine. The mines also hold crystal caverns where the svirfneblin harvest all manner of gems.
All the main routes to Blingdenstone intersect near the mine complex’s main entrance, meaning the characters are likely to pass it before arriving in Blingdenstone. If they stop there, they meet Dasco Pickshine, the deep gnome overseer in charge of general operations. Dasco is willing to let the characters tag along with a cargo of ores heading for Blingdenstone, happy to have the extra security.
Stoneheart Quarry
The Stoneheart Enclave has its headquarters in this cavern suffused with faerzress and elemental energy. This quarry doesn’t provide stone for construction, since Blingdenstone builders need only take a pick to any wall to find their building materials. Rather, this cavern provides the small army of earth elementals aiding the settlers, and its magical stone is used in the creation of items such as earth elemental gems, rings of earth elemental command, and stones of controlling earth elementals. Elementals entering into the Material Plane here, whether by spell or other means, have an additional 2 Hit Dice.
Normally, Yantha Coaxrock leads the operations in the quarry. While she is in Mantol-Derith (see chapter 9), her apprentice Nomi Pathshutter is in charge of the druids and wizards of the Stoneheart Enclave.
Elemental Healing
Nomi Pathshutter is aware of Ogrémoch’s Bane and has made it her life’s work to protect elementals from its influence. She studies samples of corrupted elementals as part of her efforts, and rewards characters who bring her a sample from any out-of-control earth elemental creature found in the unexplored areas of Blingdenstone. She pays 10 gp per Hit Die of the creature from which the sample was taken.
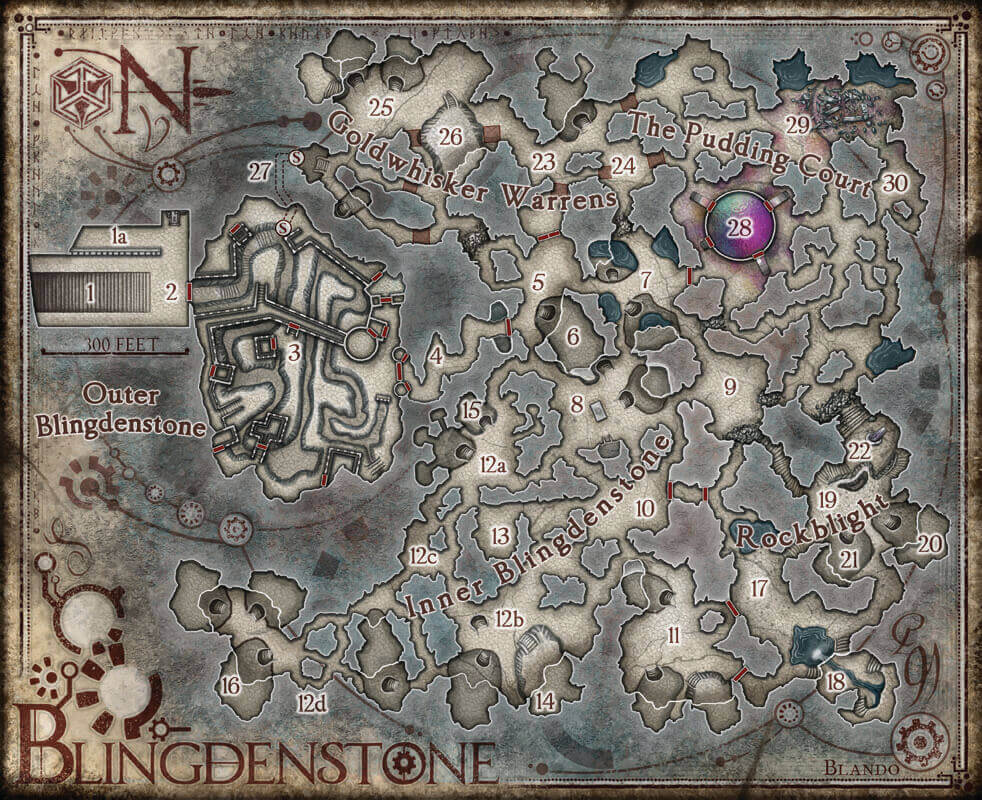
Outer Blingdenstone
Everything in Outer Blingdenstone was designed to thwart would-be invaders.
Doors of Blingdenstone
Heavy stone doors reinforced with steel or adamantine are found throughout the deep gnome settlement. Unless otherwise indicated, a door in Blingdenstone has AC 18, 40 hit points, a damage threshold of 15, resistance to thunder damage, and immunity to poison and psychic damage.
1. Stairs
Rising up to a broad terrace before the gate, these wide stairs are built for gnomish feet. They are difficult terrain for Medium and larger creatures.
1a. Cart Lift
At the top of the stairs is a large entrance on the west wall, where wagons are secured on stone sleds pulled by a chain up a steep slope. The hoisting mechanism is at the top of the lift is operated by an earth elemental, although any creature with a Strength of 20 or any group of creatures with the combined strength to lift 600 pounds can operate it.
The lift’s tunnel is wide enough for the sleds but has little clearance above them. The floor is part of the mechanism and is difficult terrain. Climbing in and out of a sled costs 10 feet of movement.
2. Main Gate
The main gate of Blingdenstone is a door made of steel and mithral, inlaid with a secret magic-resistant alloy and plated with adamantine. The gate has AC 23, 60 hit points, a damage threshold of 20, resistance to thunder damage, and immunity to poison and psychic damage.
The terrace between the top of the stairs and the gate has a slight upward slope. The slope imposes disadvantage on checks made to ram the gate.
Eight deep gnomes guard the gate. One of them carries a spell gem that contains a see invisibility spell and uses it to scan for invisible creatures when the party arrives. Arriving characters are questioned to determine their intentions. The guards are thorough but not threatening; as long as the characters seem benign, they are granted entry. Four of the guards escort them through the maze (area 3) and the gauntlet (area 4) to Inner Blingdenstone.
Having Jimjar, Topsy, or Turvy in the party helps smooth the characters' entrance to Blingdenstone. This is especially important if the party contains one or more drow, whose presence would otherwise demand an armed escort at all times within the settlement.
If the characters reveal that they are fleeing the drow, the guards decide that Chief Dorbo Diggermattock should hear their tale. The armed escort that brings the characters into the settlement leads them to an audience with the chief in area 14.
3. Maze
Between the gate and Blingdenstone proper, the svirfneblin built the maze: a twisting and turning path that runs between 10-foot-high walls studded with nails. Climbing a nail-studded wall requires a successful DC 13 Strength (Athletics) check. Even with a successful check, a creature must succeed on a DC 13 Dexterity saving throw to avoid the nails, taking 1d4 piercing damage on a failed save. The path slopes up and down, so sections can be flooded or inundated with poisonous smoke. At certain points, the path narrows to allow Small creatures through; Medium creatures must squeeze, and Large creatures can’t fit through at all unless they have an amorphous form.
A second path is inaccessible from the main gate, traveling above the winding path. This upper path is festooned with towers and battlements where defenders can fire freely at creatures attempting to make their way along the lower path. A paved road runs along the western wall of the cavern, onto which wagons and draft animals are hoisted so they can bypass the maze. The hoist mechanism can be destroyed with the single pull of a lever if invaders manage to hijack it.
4. Gauntlet
Blingdenstone’s last line of defense is a wide, winding tunnel behind a gate similar to the one in area 1.
Gate Towers
Flanking the gate are two stone towers embedded in the cavern walls. Peering through shuttered windows in each tower are four deep gnomes, eight in all. These gnomes operate winches that open and close the gate. If the characters are traveling with a deep gnome escort, the gates open as they approach, allowing access to the tunnel beyond. If the characters arrive here unescorted, the gnomes refuse to open the gate.
Tunnel
The tunnel has a 30-foot-high ceiling, and embedded in its walls are spell gems spaced 30 feet apart and 15 feet above the rough-hewn floor. The gems are set in sockets and held in place with sovereign glue, and each gem contains a symbol spell. Any deep gnome who can see a gem can activate the spell within it by using its action to speak the proper command word. Any attempt to pry a spell gem from the wall destroys the gem.
At the north end of the tunnel is a smaller door made of stone reinforced with adamantine (see the “Doors of Blingdenstone” sidebar). Fifteen-foot-high ledges in alcoves flank the door. The ledges are currently unguarded, and the stone door opens easily to reveal the caves of Inner Blingdenstone beyond.
Inner Blingdenstone
Population: 300 deep gnomes (svirfneblin)
Government: Work collective led by Dorbo and Senni Diggermattock
Defense: Militia, summoned earth elementals
Commerce: Salt, gemstones, and rare minerals
Organizations: The Miners' Guild, the Stoneheart Enclave
The defenses in Outer Blingdenstone paint a picture of a paranoid people under siege, but once past the final gates, the true character of the settlement is revealed. Warm, cozy, and welcoming, Blingdenstone is a rarity in the Underdark.
Read the following boxed text when the characters first arrive in Inner Blingdenstone, omitting the second paragraph if they arrive unescorted.
You leave the dark tunnel behind and step into what looks like another world. These aren’t sinister drow caverns or harsh, bare stone, but a subterranean land of warm colors and welcoming smells. The deep gnomes you see going about their business glance up at you with suspicion, but you instinctively understand that you face no threat here.
One of the guards escorting you abandons his severe frown to give a deep nod as he prompts you past the inner gate. “Welcome to Blingdenstone, travelers.”
Inner Blingdenstone: General Features
Inner Blingdenstone covers the areas the svirfneblin have recovered from supernatural squatters and other dangers, now secured by mundane and magical means.
Chambers. Blingdenstone is not a single cavern, but a network of interconnected caves and pockets the svirfneblin have widened and worked for use as homes, workshops, vending stalls, places of worship, storerooms, and the like. Other than the private homes of svirfneblin families, all chambers are tall enough for Medium creatures to walk around without difficulty, and common areas are even larger.
It is rare for cavern walls to be bare in Blingdenstone. The walls of large caverns are studded with stairs and ramps leading to balconies and hollows serving as storage or shops. The largest caverns are crisscrossed by walkways allowing svirfneblin and visitors to reach connecting tunnels high above the floor.
Light. The caverns of Inner Blingdenstone are brightly lit with a mix of bioluminescent fungi, caged giant fire beetles, and magic. The light from these chambers spills into short connecting tunnels lacking their own illumination, creating areas of dim light. Longer tunnels have their own light, usually magically produced.
Connecting Tunnels. Svirfneblin and other Small races can walk through tunnels with ease, but Medium or larger creatures must duck and squeeze-a feature intended to control invaders' movements. Most tunnels have smooth floors, but those around the periphery of the reclaimed areas are strewn with rubble and debris.
Some of the connecting tunnels in Blingdenstone are trapped. The most common traps are collapsing roofs and spiked pits (see “Sample Traps” in chapter 5 of the Dungeon Master’s Guide). Many tunnels slope down before rising up again, allowing the gnomes to flood them. All tunnel traps are inactive in Inner Blingdenstone, but the svirfneblin can quickly activate them in case of emergency.
5. Reception Hall
This busy cavern welcomes visitors to Blingdenstone and connects the most important chambers of the new settlement. Two sealed tunnels here lead to the Goldwhisker Warrens. One is closed off by a deliberately caused cave-in to the south, and the other by reinforced, locked, and guarded gates.
6. Barracks
This chamber is above the main level of Blingdenstone, and houses off-duty svirfneblin currently assigned to defend the entrance.
7. Traders' Grotto
This cavern serves as Blingdenstone’s central market. All manner of fungi once grew in the moist grotto, but a miscast spell turned them to stone centuries ago. Blingdenstone’s merchants gather here in makeshift stalls amid the stone stalks to hawk their wares and barter with one another. Arriving caravans lower their cargo to warehouses carved out beneath the grotto.
Kazook Pickshine
If the characters accepted Werz Saltbaron’s errand in Gracklstugh (see chapter 4), they can deliver Werz’s sack of gems to Kazook Pickshine, who has a stall in the Traders' Grotto. Kazook is a deep gnome. If the characters approach him openly and present the sack to him, he muffles a gasp as he looks around, then quickly ushers the characters into the stall, admonishing them to talk quietly and not be so open. He inspects the gems, weighs them by hand while looking at the characters with suspicion, then pays them for the delivery with a zircon worth 50 gp.
Gelatinous Cube Incursion
The first time the characters visit the Traders' Grotto without an escort, a clanging bell sounds near the main entrance. When this happens, read the following boxed text to the players.
The deep gnomes around you all draw weapons and retreat as you see a guard stumble back, then rise up in the air. A strange shimmer around him reveals the surface of the gelatinous cube that has engulfed him.
Two gelatinous cube seep through a collapsed tunnel between the Traders' Grotto and area 24 of the Goldwhisker Warrens. Both cubes advance, attempting to engulf and consume any other creatures in their paths until they are destroyed.
The trapped svirfneblin is named Mev Flintknapper (use the veteran statistics in the Monster Manual, but also give Mev the Stone Camouflage, Gnome Cunning, and Innate Spellcasting features of a deep gnome). He has already taken 10 acid damage and takes another 21 (6d6) acid damage at the start of each of the cube’s turns until pulled free with a successful DC 12 Strength check. The attempt requires an action, and any creature making the attempt takes 10 (3d6) acid damage is it reaches into the cube.
If Glabbagool is with the characters, it attempts to intimidate the other cubes by interposing itself between them and the characters. At your discretion, allow Glabbagool to use the Help action to assist the characters' attacks.
Treasure. Once destroyed, the hostile cubes spill their contents on the ground: 12 gp and a +1 shortsword of drow manufacture (see the “Drowcraft Items” sidebar in appendix B).
Development
After the gelatinous cube encounter, svirfneblin inform the characters that incursions by oozes are becoming more frequent. In every case, it seems as though the oozes are trying to make their way toward the abandoned northwest section of the city (labeled “The Pudding Court” on the map of Blingdenstone).
XP Awards
The characters gain a special award of 100 XP each for delivering Werz’s sack of gems to Kazook Pickshine.
If the characters managed to rescue Mev, or made a sincere effort to do so, award each of them 50 XP, and allow the characters to make a group Charisma check to improve the deep gnomes' attitude (see “Changing Svirfneblin Attitudes”).
8. The Ruby in the Rough
The Stoneheart Enclave agreed to join the Diggermattock effort to resettle Blingdenstone in exchange for help reclaiming this temple known as the Ruby in the Rough. The temple is dedicated to Segojan Earthcaller, the svirfneblin god of deep earth and nature. The rituals and day-to-day duties of the temple are overseen by a deep gnome named Glyphic Shroomlight, a nervous young novice doing his best in a situation requiring a much older and more experienced cleric (use the acolyte statistics in the Monster Manual, but also give Glyphic the Stone Camouflage, Gnome Cunning, and Innate Spellcasting features of a deep gnome).
Despite the desecration of the drow invasion and the decades of scavenging and raiding in its aftermath, the old city’s honored dead still rest securely in the catacombs beneath the temple. A passage on the east side of the cavern leads down into this network of small linked caverns accessible only through the temple.
The catacombs are built along a mostly regular grid, making it easy for characters to find their way among standing statues and funerary niches. If the characters come here following rumors of ghosts, it’s only a matter of time before they meet Burrow Warden Jadger, a ghost from the time of the drow invasion.
If the characters recovered Pelek’s severed hand in the “Whorlstone Tunnels” section of chapter 4, they can lay Pelek’s spirit to rest by placing his remains in the catacombs. If they do this, the ghost of Burrow Warden Jadger appears before them.
Burrow Warden Jadger
Jadger’s ghost greets the characters but disappears through a wall if they attack. (Word quickly gets around the settlement of the adventurers' rudeness, negatively shifting the gnomes' attitude toward the characters.) Jadger speaks candidly about who he is and what happened to him. After gaining any sense that the characters are seeking information from the svirfneblin, he asks them to perform two tasks involving laying other svirfneblin spirits to rest:
- Destroy Vazuk, a deep gnome who is mad with grief and a threat to the other residents of Blingdenstone. His specter can be found haunting his old home in area 12a.
- Recover the remains of a deep gnome named Udhask and bring them to the catacombs. Jadger knows that the deep gnome died somewhere in Rockblight, the northeast section of Blingdenstone.
Jadger tells the characters he will answer one question for each ghost laid to rest (including Pelek from Gracklstugh, if the characters have returned his hand here). His knowledge of the Underdark is considerable, though somewhat outdated.
XP Awards
If the party returns Pelek’s remains to the catacombs, each character gains a special award of 100 XP.
9. Cultivation Cave
This cavern complex is devoted to the cultivation of useful fungi the svirfneblin use in their cooking and crafting, including the following edible and exotic fungi:
- 3d6 barrelstalks
- 6d6 bluecaps
- 3d6 Nilhogg’s noses
- 3d6 torchstalks
- 3d6 trillimacs
Two blocked-off tunnels lead north and northeast to areas that have not been resettled. All elementals are kept away from the passages because the Stoneheart Enclave believes they lead to the caverns where Ogrémoch’s Bane lurks.
10. Staging Area
This cave is fortified with barricades and defended by eight deep gnomes and four cave badgers. There are no earth elementals reinforcing security here because the passage on the north wall-sealed at either end with a locked door-leads to areas where the deep gnomes have confirmed the influence of Ogrémoch’s Bane.
Unseen Evil
The leader of the guards is a wryly cynical svirfneblin named Sark Axebarrel, who warns the characters of reports of a medusa lurking in the caverns beyond the doors, in a section of the old city that the gnome refers to as Rockblight. If they decide to explore Rockblight, Sark asks them to find out whatever they can about the medusa and kill her if they are able. He offers a payment of 50 gp per character for useful information, plus a diamond worth 1,000 gp if they bring back proof that the medusa is dead.
11. Caves of Clatter
This cluster of caverns on the eastern end of the settlement serves as a workspace for weaponsmiths and armorsmiths. Traditional svirfneblin arms, including picks, darts, and daggers, along with ring mail, scale mail, and chain mail shirts, are forged and traded here. Less common equipment such as swords and shields can be custom ordered. Prices for weapons and armor are double those listed in the Player’s Handbook.
The passages leading to area 17 are sealed off by steel walls that can’t be opened.
12. Residential Caves
These caverns branch off into smaller caves serving as hovels for families of svirfneblin. Tunnels lead to secondary chambers that branch out into more hovels. Deep gnome hovels have no doors.
The locals are willing to talk with the characters, pointing them toward a particular cave that was recently evacuated. A “ghost” manifested there and chased out a family trying to settle within (see area 12a).
12a. Vazuk’s Home
Vazuk was a simple leatherworker who died in the drow invasion. His spirit awoke when a family moved into what used to be his home, then began to throw fits and terrorize any creatures coming near.
Vazuk is a specter (use the poltergeist variant). He can’t be turned while inside his former home. He attacks the characters as soon as they enter the house, all the while screaming “Mine! My stuff! Not yours!”
Treasure. A character who searches the hovel and succeeds on a DC 15 Wisdom (Perception) check spots a concealed hole in the floor. The hole contains a small zurkhwood chest holding eight tiny rubies worth 250 gp each.
XP Awards
In addition to the XP earned for defeating Vazuk, each character earns 50 XP if they inform Burrow Warden Jadger (see area 8) that the spirit has been dealt with.
13. Speaking Stones
A circle of stone menhirs predating Blingdenstone stands at the center of this small cavern. The gnomes believe this henge is a cluster of truly ancient galeb duhr, venerated as manifestations of the gods. The more religious members of the Stoneheart Enclave cast augury and commune spells within the circle, interpreting the responses to their entreaties through subtle changes in the vibrations in the bedrock below.
Cleanse the Steadfast Stone
Gurnik Tapfinger, head priest of Callarduran Smoothhands in the Stoneheart Enclave, approaches the characters if they show any interest in the Speaking Stones (use the priest statistics in the Monster Manual, but also give Gurnik the Stone Camouflage, Gnome Cunning, and Innate Spellcasting features of a deep gnome). He asks them to undertake a task in a closedoff area of the old city known as Rockblight, where the temple of his god stands desecrated. If the characters agree, he gives them a ruby spell gem containing the hallow spell and asks them to place the gem in the Steadfast Stone’s menhir (see area 22).
Gurnik warns them that once they place the gem, Ogrémoch’s Bane will send its servants to stop them. They must defeat these servants until the gem awakens three temple guardians, at which point the temple will be cleansed and the characters can leave. Once the characters accomplish this task, Gurnik channels the power of the cleansed temple, bestowing a blessing of protection or a blessing of weapon enhancement on each of the characters (each player’s choice); see “Other Rewards” in chapter 7 of the Dungeon Master’s Guide for more information on blessings.
14. Diggermattock Hall
This is the home of Dorbo and Senni Diggermattock as well as the “palace” of the provisional government of Blingdenstone. Characters are escorted here if they reveal to the guards in area 1 that they are fleeing from the drow.
Two dozen or so svirfneblin occupy this well-lit cavern, some moving briskly with messenger pouches in hand while others huddle around several stone tables covered in maps and other papers, talking in hushed, serious tones. The back of the room is dominated by a dais carved from the rock of the cavern, atop which rest two stone desks facing each other. Two svirfneblin-one male, one female-sit behind the desks, conferring with advisers and each other. They turn their attention to you as you enter.
The de facto rulers of Blingdenstone are interested in everything the characters have to say about their adventures, especially if they’ve witnessed any events related to demonic influence in their visits to other parts of the Underdark.
The Diggermattocks offer characters a safe haven on the condition they cause no trouble in the community. If asked about reaching the surface, Dorbo says he’d like to help, but Blingdenstone is under severe pressure and he can’t spare anyone to guide them. Moreover, the gnomes don’t allow strangers to buy or borrow their maps. Both Dorbo and Senni become evasive and angry if the characters press the issue, at which point the characters must succeed on a group DC 15 Charisma check or have the attitude of the svirfneblin worsen.
If the adventurers offer to help the beleaguered settlement, the svirfneblin leaders mention things the characters can do to help take the pressure off the community and free up its resources. Each task the characters successfully undertake shifts the attitude of the svirfneblin (see “Changing Svirfneblin Attitudes”).
“Operation: Ooze There?”
The Diggermattocks relay rumors that some monster or magic in the northwestern part of the settlement might be responsible for the growing number of oozes in Blingdenstone. If the characters return with information about the Pudding Court and the threat lurking therein, the Diggermattocks pay them with an empty spell gem of the highest spell level a spellcaster in the party can cast.
“Operation: Exterminate?”
The wererats of the Goldwhisker clan are a point of contention among the Diggermattocks. Dorbo wants them out of the warrens to free up living space for hard-working svirfneblin. He also wants to recover the House Center he believes is still in the wererats' grasp (see area 28). Senni argues that the wererats are descendants of Blingdenstone citizens and deserve to stay and rejoin their community.
Since the wererats are as territorial and defensive as the svirfneblin, any attempt to parley has been met with violence. Senni asks the characters to venture into the warrens and talk with whomever is in charge. The characters' report will determine whether the svirfneblin step up their efforts to eliminate the wererats or work toward an agreement.
If Topsy or Turvy are with the party, they want to learn more about the wererat community. If their own nature as wererats is revealed to the Diggermattocks or other deep gnomes, the twins are given the choice of going into the wererat-controlled part of Blingdenstone or being cast out of the settlement altogether, which might encourage the characters to meet and talk with the Goldwhisker clan.
15. Singing Stones
This elevated cavern near one of Blingdenstone’s main residential areas holds a variety of rocks and crystals in the middle of its bowl-shaped floor. Svirfneblin minstrels skilled in the art of stone singing can alter the pitch of the vibrations emitted by the individual stones, creating an effect similar to an assemblage of harpplaying bards. When the characters initially come here, a deep gnome named Garra Songstone is playing the crystals for an appreciative audience of 3d4 deep gnome children (noncombatants).
16. The Foaming Mug
The Foaming Mug was built as an inn to house foreign guests visiting Blingdenstone. It was abandoned after the drow invasion but has recently reopened. While its supply of surface foods and beverages is meager, the rooms are sized for Medium guests, with comfortable beds and two separate hot springs used for bathing and relaxation. There are no other guests currently, so party members who stay here have the inn to themselves. Many svirfneblin frequent the inn’s taproom after work, keeping the place lively. The tavern serves Darklake Stout, an ale that the svirfneblin purchase from duergar traders in Mantol-Derith (see chapter 9).
Tappy Foamstrap, a bored deep gnome, runs the inn. The characters' arrival is the most exciting thing that has happened in months, so she peppers them with questions about their lives and adventures, pushing free drinks and food on them.
Rumor and Hearsay
The svirfneblin community is tight-knit, so rumors spread quickly. Characters who engage with the tavern’s patrons while the gnomes' general attitude is indifferent or friendly learn the following information.
- Blingdenstone’s ghost problem is getting worse, and there are even spirits haunting the catacombs.
- There was a crazy svirfneblin back in the first days of reclamation who disappeared. Some of the scouts claim to have seen him, skulking around the unrecovered areas of the settlement. (The scouts don’t know that this gnome is the Pudding King.)
- The Stoneheart Enclave is closing in on a solution to the threat of Ogrémoch’s Bane (untrue). The gnomes call a large unclaimed area in the northeast of the settlement “Rockblight,” as earth elementals go mad whenever they go near it.
- People are divided as to what to do about the wererats living in the southwest caverns. Some want them out, while others propose an alliance of mutual defense.
- A merchant from Gracklstugh says there’s an influx of surface-world coins there, but nobody knows where they come from. (See chapter 4 for more information.)
- A svirfneblin caravan returning from Whiteshell Mines encountered a parade of dancing myconids. Through their rapport spores, the myconids told the gnomes about a “wedding celebration,” which is strange considering that myconids don’t celebrate or have weddings. (See chapter 5 for more information.)
The characters can spend a few hours socializing in the taproom of the Foaming Mug. If they do, they gain advantage on their next group Charisma check made to improve the deep gnomes' attitude.
Rockblight
When the drow attacked Blingdenstone, Ogrémoch’s Bane retreated to the far corners of the ruined city, waiting for the time to reemerge and seek out earth elementals to corrupt. The malevolent entity didn’t have to wait long, as the drow sent teams of scavengers to loot the treasures the deep gnomes left behind, bringing their own elemental creatures with them.
Ogrémoch’s Bane haunted the drow with the same relentless cruelty it did the svirfneblin, turning their elemental servants against them. Eventually, the drow armies departed the city, but when they did, a drow priestess of Lolth named Neheedra Duskryn stayed behind. Neheedra was obsessed with collecting spell gems for their power and beauty, intent on making herself the regal and powerful master of her own underground realm. She commanded a force of drow servants and soldiers with unabashed cruelty, relentlessly driving them to seek out spell gems and increase her own wealth and power.
Overcome by her own greed and vanity, Neheedra engaged in dark rituals designed to secure her hold on power, imagining that Blingdenstone would one day become a drow enclave with her as its immortal leader. Unfortunately, the magical pacts she struck eventually transformed the vain priestess into a medusa.
Enraged by her fate, Neheedra turned her servants to stone and descended into madness. Over decades, she petrified any creature she encountered, eventually catching the attention of Ogrémoch’s Bane. Now, the medusa works in concert with the fell entity, creating stone servants animated by its power.
Since the return of the svirfneblin to Blingdenstone, the deep gnomes have studiously avoided sections of the old city that Ogrémoch’s Bane and Neheedra inhabit, blocking it off from the rest of the settlement and giving it the name “Rockblight.”
Rockblight: General Features
Unlike the reclaimed parts of Blingdenstone, Rockblight is barren, cold, and hostile.
Light. All parts of Rockblight are dark except for whatever light sources the characters bring with them.
Caverns and Corridors. The caverns and connecting tunnels in this part of Blingdenstone are of the same construction seen in Inner Blingdenstone, but are empty and strewn with rubble.
Humidity. A few shallow pools and streams run through the area, making the air damp and chill. Pools are difficult terrain.
17. Abandoned Residences
This large cavern mirrors the residential areas of Inner Blingdenstone, except there is no warmth or joy here—only darkness and signs of carnage.
Every step echoes against walls beyond your circle of light. The air is cold and damp, and you can hear a waterfall somewhere in the blackness, along with faint echoes of battle.
The echoes of battle are always in the darkness beyond the range of the characters' light and darkvision. As characters move toward the apparent source, the echoes become more distant, as though originating somewhere else.
Unless the characters quickly retreat whence they came, the ghost of a svirfneblin named Udhask appears. It uses Horrifying Visage, then attacks with his Withering Touch. If it takes any damage, the ghost shouts “They are coming! Everyone must hide!” It then flees. The characters can follow the fleeing ghost to an old burrow, where it disappears. Within the burrow, Udhask’s skeletal remains lie next to a stone bed. There’s no evidence that he died a violent death. In fact, when the drow attacked Blingdenstone, Udhask had a heart attack and died while reaching for his loot (see “Treasure”).
Pool and Waterfall
A waterfall fed by an underground freshwater stream pours into a 100-foot-diameter, 10-foot-deep pool that dominates the east end of the cavern. Flanking the pool are two wide, rough-hewn staircases that climb 30 feet to an overlooking cave filled crystals and fungi (area 18). The stream runs through the higher cave before pouring into this one.
Treasure
Udhask’s skeleton appears to be reaching under the stone bed. A character who searches under the bed and succeeds on a DC 15 Wisdom (Perception) check finds a hidden compartment in the floor. Within the compartment is a rotted pouch containing six 100 gp gems and a
Development
Collecting Udhask’s bones and taking them to Burrow Warden Jadger’s ghost in area 8 completes one of Jadger’s tasks.
18. Overlook
A shallow, swiftly flowing stream bisects this cave. Crystalline formations sprout from the floor on both sides of the stream, and rough-hewn staircases at the back of the cave climb 30 feet to a barren stone ledge with a pair of winged statues perched atop it.
The “winged statues” on the ledge are two gargoyle. If the characters attack the gargoyles or move within 30 feet of them, the monsters swoop down and attack. In the second round of combat, an insane earth elemental rises from the stone floor and joins the fight.
The stream that flows through the cave originates from a naturally formed culvert in the northeast wall, beneath the ledge. The stream is only 3 feet deep.
The crystal formations growing throughout the cave are large enough for characters to hide behind, but they are neither magical more valuable.
Treasure
Among the remains of the earth elemental, the characters can find an earth elemental gem. Before they can use it, however, it must receive a remove curse spell from a priest of the Stoneheart Enclave. Otherwise, the elemental summoned by the gem is always hostile toward its summoner. The characters can also harvest samples from the bodies of the corrupted elemental and the gargoyles for Nomi Pathshutter (see “Stoneheart Quarry” in the “Blingdenstone Outskirts” section).
19. Crystal Garden
Light from bioluminescent fungi refracts through large crystal formations erupting from the floor, creating a kaleidoscope of colors on the surrounding walls. The crystals are semitransparent, slightly distorting images seen through them. A statue of a gnome cowers near a crystal outgrowth, holding a broken crystal in its hands.
Six nightlights illuminate this cave. Tunnels in this area climb up to area 20 and down to area 21, and two sets of stairs carved from the walls lead up to area 22.
The statue is actually a deep gnome named Vort, who was turned to stone by Neheedra the medusa. He tried to use one of the crystals to block the medusa’s gaze but failed. Anyone examining the statue notices that the gnome seems to be raising the crystal toward his face, as if to look through it.
The crystals here can be used as countermeasures against Neheedra’s gaze. A creature with one hand free can hold a crystal to its eyes, gaining advantage on the Constitution saving throw made against Neheedra’s gaze. However, the creature makes attack rolls with disadvantage.
20. Neheedra’s Lair
Neheedra Duskryn was part of the expedition sent to loot Blingdenstone of its spell gems. Her abode reflects the richness and elegance of the drow monarch she yearned to be.
The adornments in this chamber would be more at home in a drow city. Spider-themed tapestries, fine zurkhwood furniture, and racks of expensive clothing fill the area, all of it old and rotted. At the center of the chamber, a female drow sits upon a zurkhwood throne. She stands, eyes closed and arms crossed as if in meditation or prayer. Then her white hair writhes, and you see it is formed of pale, hissing snakes.
The medusa attacks intruders without hesitation. Neheedra’s curse has driven her mad, and reasoning with her isn’t an option.
Treasure
Five of the dresses in Neheedra’s rack are made of spider silk shaped by drow magic. They are worth 200 gp each if sold in the markets of the Underdark. The drow magic on a dress fades when the garment is exposed to sunlight, causing it to fall apart.
Development
If the characters divulge the medusa’s location to Sark Axebarrel in area 10, they receive the promised reward of 50 gp each. If they deliver Neheedra’s head to Sark, he also gives them the 1,000 gp diamond he promised them.
XP Awards
The characters gain 50 XP each if they successfully report back to Sark, whether they defeat the medusa or not. Upon earning this award, the characters can make a group Charisma (Persuasion) check to improve the gnomes' attitude (see “Changing Svirfneblin Attitudes”).
21. Drow Statues
This cave is filled with thirty statues of drow warriors, all standing as if on guard. In her madness, Neheedra turned these warriors of her house to stone. Over long years, Ogrémoch’s Bane has used its power to animate these statues, turning them into elemental creatures.
When the characters step inside the chamber, six of the statues animate and attack. The statues have the statistics of animated armor, except that they are elementals instead of constructs.
The statues attack until destroyed but don’t leave this area. If the characters spend 1 round or longer in the chamber after defeating the last statue, six more statues animate. This process repeats until either all of the statues are destroyed or until the characters leave the cave. A statue also animates and attacks if touched or otherwise disturbed.
Ogrémoch’s Bane
If every statue in this cave is destroyed, Ogrémoch’s Bane appears.
As the last statue crumbles, a cloud of dust erupts from its shattered remains and expands to fill the cave.
The cloud is Ogrémoch’s Bane. Characters within the cloud can sense its malevolence, and a successful DC 15 Intelligence (Arcana) check confirms that the cloud is of extraplanar origin. The cloud has a flying speed of 20 feet and is impervious to all damage and spells except the following.
- A
gust of wind spell or similar magic can forcibly move the cloud. - Casting a
banishment spell on the cloud sends it back to the Elemental Plane of Air if it fails its Charisma saving throw (it has a +4 modifier to the roll). Adispel evil and good spell is equally effective and doesn’t require a successful attack roll; however, the caster must be in contact with the cloud.
Creatures native to the Elemental Plane of Earth (including earth elementals, galeb duhr, gargoyles, and xorn) that come in contact with Ogrémoch’s Bane instantly fall under the cloud’s sway. The effect lasts as long as the enslaved elementals and Ogrémoch’s Bane are on the same plane of existence.
XP Awards
If Ogrémoch’s Bane is banished back to the Elemental Plane of Earth, award each character 150 XP.
22. Steadfast Stone
Once a temple of Callarduran Smoothhands, the deep gnomes' god of stone and mining, this cavern was named after its long-lost galeb duhr protectors-the dharum suhn (the “Hearts of Steadfast Stone”).
The floor of this cavern is worn smooth, but the walls are rough. A great menhir carved from a stalagmite stands in the center of the chamber, pockmarked with dozens of empty sockets that might once have held gems.
Characters with a passive Wisdom (Perception) score of 14 or higher notice that the roughness of the walls outlines several large, vaguely humanoid shapes.
Cleansing the Temple
If the characters accepted Gurnik Tapfinger’s task (see area 13), they can place the ruby spell gem he gave them into one of the sockets in the menhir. When they do so, the elementals in the walls begin to stir.
As the ruby begins to glow against the menhir, the walls begin to rumble. Part of one wall shifts, detaches, and charges toward you.
An earth elemental materializes out of the wall and attacks. When the elemental is reduced to 0 hit points, it crumbles, and a galeb duhr emerges from the ground near the menhir in an unoccupied space. The galeb duhr faces outward in a guarding pose, but doesn’t move or respond. Another earth elemental then emerges from the wall of the chamber and attacks, when it is destroyed, a second stoic galeb duhr appears. This summoning process repeats once more, until the third earth elemental appears and is destroyed. The elementals ignore the galeb duhr, which continue to stand motionless throughout the fight.
When the characters reduce three earth elementals to 0 hit points and summon three galeb duhr, a white light shines from the menhir, producing a hallow effect protecting the galeb duhr from the influence of Ogrémoch’s Bane. The galeb duhr then animate and acknowledge the characters with a grave nod, before settling down in their boulder guise around the menhir.
Gurnik delivers his promised blessings when the characters return to notify him of their success in the temple. He can sense whether or not the temple has been restored to its former glory, so if the characters fail to cleanse the temple but tell him they succeeded, he knows they’re lying, and the deep gnomes' attitude toward the party worsens. If the characters accomplish Gurnik’s task, they can make a DC 15 group Charisma check to improve the gnomes' attitude, with all characters making the check with advantage.
Development
A wide, descending staircase ends before a wall of collapsed stone that blocks access to the tunnels and caves that constitute the Pudding Court. The debris can be cleared with a few days of work. However, if the characters want to use this passage as an entry point to attack the Pudding King, they can use a volatile concoction brewed by Kazook Pickshine to quickly clear the debris (see “Battle for Blingdenstone” later in this chapter).
XP Awards
Each character gains 200 XP for restoring the temple.
Goldwhisker Warrens
The svirfneblin wererats of the Goldwhisker clan don’t remember having lived anywhere but in the ruins of Blingdenstone. They descend from survivors of the drow invasion who became infected with lycanthropy after an unfortunate encounter with a pack of wererats.
For decades, the Goldwhisker svirfneblin have lived and thrived in these caverns, avoiding drow and crazed elementals, and securing their homes in cunning and vicious ways. They aren’t willing to leave just because the cowards who fled Blingdenstone when it needed them most have now returned.
Goldwhisker Warrens: General Features
One of the first things lycanthropy cost the svirfneblin was their fastidious tidiness. The wererat warrens are messy, with several areas smelling of mushrooms too ripe for any normal person to eat.
Light. The wererats light their warrens with nightlight fungi and torchstalks.
Traps. The wererats have rigged traps throughout the warrens. All wererats know where the traps are and how to avoid them. The traps are marked with russet squares on the map. The first time a party member enters one of these areas, he or she triggers a trap unless the trap has been detected and disarmed. Roll a d6 to determine the type of trap: 1-2, spiked pit (10 feet deep and lined with zurkhwood spikes); 3-4, collapsing roof; or 5-6, poison darts. See “Sample Traps” in chapter 5 of the Dungeon Master’s Guide for information on each trap.
23. Main Entrance
The svirfneblin installed locked doors to close off this section of the warrens. West of the doors, the wererats have installed a trap (see the “Traps” section in the “Goldwhisker Warrens: General Features” sidebar).
Four svirfneblin wererats attack when the characters trigger, disarm, or avoid the trap. The wererats avoid biting their enemies to minimize the risk of giving them the “gift” of wererat lycanthropy. If the characters kill two of the wererats, the survivors retreat to area 25.
Development
Sounds of battle here alert every other wererat in the warrens. Thereafter, the wererats can’t be surprised.
24. Refuse Pile
The characters notice a foul stench as they approach this cave. This chamber used to be a small residential area, with homes dug into the walls at various heights, but no one dwells here now.
The pile of refuse dominates the cave. It contains decomposing matter, including a pair of slimy, partially digested svirfneblin corpses. A successful DC 12 Intelligence (Investigation) check reveals that the gnomes were victims of some kind of ooze.
25. Hall of Miners
During Blingdenstone’s heyday, this cavern held the old city’s smelters and marketplace for ore and uncut gems. It’s now the main square of the wererat warrens.
A small crowd has gathered here. Most of the assembled creatures are deep gnomes, but some have ratlike features-including a fat specimen standing in front of the others, smiling at you with jagged buckteeth. “Peace,” the big wererat says. He takes a step forward, arms extended and hands open. “Chipgrin’s the name. I’m chief of the Goldwhisker clan. Shall we talk?”
Forty svirfneblin wererats are gathered here, making combat a dangerous proposition and likely inspiring the characters to accept Chipgrin’s peaceful parley. The wererat boss climbs a set of stairs to the top of a natural rise (area 26), bidding the characters to follow him.
Chipgrin is a svirfneblin wererat with 45 hit points and AC 14 (studded leather).
26. Chipgrin’s Rise
The leader of the Goldwhisker clan claims this plateau as his personal retreat and also entertains guests here.
Stairs lead to the top of this rise, where the floor is covered with a soft and well-manicured carpet of green moss. The wererat chief sits on a stone chair flanked by two giant rats. Draped over the chair’s back is a cave badger pelt.
“Let’s get down to brass hobnails, then. You were sent by the Diggermattocks ‘cause they want us out, right? Right?! Well, they might get their wish soon enough, but in a way they ain’t likely to cheer about.”
The wererats face constant attacks by the oozes and are close to fleeing the settlement and leaving the other deep gnomes to fend for themselves. However, Chipgrin has learned of the mysterious figure controlling the oozes, and he hopes to use that information to strike a bargain. If the characters are willing to hear what he has to say, Chipgrin goes on to describe the creature he refers to as “the Pudding King.”
“I remember him from when he worked in the tunnels, and my kin saw him when he returned. I know who he is, what he’s doing, and-most of all-where he can be found! If you and the Diggermattocks want, I can take you straight to him-he what calls himself the Pudding King.”
The wererat leader remains civil, but he refuses to tell the characters anything more about the Pudding King until he has secured a meeting with the Diggermattocks. If there is any hint of violence, he calls for help.
If the characters decide to fight, all forty svirfneblin wererats in the surrounding cavern (area 25) rush to attack, in addition to Chipgrin and his two giant rat. Chipgrin orders his fellow wererats to take down clerics first, then any other spellcasters, and to keep melee combatants locked down. He doesn’t kill the characters, but makes sure they are infected with wererat lycanthropy before dumping them in the maze in Outer Blingdenstone (area 3).
During any negotiation, Chipgrin is affable but firm in his demands. He also asks the characters if they’ve noticed anything odd among the svirfneblin. The wererats have noticed the greed and aggression growing among their cousins living outside Blingdenstone (see “Blingdenstone Outskirts”). However, they are unaffected by it themselves, given their bestial natures. Chipgrin doesn’t know about demon lords, but he’s smart and can help the characters connect the dots if they’ve heard of Juiblex and its unending hunger.
If either Topsy or Turvy are with the characters, Chipgrin is pleased to welcome them to the Goldwhisker clan. The twins accept the offer unless their bond of friendship with the characters inspires them to remain with the party.
Development
This encounter tests the characters’ skills as diplomats and peacemakers. If they take Chipgrin’s message to the Diggermattocks and arrange an audience, Chipgrin suggests that they stick around long enough to see what comes from “all this chit-chat and howdy-do!”
27. Secret Tunnel
The wererats use this secret tunnel to enter and leave their warrens. Oozes have also been using this route to enter Blingdenstone and join the Pudding King’s court. The secret doors are well hidden and require a successful DC 18 Wisdom (Perception) check to spot.
The Pudding Court
The Pudding King set up his court in the northwest corner of Blingdenstone, slipping through the wererat warrens with his beloved “children,” Princess Ebonmire and Prince Livid (see the “Royal Oozes” below). Since his return, the Pudding King has been using the power granted him by Juiblex to summon and command every ooze in the region.
Royal Oozes
Princess Ebonmire is a black pudding with an Intelligence of 6 (-2) and the ability to hurl blobs of its substance as a ranged weapon attack out to a range of 30 feet. This attack has the same attack bonus, damage, and effect as the black pudding’s Pseudopod attack.
Prince Livid is a gray ooze with 30 hit points (use the psychic gray ooze variant).
28. House Center
This cavern was once the heart of Blingdenstone’s government-a large space with a rocky sphere in its center. The sphere is hollowed out and contains the royal chambers from which the old kings and queens ruled. All of it has been transformed by the presence of the Pudding King.
The walls of this great cavern are covered in slime—dripping, sickening green slime. Echoes of dripping water also fill the cave, in the center of which is a large spherical structure is held up off the floor by stone pillars. Around these pillars crawl dozens of living oozes, heaving forward while reaching out with grasping pseudopods. The sphere’s surface, like the cave walls, is covered with slime. Black slime swirls with yellow and gray slime in a disgusting soup, the unearthly patterns in the movements of the slime straining your eyes and tugging at your mind.
A disembodied voice fills the cave. “What’s this, what’s this? Visitors? Now? Not yet! We’re not ready! Go away, pests! I will call upon thee and all of Blingdenstone to announce our glad tidings of the Faceless Lord to come at the proper time! Begone!”
Hundreds of ooze creatures congregate here, drawn by the will of the Pudding King. They include dozens of black pudding, gray ooze, and ochre jelly, as well as the occasional gelatinous cube. If the characters intend to rush this deadly tide, warn them that retreat is a better option, and that this is a fight they aren’t likely to survive without strategy and aid. See the “Battle for Blingdenstone” section for the ways the characters can return here and have a chance to triumph.
If Glabbagool is with the party, it attempts to communicate with the other ooze creatures, telling the characters that others of its kind are calling for it to join them. The adventurers can convince the gelatinous cube not to go, but even if it does, Glabbagool might still serve as an ace in the hole during the battle for Blingdenstone.
The cavern is damp and has a 180-foot-high ceiling lined with dripping stalactites. The walls are covered with patches of green slime. Any creature that comes into contact with a wall takes damage as normal.
Royal Sphere
The hollowed-out stone sphere is 150 feet in diameter and elevated 10 feet off the ground, such that the top of the sphere is 20 feet below the cave ceiling. Stone ramps without railings climb 30 feet to four small, open doorways in the sides of the sphere. A patch of green slime hangs above each door. The chambers the fill the sphere’s interior have been scoured by the ooze creatures, leaving nothing but bare corridors and empty chambers. Even the metalwork has been corroded and eaten away. There is nothing of interest or value within.
29. Ruined Stockade
This cavern was once a shrine for Baervan Wildwanderer, the gnomish deity known as the Father of Fish and Fungus. Now it belongs to the Pudding King.
The sound of dripping water fills this dark cave, and various oozes slither across the walls and floor. Some sort of fungal wall or partition once divided the cave, but that barrier has been destroyed. Beyond it lies more wreckage and debris scoured clean by the oozes.
This area once contained a stockade fashioned from zurkhwood and trillimac fungi. Here, the deep gnomes kept their deep rothe (Underdark cattle). The place was ransacked during the drow invasion, and the Pudding King’s oozes have dissolved most of what the drow left behind, including the bones of the slaughtered rothe. Two freshwater pools form along the west wall.
Dozens of ooze creatures - black pudding, gray ooze, and ochre jelly - inhabit this cavern. However, they don’t attack intruders unless they are harmed or commanded to do so by the Pudding King.
This cave is also home to a gibbering mouther that isn’t under the sway of Juiblex or the Pudding King. It crept into this cave and hides among the oozes, occasionally feeding on them. It looks like a pool of reddish-brown slime in the middle of the cave until one or more characters touch it, whereupon it opens its eyes and attacks.
30. Throne Room
Phosphorescent lichen illuminates this cave, the floor of which is covered with pools of green slime. More green slime clings to the ceiling and forms hideous drapes along the walls. In the middle of the cave, facing east, is a slime-covered throne.
The Pudding King holds court here, attended by his royal “children,” Princess Ebonmire and Prince Livid.
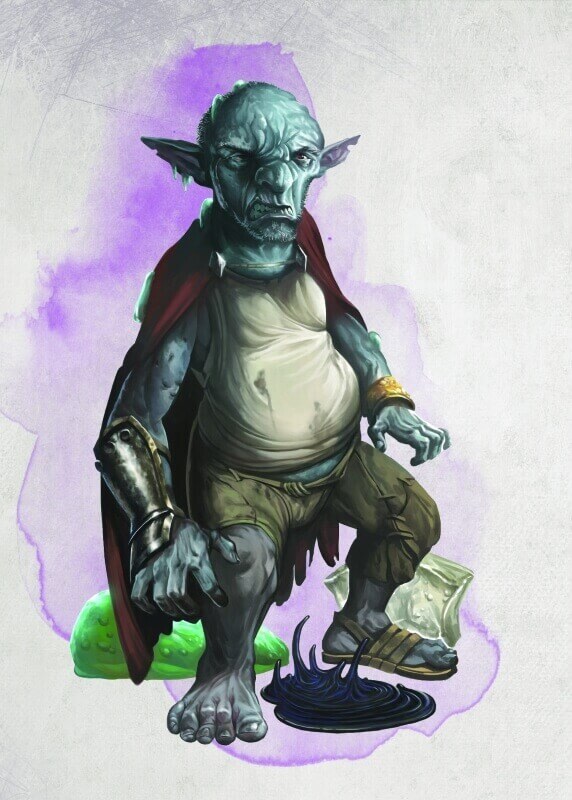
The Pudding King’s throne is made of chiseled stone and sculpted with lidless eyes and gaping mouths. A patch of green slime covers it. More patches of green slime hang from the ceiling and form pools on the floor. The pools are easily avoided, while the patches on the ceiling don’t fall unless the Pudding King commands them to. The Pudding King can use a bonus action to make a patch of green slime fall from the ceiling onto a creature below.
In front of the throne is a footstool made from a squat, petrified mushroom. The mushroom’s cap can be removed, revealing a hollow compartment in the stem where the Pudding King hides his treasure.
Treasure
The hidden compartment in the Pudding King’s fungal footstool contains 55 gp, 30 ep, a
Battle for Blingdenstone
Once the characters see how overwhelming the opposition is inside the Pudding Court, they have little choice but to retreat and report their findings to the Diggermattocks. The deep gnome leaders grimly thank them for their efforts, asking them to wait and attend a council meeting the following day.
The council meeting takes place in Diggermattock Hall (area 14) and includes Chief Dorbo and Quartermaster Senni, Nomi Pathshutter and Gurnik Tapfinger representing the Stoneheart Enclave, Kazook Pickshine representing the Miners' Guild, and Burrow Warden Jadger’s ghost or Trisk Adamantelpiece representing the Burrow Wardens. If the characters talked with Chipgrin Goldwhisker and agreed to take his offer to the Diggermattocks, Dorbo and Senni invite him to attend as well.
Senni asks the characters to inform everyone about what they saw, after which the council debates what to do. If nobody suggests it first, Jadger’s ghost says that Blingdenstone has no hope to defeat this threat if the settlement stands divided. That means counting the Goldwhisker wererats as allies and recognizing their right to rejoin the community.
Give the characters a chance to ask questions of the svirfneblin regarding what each faction can bring to the table (see “Blingdenstone Factions” linked below).
Blingdenstone Factions
The following sections describe what each deep gnome faction has to offer in the Battle of Blingdenstone.
The Diggermattocks
If the characters don’t suggest it, the deep gnome leaders note that fighting all the oozes might not be necessary. If the adventurers can get to the Pudding King and destroy him, the oozes might be reduced to their typically mindless and disorganized state. A large force can serve as a distraction, while the characters sneak in from an alternate route.
Dorbo Diggermattock wants the main force to attack from the temple of the Steadfast Stone. Before the battle can get underway, the temple must be cleansed (see area 22). Meanwhile, Senni Diggermattock gives Kazook Pickshine the materials he needs to create an alchemical concoction that can clear the debris blocking the way into the domains of the Pudding King.
The Goldwhisker Clan
Chipgrin doesn’t know about the Pudding King’s deal with Juiblex, but he knows the Pudding King can command the oozes as if they were intelligent. If the characters help convince Dorbo Diggermattock that the Goldwhisker clan belongs in Blingdenstone, the svirfneblin wererats participate in the battle and prove sturdier than the average deep gnome, taking point on any attack.
The Stoneheart Enclave
Stone is a resilient defense against oozes, making earth elementals the perfect force to combat them. Nomi Pathshutter suggests that if Entemoch’s Boon could be found and its summoning circle put to use, the likelihood of victory would increase greatly.
Gurnik Tapfinger says that with Ogrémoch’s Bane still lurking, any elemental brought to the battle runs the risk of being driven insane.
Nomi and Gurnik agree that if the Steadfast Stone is cleansed and Ogrémoch’s Bane is banished, the Stoneheart Enclave can protect its elementals during the battle.
The Miners' Guild
Kazook Pickshine can concoct an oil to protect weapons and armor from acid corrosion, but he needs a large quantity of ingredients from Neverlight Grove. If the characters have already been in Neverlight Grove and witnessed the horror of Zuggtmoy, they can discard this idea or brave a stealthy return to the corrupted myconid haven.
Another option is to send a shipment of salt to Gracklstugh to trade for high-quality weapons. The characters could escort the caravan if they have already visited the City of Blades and have unfinished business.
Svirfneblin Spirits
If the characters have not already completed Burrow Warden Jadger’s tasks, doing so convinces Jadger’s ghost to rally the other benevolent ghosts of Blingdenstone and join the battle.
Task List
The success of any plan to rid Blingdenstone of the Pudding King and his minions is more likely if the characters complete the following tasks:
- Convince Dorbo Diggermattock that the Goldwhisker clan deserves to live in Blingdenstone.
- Find Entemoch’s Boon.
- Cleanse the Steadfast Stone (area 22).
- Travel to Neverlight Grove and harvest a wagon load of ingredients among its fungal pools and fields.
- Escort a salt shipment to Gracklstugh to trade for duergar-made weapons.
- Complete one or both tasks set forth by the ghost of Burrow Warden Jadger (see area 8).
Let the players come up with other ideas that might help, such as asking for aid from the stone giants of Gracklstugh or stealing magic weapons from the drow. Some quests might take time to complete, since they require travel through the Underdark.
See the “Benefits for Completing Tasks” below for benefits that the characters gain during the Battle of Blingdenstone if they complete certain tasks.
Benefits for Completing Tasks
Completing certain tasks in Blingdenstone can provide the characters with benefits and allies in the final battle.
- If the characters find Entemoch’s Boon and share its location with the svirfneblin, or if they cleanse the temple of Callardurran Smoothhands (area 22), an earth elemental aids them. If the characters completed both tasks, the elemental has 15 additional hit points.
- If the characters fetch the ingredients from Neverlight Grove, their metal equipment is immune to the corrosive effects of oozes.
- If the characters procure weapons in Gracklstugh, they can call for ranged artillery support during the Battle of Blingdenstone. Each character deals 2 extra damage with each attack during the “Cry Havoc!” encounters, representing covering fire from svirfneblin using duergar-made crossbows.
- If the characetrs complete the tasks set before them by Burrow Warden Jadger, each character can reroll one attack roll or saving throw during the Battle of Blingdentone as a ghost emerges from the ground to distract foes.
- If the characters befriended Glabbagool and brought it to Blingdenstone, the intelligent gelatinous cube joins the battle as their ally. If Glabbagool left the party previously, it can reappear as a surprise ally during the battle.
Cry Havoc!
When the characters feel that they have attained their goals and secured their resources, the battle for Blingdenstone can begin.
Earth elementals under the control of the Stoneheart Enclave lead the charge, followed by the wererats of Clan Goldwhisker. Svirfneblin under Chief Dorbo Diggermattock form the rearguard and provide ranged support. If the ghosts participate, they attack from above and below. The plan is to get the characters to the Pudding King while the other factions hold the oozes at bay.
To reach the Pudding King, the characters must face 1d4+2 encounters, minus one encounter per goal achieved in the “Task List” section. Roll a d6 and consult the Battle of Blingdenstone Encounters table to determine each encounter.
Battle of Blingdenstone Encounters
| d6 | Encounter |
|---|---|
| 1-2 | 1 black pudding and 2 gray oozes |
| 3 | 1 gelatinous cube and 1 ochre jelly |
| 4-5 | 3 gray oozes and 1 ochre jelly |
| 6 | 2 black puddings |
During the battle, the voice of the Pudding King can be heard through the layers of oozing miasma, crying out “Fight for your king!” and “Glory to the Faceless Lord!”
Oozing Royalty
When the characters defeat the last group of oozes, but before they reach area 30, the Pudding King appears.
The insane, slime-covered deep gnome points at you and cackles. “Devour them, my precious children! Make your father proud!” He then bolts as two oozes drop from the ceiling in front of you, their dark forms flowing in your direction with unsettling awareness and malevolence.
The characters must contend with Princess Ebonmire and Prince Livid. These dimly intelligent oozes defend their master to the death, blocking the characters from reaching the Pudding King as he retreats to his throne room (area 30).
Princess Ebonmire engages in melee, protecting Prince Livid as it uses its Psychic Crush attack. Prince Livid prefers to slink and hide while its Psychic Crush attack recharges.
Treasure
When Princess Ebonmire dies, the black pudding disgorges a pair of spellbooks with covers made from troglodyte hide and pages made from trillimac fungus (see “area Fungi of the Underdark” in chapter 2). The covers and pages are coated with a magical varnish that renders them immune to acid damage, protecting them from the pudding’s digestive juices. The varnish also protects against water damage.
A svirfneblin archmage named Lesla Carrowil authored both spellbooks. The wizard spells contained in each book are listed below; feel free to swap out any spell with another of the same level.
The first spellbook, titled Underland Magick, contains the following spells:
1st level: alarm, color spray, comprehend languages, find familiar, grease, identify, jump, Tasha’s hideous laughter, unseen servant
2nd level: alter self, blur, crown of madness, gust of wind, invisibility, knock, magic weapon, phantasmal force, spider climb
3rd level: blink, dispel magic, gaseous form, major image, protection from energy, slow, tongues, water breathing
4th level: blight, fabricate, fire shield, hallucinatory terrain, locate creature, phantasmal killer, polymorph, stoneskin
The second spellbook, titled Magick from Beyond the Mirror, contains the following spells:
5th level: Bigby’s hand, cloudkill, hold monster, legend lore, passwall, Rary’s telepathic bond, telekinesis, wall of stone
6th level: chain lightning, disintegrate, Drawmij’s instant summons, eyebite, flesh to stone, Otto’s irresistible dance, true seeing
7th level: forcecage, mirage arcana, Mordenkainen’s magnificent mansion, prismatic spray, reverse gravity, teleport
8th level: antimagic field, feeblemind, incendiary cloud, maze, power word stun, telepathy
The Pudding King
The mad svirfneblin waits for the characters in his disgusting throne room. If the characters haven’t seen the throne room before, read the boxed text description of the room (see area 30) and add the following:
The Pudding King cowers behind his slime-covered throne and chortles in his joy. “Callooh! Callay! Now you can join the party!” he cackles. “You can be one with the Faceless Lord. Just let yourselves be eaten and disgorged!”
The Pudding King prefers to cast spells while using the throne for cover. As a bonus action on his turn, he commands a patch of green slime to drop from the ceiling onto one randomly determined party member.
When one or more of the characters close to within reach of the Pudding King, he laughs madly as he tears away his humanoid guise and transforms into an ooze. When he reaches 0 hit points, he shrieks as he dissolves into a dense puddle of goo. Read the following boxed text as he expires:
“You haven’t won! No! We will rise from our children! We will be reborn from the Faceless Lord! Juiblex will consume the banquet of the Queen of Fungi and we… will… all… grow… !”
With the Pudding King gone, the oozes lose their organization, but they are still too many and the svirfneblin sound the call to retreat. Three galeb duhr led by the ghost of Burrow Warden Jadger arrive to take the characters to safety. If the svirfneblin of Blingdenstone didn’t already have a friendly attitude, they become friendly toward the characters after the battle.
Development
Back in Diggermattock Hall, the gnome leaders make good on their promise, giving the characters a stone of controlling earth elementals along with the gratitude of their people.
XP Awards
If the characters participated in the battle, they gain a special award of 200 XP each.
Leaving Blingdenstone
The characters can leave Blingdenstone as heroes of the svirfneblin. If they express interest in visiting other Underdark locations, the deep gnomes give them whatever help they can, including placing them in a caravan to Gracklstugh or Neverlight Grove. If the characters ask for help reaching the surface world, the gnomes guiding them to a tunnel that leads there (eventually). They also provide enough food, water, and other basic supplies for the party’s journey.
The characters achieve a great victory if they defeat the Pudding King, but their victory is incomplete. The Pudding King’s death is a small setback for Juiblex, and the demon lord might send another minion to command the remaining oozes in Blingdenstone until they are destroyed.
The “banquet” the Pudding King referred to is the demonic rite of domination through which Zuggtmoy plans to transform the Underdark into her new abyssal domain. See chapter 16, “The Fetid Wedding,” for more information.