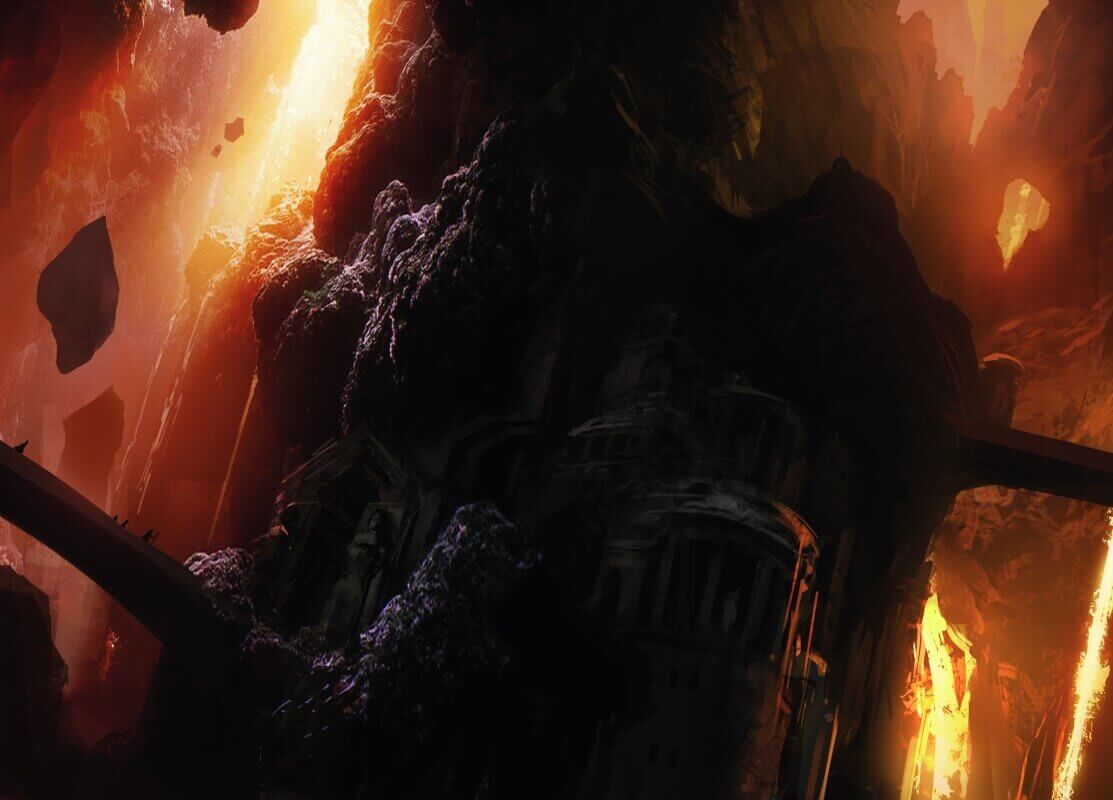
Visitors to the duergar city of Gracklstugh are greeted by its hot and acrid air, followed by the angry red glare of the eternally burning smelters fueling the city’s metal works, its clanging heart, and the forges kept alive by the flames of Themberchaud, the red dragon that holds the title of Wyrmsmith. Gracklstugh toils endlessly, its smiths churning out the best armor and weapons among the Underdark races. Those who do business here refer to Gracklstugh as “the City of Blades.”
As merciless as it can be, Gracklstugh is a major bastion of civilization in the Underdark with active trade routes. For the characters, this means a potential chance to find a way back to the surface world-and just as importantly, to shake off the drow that pursue them. However, the adventurers will quickly realize that the power of the demon lords is a threat even here, getting an even closer glimpse of the Underdark’s decay as the madness of the Abyss continues to spread.
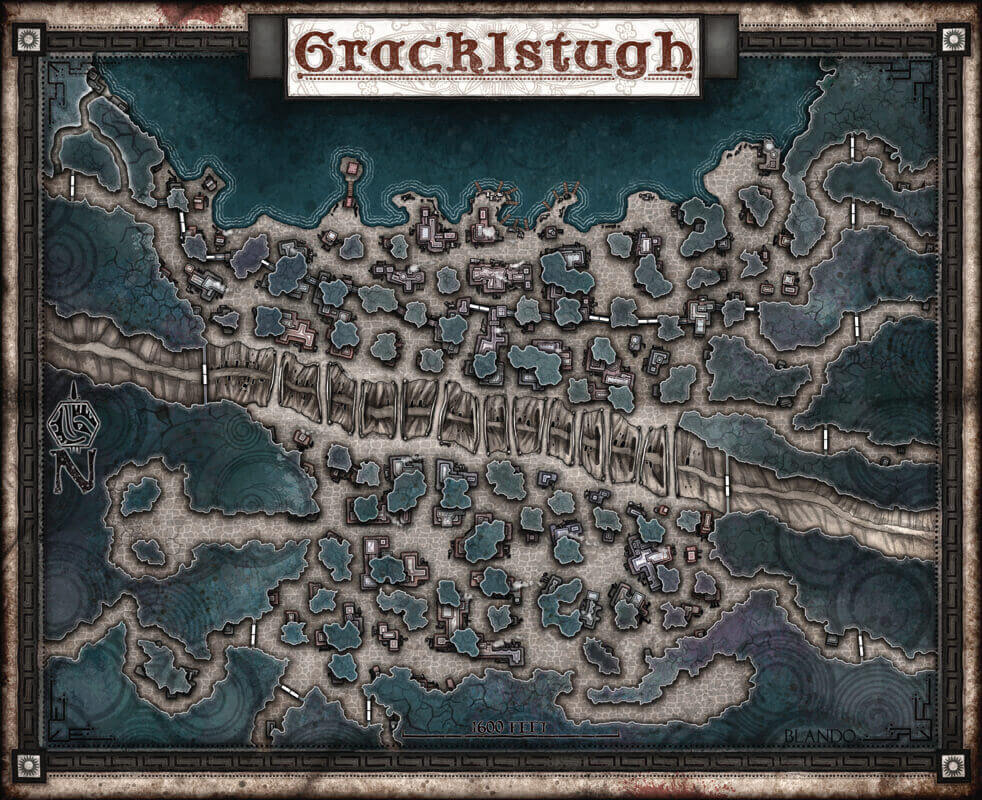
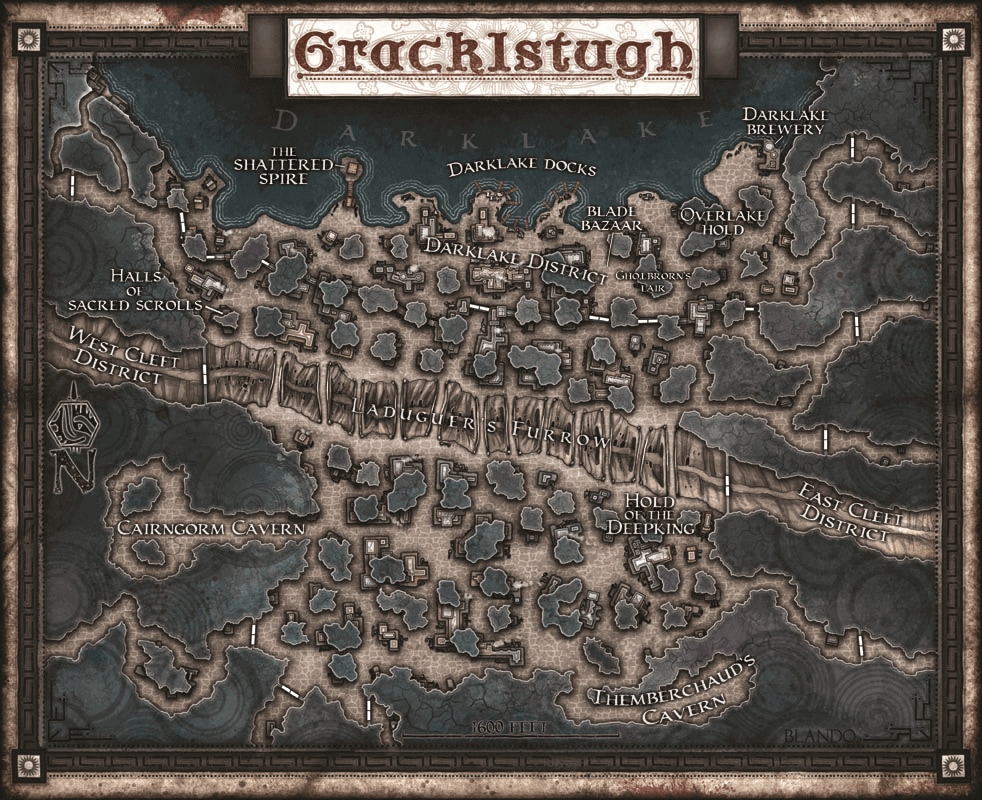
Built within the walls of a deep cavern southwest of the Darklake, Gracklstugh is the commercial, political, and spiritual center of the duergar, all of whom look to the Deepking with respect. The city has an open shore along the Darklake, while several caverns and passages connect Gracklstugh to other parts of the Underdark to facilitate travel and trade.
The characters have a chance to witness and shape events in the city that point toward the danger Gracklstugh faces-and how unprepared the city is for it. But with each moment the characters spend in the City of Blades, they run the risk of having escaped the drow only to be enslaved by the duergar.
Gracklstugh: General Features
Sweltering heat and cloying smoke cling to every corner of the duergar city, spewing from smelters housed inside massive stalagmites and stalactites. These protrude from the cavern’s floor and ceiling like the teeth of some great maw.
Light. Gracklstugh’s glowing forges and smithies operate continuously. Most of the city is dimly lit by a hellish red glow, with patches of darkness here and there.
Noise. The clanging and clacking of hammers and machinery echoes constantly throughout the city. Wisdom (Perception) checks made to listen in Gracklstugh have disadvantage.
Smoke and Haze. Despite vents dug into the walls and ceiling of the city’s great cavern, fumes from smelters and forges linger at ground level (as does the gas tapped in Laduguer’s Furrow). Visitors might contract the illness known as grackle-lung (see Grackle-lung).
Grackle-Lung
The constant smog in Gracklstugh causes grackle-lung in living, breathing creatures, resulting in persistent, wracking coughs and the spewing of thick, black phlegm. Whenever a living, breathing creature finishes a long rest in Gracklstugh, it must make a DC 11 Constitution saving throw. On each failed save, the creature gains one level of
A creature with one or more levels of
If a creature’s
Going to Gracklstugh
Despite its dangers, Gracklstugh does have a few things to offer… or at least that’s what some of the characters' fellow escapees tell them.
Buppido (see chapter 1) and Hemeth (see chapter 3) are the only NPCs who actively suggest going to Gracklstugh. They know that duergar have no love for the drow, and their draconian laws keep all foreigners in check, which should provide some measure of sanctuary from drow pursuit. Gracklstugh is as good a place as any in the Underdark to sell stolen gear and buy more useful equipment. Additionally, the duergar trade actively with other subterranean and surfacedwelling races. Gracklstugh’s Blade Bazaar might be the ideal place to find traders or explorers heading to the surface world.
If Buppido or Hemeth isn’t with the party, others can provide the above information. Sarith resists plans to travel to the city at first, conscious of the low regard the duergar have for drow. He changes his mind quickly, however, as Zuggtmoy’s spores drive him to seek a densely populated area where he can spread his contagion.
It’s also possible the party arrives at Gracklstugh involuntarily. Duergar slavers scour the Underdark in search of new “merchandise,” and they might deceive or outright capture the characters and bring them to their city’s slave markets. The random encounters in chapters 2 and 3 can easily set up this scenario.
Gracklstugh and Drow Pursuit
Taking refuge in Gracklstugh has its advantages. Each day they spend in the duergar capital, the characters can attempt a DC 16 group Dexterity (Stealth) check to move around cautiously, with success indicating that they avoid drawing attention to themselves. The characters can also attempt a DC 13 group Wisdom (Insight) check to assess the mood in the city, with success allowing them to avoid trouble before it starts. Characters who lie low for the day have advantage on this Wisdom check.
Success with either check reduces the party’s pursuit level by 1 (see “Drow Pursuit” in chapter 2).
Arriving in Gracklstugh
The Darklake District is a likely entry point to the city for the characters, whether they arrive via the water or travel one of the many tunnels leading to the district’s gates. Non-duergar arriving from tunnels that lead to other districts are stopped and escorted to the Darklake District under heavy guard, as every other district is normally off limits to outsiders, and trespassers risk being confronted by an invisible patrol of four duergar.
The party’s fellow escapees know that trying to enter through the main entrances is a sure way to get enslaved, unless one of the characters is an epic liar who can convince the guards the party is a legitimate diplomatic or trade delegation. Anyone with a merchant or criminal background has heard rumors that the Zhentarim trade in the Underdark, but posing as Zhentarim has its own risks, as such claims are bound to be questioned. A character who is actually a member of the Zhentarim can buy the adventurers a couple of days inside the city before the duergar slavers start taking their measure.
Arriving by way of the Darklake Docks is easier and more discreet. If the characters are traveling by boat, Buppido can guide them to a deserted pier where they can dock quietly. He warns them that they have to keep a low profile and head directly to the only inn in the city devoted to outsiders. The Ghohlbrorn’s Lair is frequented by merchants, mercenaries, and other foreigners who can offer information about traveling elsewhere in the Underdark-or perhaps even to the surface world.
Random Encounters
With routine patrols of heavily armed gray dwarves who can turn invisible, Gracklstugh is a relatively safe place for those who know where they belong and stay there. However, tensions are rising because of the influence of Demogorgon, and the characters have many opportunities to participate in events unfolding in the city. At the end of each long rest, roll a d20; on a roll of 17-20, an encounter takes place. Roll another d20 and consult the Random Encounters in Gracklstugh table; if the characters are outside the Darklake District, treat any entry marked with an asterisk as a “Duergar Patrol” encounter instead.
Darklake District Random Encounters
| d20 | Encounter |
|---|---|
| 1-2 | Abusive Duergar Guards |
| 3-4 | Deep Gnome Merchant |
| 5-7 | Derro Rioters |
| 8-9 | Drow Emissary |
| 10-12 | Duergar Patrol |
| 13-14 | Mad Duergar |
| 15-16 | Orc Mercenaries |
| 17-18 | Slave Caravan |
| 19 | Steeder Handlers |
| 20 | Themberchaud |
Gracklstugh Random Encounters
| d20 | Encounter |
|---|---|
| 1-2 | Abusive Duergar Guards |
| 3-4 | Deep Gnome Merchant |
| 5-12 | Duergar Patrol |
| 13-14 | Mad Duergar |
| 15-16 | Duergar Patrol |
| 17-18 | Slave Caravan |
| 19 | Steeder Handlers |
| 20 | Themberchaud |
Random Encounters in Gracklstugh
| d20 | Encounter |
|---|---|
| 1-2 | Abusive duergar guards |
| 3-4 | Deep gnome merchant* |
| 5-7 | Derro rioters* |
| 8-9 | Drow emissary* |
| 10-12 | Duergar patrol |
| 13-14 | Mad duergar |
| 15-16 | Orc mercenaries* |
| 17-18 | Slave caravan |
| 19 | Steeder handlers |
| 20 | Themberchaud |
Abusive Duergar Guards
The characters come upon two duergar guards beating a duergar merchant and shouting accusations of heresy. Any Underdark native accompanying the party urges the characters not to intervene on the merchant’s behalf, telling them this isn’t their business and warning them that any interference might get them arrested or killed. Bystanders look a little surprised or concerned but don’t intervene, not even to aid the unconscious merchant once the guards leave.
If the characters investigate the circumstances leading to the assault, bystanders tell them that one of the guards noticed a golden pin the merchant was wearing inside his collar. Though adornment for adornment’s sake is something duergar society frowns upon, the guards' violent response was unnatural - a hint of the growing madness festering inside the City of Blades.
Deep Gnome Merchant
A female deep gnome named Ariana and her earth elemental bodyguard approach the party. Ariana aims to deliver a cargo of gemstones, but she can’t find the duergar merchant she’s supposed to meet. She assumes the characters are smugglers and tries to unload her goods: ten sparkly garnets worth 100 gp each. Ariana keeps the gems in a bag of holding, which isn’t for sale.
The merchant whom Ariana is looking for was recently arrested and executed for selling stolen jewelry. You can decide whether Ariana’s interest in the characters attracts the attention of a duergar patrol.
Subsequent occurrences of this encounter are with other deep gnome merchants who ignore the characters unless approached. They carry nothing of value.
Derro Rioters
A mob of derro rampages through the streets. Five of them detach from the mob to attack the characters. Four duergar patrols (see “Duergar Patrol”) arrive when the characters kill the last derro, but they simply nod at the characters before repressing the rest of the mob. Word quickly spreads that the characters helped the city guard control the unruly derro scum. At your discretion, give the characters advantage on checks made to interact with any duergar in the city until such time as the benefit no longer seems appropriate.
Drow Emissary
A drow proudly wearing the insignia of a drow house travels with an entourage of 1d4+1 quaggoth slaves. The drow is in Gracklstugh to retrieve a cargo of duergar metalwork and knows nothing about the recent events in Velkynvelve. Roll a d6 and consult the Drow House Loyalty table to determine the house to which the drow is affiliated.
Drow House Loyalty
| d6 | House |
|---|---|
| 1-2 | House Baenre |
| 3-4 | House Faen Tlabbar |
| 5-6 | House Xorlarrin |
House Faen Tlabbar and House Mizzrym are bitter rivals. If the drow emissary belongs to House Faen Tlabbar and the characters divulge that they are enemies or former prisoners of House Mizzrym, the drow warns the party about Xalith (see “Signs of Pursuit” later in the chapter).
House Baenre and House Xorlarrin are current allies of House Mizzrym. A drow emissary allied with House Mizzrym who knows that the characters are escaped prisoners from Velkynvelve seeks out Xalith and warns her that the characters are in Gracklstugh.
Duergar Patrol
A patrol consists of 1d4+2 duergar, all but two of whom are invisible. Invisible duergar can sneak up on a character by making a Dexterity (Stealth) check with advantage, contested by the character’s passive Wisdom (Perception) score.
Mad Duergar
The characters encounter a duergar afflicted with a form of indefinite madness. Roll a d10 and consult the Mad Duergar table to determine what the party encounters.
Mad Duergar
| d10 | NPC |
|---|---|
| 1-2 | A merchant desperate to sell his wares, convinced that his life depends on it. |
| 3-4 | A street sweeper who hounds the characters while accusing them of being spies working for the drow. |
| 5-6 | A cloaked guard who thinks he’s Deepking Horgar Steelshadow V drafts the party to help him slay Themberchaud, convinced that the dragon is possessed by a demon lord. |
| 7-8 | A merchant who accuses the characters of theft and calls out for a duergar patrol to arrest them. |
| 9-10 | A weaponsmith convinced that one of the characters is a long-lost member of her clan and who insists on giving the party food and shelter. |
Orc Mercenaries
These 1d4+1 orc have come to Gracklstugh as caravan guards, and see the characters as a chance to bully some surface dwellers. The orcs try to goad the characters into striking first, then quickly stand down, knowing that a patrol (see “Duergar Patrol”) will arrive 1d6 rounds after combat starts.
Slave Caravan
The characters come across a group of 1d4+1 duergar slavers herding unarmed slaves (roll a d12 and consult the Slaves table). The slaves wear iron collars and manacles similar to the ones worn by the characters in Velkynvelve (see “Restraints” in chapter 1).
Slaves
| d12 | Slaves |
|---|---|
| 1-2 | 2d4 human commoners |
| 3-4 | 3d4 shield dwarf commoners |
| 5-6 | 2d4 strongheart halfling commoners |
| 7-8 | 3d6 goblins |
| 9-10 | 2d6 grimlocks |
| 11-12 | 3d6 kobolds |
Steeder Handlers
A group of 1d4+1 duergar teamsters herd a clutch of 2d6 male steeder. There is a 50 percent chance that 1d4 of the steeders attack nearby characters or bystanders. The duergar keep the rest of the clutch in check, but they clamor for the characters' arrest if even one of the arachnids is killed. A nearby patrol (see “Duergar Patrol”) hears the teamsters' clamor and arrives 1d6 rounds later.
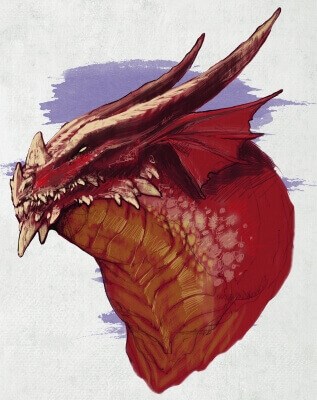
Themberchaud
The adult red dragon is out on his regular rounds, keeping the city’s forges aflame. Themberchaud has long been keeping his eye out for mercenaries in the city that could be bent to his service. If he spots the characters, he might take an interest in them. See “Themberchaud’s Lair” for information on the Wyrmsmith’s motivations and possible setups for an additional encounter with the red dragon.
Important NPCs of Gracklstugh
The characters might encounter one or more of the following NPCs during their stay in Gracklstugh.
| Gracklstugh NPCs | |
|---|---|
| Gorglak | Corrupt male duergar on duty at the gate where the characters first arrive in Gracklstugh |
| Xalith | Female drow scout charged with recapturing the characters for Ilvara |
| Errde Blackskull | Female duergar captain of the Stone Guard with a side quest for the party |
| Themberchaud | The city’s Wyrmsmith, an adult red dragon with a possible mission for the party |
| Gartokkar Xundorn | Male duergar Keeper of the Flame with a side quest for the party |
| Ylsa Henstak | Female duergar merchant with a side quest for the party |
| Droki | Male derro courier in the employ of both the Gray Ghosts and the Council of Savants, and the subject of different possible side quests |
| Werz Saltbaron | Male duergar merchant with a mission for the party |
| Stonespeaker Hgraam | Male stone giant leader with a side quest for the party |
| Narrak | Male derro savant, junior member of the Council of Savants and leader of a cult dedicated to Demogorgon |
Factions of Gracklstugh
The Deepkingdom is a feudal state with the Deepking as the absolute monarch, who passes the crown to descendants or relatives in his Steelshadow clan. Each clan is led by a laird, who rules over his or her own holdings and directs the clan in dedicating its efforts toward a particular trade or craft. A caste of priests called thuldar officiate all rituals and record the Deepkingdom’s lore. However, ultimate political and religious power is held by the Deepking and the lairds.
Deepking Horgar Steelshadow V
Deepking Horgar V ascended to the throne in 1372 DR. He is a ruthless and canny ruler who engages in secret meetings with all the city’s councils and clans to keep their members guessing what he’s up to, hands out favors out of the blue, and lets it be known that he’ll use any trick to maintain his hold on power. This includes hiring assassins through third parties to take care of potential troublemakers (see “Empty-Scabbard Killers,” below). This strategy keeps all the city’s factions at each other’s throats and out of Horgar’s way.
Council of Lairds
This advisory body represents the interests of the different clans that have pledged allegiance to the Deepking. The lairds hold council to resolve disputes and discuss future plans. Each clan has its own holdings in Gracklstugh and specializes in a certain craft or service.
| Duergar Clans | |
|---|---|
| Smithing Clan | Steelshadow (weaponsmiths), Clan Ironhead (weaponsmiths), Clan Thrazgad (armorsmiths), Clan Firehand (smelters), Clan Anvilthew (toolmakers) |
| Mercantile Clan | Thuldark (metalworks and jewels), Clan Henstak (food), Clan Muzgardt (brewers) |
| Mining Clan | Coalhewer (coal miners), Clan Xardelvar (gas miners), Clan Saltbaron (salt miners) |
| Other Clan | Parlynsurk (clothing manufacturers), Clan Hammercane (construction engineers), Clan Xundom (steeder breeders), Clan Burakrinwurn (dock operators), Clan Xornbane (scouts and prospectors), Clan Blackskull (stonemasons), Clan Bukbukken (farming), Clan Thordensonn (jewelers) |
Council of Savants
The Council of Savants is a circle of derro savants who enjoy all the privileges and trappings of a governing body while the rest of their people live in squalor. Only the best thirty-six savants are admitted into the council, and succession almost always includes an incumbent member’s demise. The savants control members of some duergar clans through magic and guile, and are always looking for ways to expand their influence.
Merchant Council
The lairds and merchants who sit at this council make sure that trade and commerce flow smoothly. They employ slave labor to maintain trade routes in the dangerous Underdark, and are always open to hiring explorers to check out leads on potential new routes. Expendable outsiders hired as caravan guards always take point and receive little aid or support from the caravan masters. Despite these unfair assignments, the duergar always live up to their bargains, paying survivors as promised.
Gracklstugh Military
In addition to the clans' regular armies, Gracklstugh trains specialized warriors whose oaths of service always supersede their original loyalties. See appendix C for more information.
Duergar stone guard. This force of five hundred veteran warriors serves the Deepking as bodyguards, elite troops, and secret police.
Duergar darkhaft. Members of the Deepking’s secret corps of psionic agents, the darkhafts often travel with duergar merchants as overseers and spies.
Duergar kavalrachni. The vicious kavalrachni ride giant tarantulas known as steeders. Most kavalrachni come from Clan Xundom.
Duergar xarrorn. These specialists train with deadly flame lances forged in Gracklstugh. Most Duergar xarrorn come from Clan Xardelvar.
Despite reports that the darkhafts and the Stone Guards have received about the growing crisis outside the city’s walls, hubris and the onset of madness prevents them from mounting any sort of response or campaign, blind to the corruption that festers around them.
Clan Cairngorm
The stone giants of Clan Cairngorm lead quiet lives of art and contemplation in Gracklstugh. Although reclusive and averse to conflict, the giants have sworn an ancient oath of loyalty to the Deepking, and have been serving his line for as long as any can remember. This oath, however, was given only to the Steelshadow clan. If the throne passes to another dynasty, the stone giants will cease to be the city’s allies.
The leader of the stone giants is Stonespeaker Hgraam, a priest of Skoraeus Stonebones, the god of his people. Hgraam is wise and knowledgeable. He has sensed that some great evil has broken into the Underdark, but isn’t aware of the threat’s danger or extent. The giants will rise to defend Gracklstugh if any demons dare to invade, but they are unaware of the danger creeping into the city from within.
Keepers of the Flame
This order of psionic clerics tends to Themberchaud’s needs, enjoying great influence and helping Horgar V stay ahead of the machinations of the Council of Savants.
The Keepers of the Flame are currently distracted by their ongoing vendetta against the Gray Ghosts, who recently stole a valuable dragon egg that would have hatched Themberchaud’s eventual successor. Complicating matters, Themberchaud himself is growing stronger and more resistant to the clerics' coaxing, appeasement, and psionic manipulation.
Themberchaud the Wyrmsmith
This adult red dragon keeps the city’s smelters and forges ablaze, receiving treasure, free meals, and constant pampering in exchange. Themberchaud doesn’t know that, like other Wyrmsmiths before him, he is doomed to be slain before he grows too strong, replaced by a new red hatchling. However, the line of succession was interrupted when the Gray Ghosts stole a red dragon egg from the Keepers of the Flame.
The Wyrmsmith is beginning to chafe under the Keepers' control. He now wonders why he is content with a mere trickle of gold and a paltry handful of slaves, when he could simply force the entire city to bend knee to him and give him everything he desires. For now, his actions are limited by how little he cares about the duergar and how much the Keepers speak “on his behalf.” But he has begun taking an interest in the affairs of Gracklstugh and the opportunity to recruit new servants from outside the Keepers of the Flame, using his outings to rekindle forges and smelters as a means to keep an eye out for promising subjects.
Gray Ghosts
The Gray Ghosts are the only true thieves' guild in Gracklstugh and the Deepkingdom. Its members are duergar and derro outcasts, plus the odd escaped slave.
The Keepers of the Flame caught and executed the Gray Ghosts' previous leader, who stole their red dragon egg but never revealed its whereabouts. The relentless vendetta forced the thieves into hiding and restricted their activities, but they persevere thanks to the three renegade derro savants who are their current leaders: Uskvil and the twin sisters Aliinka and Zubriska.
Empty-Scabbard Killers
The Forak-Erach-Naek (“Empty-Scabbard Killers” in Common) are a folktale in Gracklstugh, their name derived from an ancient, obscure Dwarvish dialect. They are an order of psionic assassins practicing disciplines unknown to even the savviest derro or the wisest priest. More than a myth, these killers have been plying their trade for centuries, their motives unknown and their methods inscrutable.
The Empty-Scabbard Killers are duergar soulblade who roam the streets of Gracklstugh searching for psionically gifted children to abduct and train. They also keep an eye out for worthy calassabrak (see below), offering them a chance to join a new community from which they can strike back at those who cast them out.
The Downward Spiral
The madness of the demon lords has not reached Gracklstugh in full, but it already has a foothold through the work of the derro and their savants.
A splinter group of the Council of Savants began worshiping Demogorgon even before the current crisis, and their foul rituals accelerated the spread of madness in the city. To make things worse, the divided nature of the city, both geographically and socially, resonates strongly with the dual aspect of Demogorgon. The derro cultists plan to offer the entire city to their newly arrived master.
Many duergar NPCs the characters interact with are showing the first signs of infection. Though their madness has not yet overwhelmed them, it manifests in behavior such as Errde Blackskull’s conspiracy theories, Gorglak’s corruption, and Gartokkar Xundorn’s paranoia.
Life in the City of Blades
The duergar are called gray dwarves not only because of the color of their skin, but also because of their drab and joyless lifestyle. While they make no time for merriment, the duergar have a culture as rich and complex as any other, and nowhere is this so evident as in Gracklstugh.
Work never stops in the City of Blades, and the gray dwarves take pride in efficiency and perfection even as they abhor waste and carelessness. They are merciless masters to the derro and slaves who toil and suffer under them.
Strict Hierarchy
By appearance and bearing, all duergar know their place and where they belong. Whether as individuals, families, or entire clans, duergar below other duergar in the social order don’t seek to bring their rivals down through intrigue and deceit. Rather, they roll up their sleeves and work harder to increase their prestige through the fruits of their labor.
All the honor and honesty the duergar apply among themselves doesn’t apply to outsiders. The gray dwarves constantly try to manipulate contracts to take advantage of foreign merchants, looking for any excuse to enslave random visitors who appear weak or vulnerable—including adventurers.
Though they aren’t moved by vanity, duergar are extremely proud of their work, and praising the quality of duergar crafting can sometimes help outsiders in their dealings with the gray dwarves.
Subsistence
Duergar clans use caverns under Gracklstugh and choice outlying caves to farm a variety of plants and fungi. These crops are complemented by meat from Underdark beasts and fish from the Darklake. Not even the duergar risk drinking water from the Darklake, however, and with clean streams in short supply, the people of Gracklstugh cover this scarcity with Darklake Stout, the signature ale brewed by the Muzgardt clan.
Outcasts
The bottom rung in Gracklstugh society is mostly occupied by the underclass of the derro. Enslaved by the duergar centuries ago, then freed, the derro aren’t allowed to hold honest jobs, and their rights are hardly ever recognized by the duergar. Even slaves are held in higher regard. Derro scuttle about like vermin and are mostly confined to hovels built along the walls of Laduguer’s Furrow in the West Cleft District and East Cleft District.
Another kind of outcasts are those duergar who dishonor their clans so grievously they are stripped of all but their lives: the calassabrak, meaning “the flawed who aren’t to be trusted” in Dwarvish. They are shunned by other duergar, many eventually taking their lives rather than face an existence apart from family and clan. Those who live on become bitter and tough, with many leaving Gracklstugh as hermits or adventurers, or turning to crime and a life in the shadows. Members of both the Gray Ghosts and the Empty-Scabbard Killers include a significant number of calassabrak, no longer bound by oath, honor, and duty.
Religion
Duergar don’t pray, but their religion is tightly woven into their everyday life. Deities worshiped in Gracklstugh include the following.
Laduguer. The patron of the duergar is a god of selfreliance, defense, and survival. His clerics have access to the War domain.
Deep Duerra. Laduguer’s mortal daughter who then ascended, Deep Duerra is the goddess of cooperation and dominance. War is her domain as well.
Diirinka. The patron of the derro betrayed his twin brother Diinkarazan to escape with the secrets of magic. He embodies cruelty, insanity, and cleverness. His clerics have access to the Trickery domain.
Skoraeus Stonebones. Stone giants revere the King of the Rock, god of buried things, whose clerics can access the Knowledge and Life domains. Stonespeaker Hgraam, a powerful spellcaster, is Skoraeus’s only priest in Gracklstugh.
Law and Order
Minor crime is relatively rare in Gracklstugh. The duergar live by a strict code of honor, and their laws are few, simple, and practical. Both guards and regular citizens can be invisible and watching, which keeps any potential criminals and dissenters uncertain and fearful. A laird may punish any member of his or her clan who commits a crime, but offenses between clans are immediately brought before the Council of Lairds, which resolves matters swiftly and harshly. The code of punishment is simple. Because dishonor, mutilation and imprisonment are a waste of resources and create weakness in society, a duergar who intentionally commits any crime receives a death sentence. Accidental crime by a duergar is compensated by goods or work equivalent to the damages. Derro, slaves or outsiders caught committing any crime can be executed on the spot by any duergar present.
Gracklstugh
Population: 10,000 duergar, 2,000 derro, 50 stone giants, and an unknown number of slaves (quaggoths, grimlocks, orcs, shield dwarves, svirfneblin, and a few kobolds and goblinoids)
Government: Absolute monarchy
Defense: Large standing army with specialized corps; every duergar is trained for battle, and the citizens of the city create a formidable militia
Commerce: Weapons and armor of high quality; various fungi, molds, and exotic creatures for food; trade from across the Underdark and the surface world
Organizations: The Council of Lairds, the Council of Savants, the Merchant Council, the Keepers of the Flame, Clan Cairngorm, the Gray Ghosts, and others
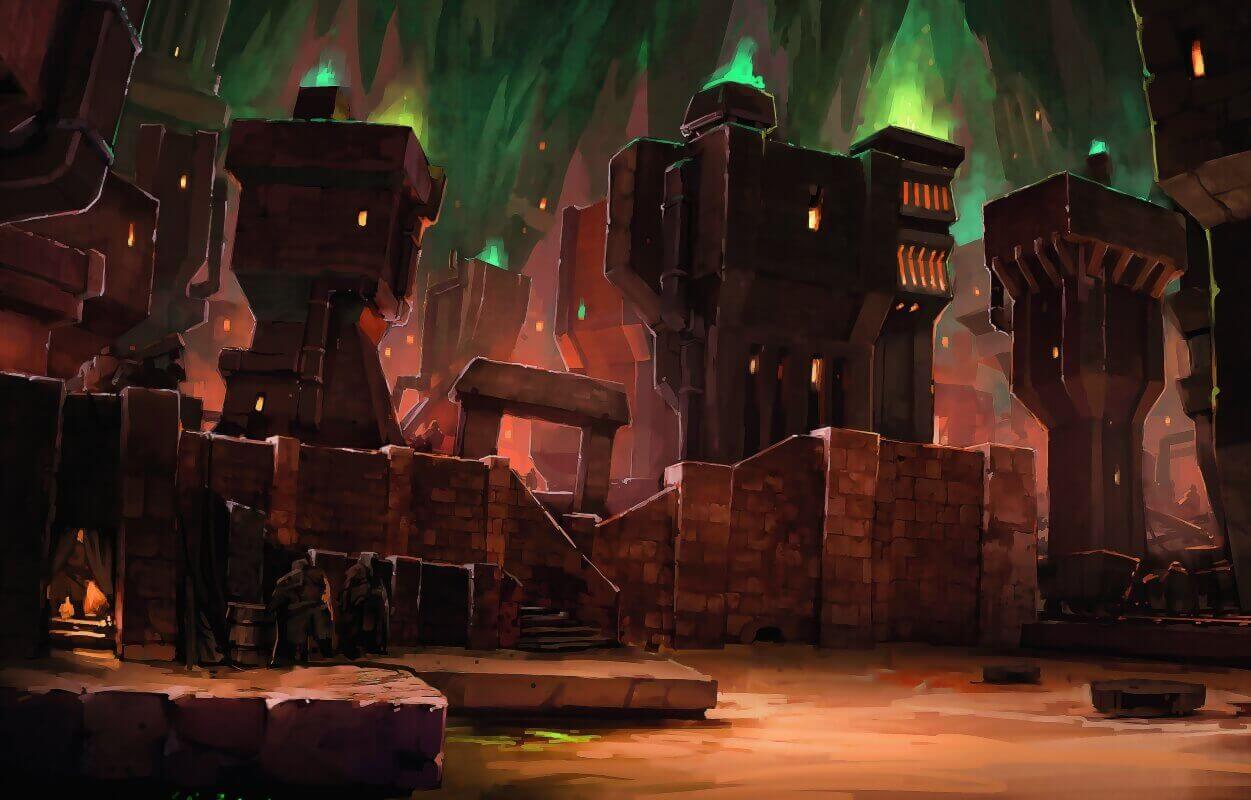
The cavern housing Gracklstugh is split in two by a rift called Laduguer’s Furrow, after the duergar patron god. The north half comprises Northfurrow District, where common workers and the clans devoted to minor crafts make their home, and Darklake District, open to foreigners and where the city’s merchants engage in trade with visitors. As befits a major settlement in a dangerous realm, Gracklstugh places no restrictions on the weapons or gear characters can carry or trade.
Twelve stone bridges lead to Southfurrow District, and then farther south to Flowstone District. These boroughs are reserved for the more prestigious clans and the largest smelters and forges Themberchaud ignites during his flights. The Wyrmsmith’s lair and the cavern complex the stone giants of Cairngorm Clan call home both connect to these districts.
Welcome to the City of Blades
Entering the city is the first major hurdle the characters must surmount in Gracklstugh. Unless they heed Buppido’s advice to arrive by way of the Darklake (or come up with the idea on their own), the characters reach one of the gates. (See “Arriving in Gracklstugh” earlier in this chapter.)
City Gates
The pragmatic nature of the duergar means that all Gracklstugh’s entrance gates are similar in design, for ease of maintenance and the training of guards.
The ground at your feet has been getting smoother and flatter, a welcome respite from the uneven passages to which you have grown wearily accustomed. Eventually, stone tiles become more noticeable, turning the path into a proper road. You can see spots of light in the distance, blue-white and too regularly placed to be phosphorescent mushrooms.
The lights are proper lamps flanking two massive stone gates blocking the tunnel. Before you get a chance to examine the intricate carvings on the gates' surface, a harsh voice hisses from a slit on the cavern wall that was not there before.
“State your names and business!” the voice orders in Dwarvish. Other similar slits open, revealing the tips of a dozen crossbow bolts. Behind you, a metallic din announces a group of six heavily armored dwarves appearing out of thin air, their swords leveled at you from behind sturdy metal shields.
When the characters first reached the road, six duergar watching invisibly started following them at a safe distance. Twelve more duergar soldiers are stationed in guardhouses concealed within the rocky walls of the cavern, all of them aiming heavy crossbows at the party.
The duergar are hostile, and the guard who spoke follows up on every answer the characters give. One character can take the lead in the interrogation by speaking for the party and making a DC 15 Charisma check (Deception and Persuasion apply; Intimidation or Performance are met with scorn). Depending on how believable the party’s story is and how the other adventurers behave during the questioning, you might allow the character to make the check with advantage or impose disadvantage.
The guard grudgingly lets the characters pass if the check succeeds, and refuses them entrance if it fails. If the check fails by 5 or more, the guard gives the order to arrest the characters, announcing that they are now slaves of the duergar (see “Getting Captured” below).
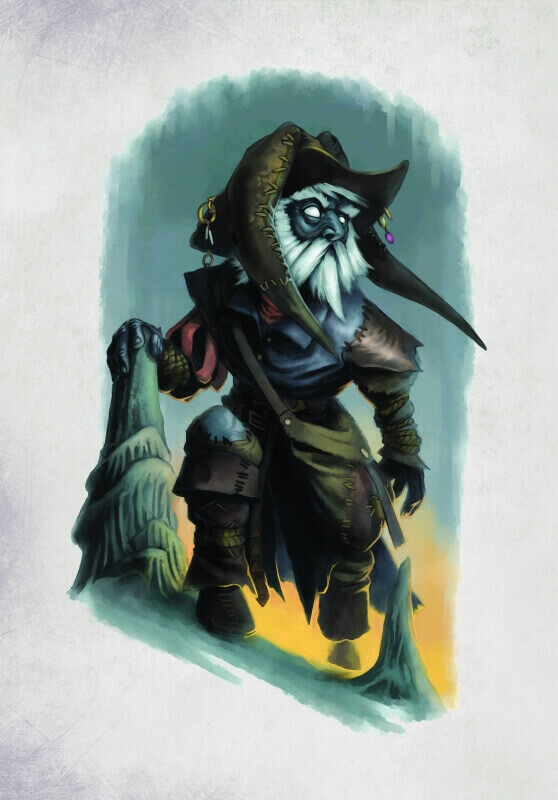
The first time the characters are allowed inside the city or turned away from a gate, a secret door on the wall opens, revealing Gorglak, a duergar Stone Guard.
“Well.” The duergar removes his helmet, revealing the gray skin of his kind. He musses his white beard as he walks closer, switching to Common as he lowers his voice. There is a discomfiting glint in his eyes and his smile. “You are clearly lying. I ought to just send you to the slave pens, but… you amuse me. What do you have that is worth your freedom?”
The duergar waits for your answer, his gaze touching on each of you in turn as he smiles in anticipation.
If they are with the party, Topsy and Turvy, Sarith Kzekarit, Jimjar, and Buppido can whisper to the characters that few duergar are so blatantly corrupt as Gorglak seems to be. A successful DC 12 Wisdom (Insight) check lets a character notice that Gorglak is eying the adventurers' weapons (especially any drow weapons or magic weapons they might have), and that there’s something odd about his behavior. The madness creeping into Gracklstugh has made Gorglak obsessed with rare weapons. He’s willing to go to great extents to acquire new weapons of exquisite design for his growing collection.
Offering Gorglak a worthy weapon for his collection gets the characters through the gate. Any other bribe requires one of the characters to succeed on a DC 13 Charisma (Persuasion) check, or Gorglak is insulted and has the party arrested. If the characters are too open about the negotiation, Gorglak has them arrested and pretends he didn’t say anything.
If Gorglak finds the characters' bribe appealing, he refuses to accept it then and there, instead directing them to find one Werz Saltbaron in the Darklake Docks and hand the bribe to him. Gorglak tells the characters that he will check with Werz at the end of his shift, and will find the characters and arrest them if they have not paid by then.
Characters allowed through the gate are escorted to the Darklake District by four duergar guards, two of whom are invisible. Once the party reaches the edge of the district, the guards leave and return to the posts.
Darklake Docks
Arriving at the Darklake Docks requires a combination of skill, ingenuity, and luck. Vigilance is a little more relaxed here because the guards at Overlake Hold can spot any obvious threat coming from the waters.
After hours of tense navigation, you glimpse an orange glow in the distance. Soon you hear faint metallic echoes, growing louder as you come closer.
Firelight illuminates massive columns with structures built around their bases. The cold air of the Underdark is becoming warmer even at this distance, and you can now see a variety of piers made from zurkhwood, stone, and plain rock jutting out along the edge of a huge cavern.
As the characters draw closer, they can see that the eastern docks are the least crowded. If Buppido is with them, he guides them to a natural rock pier on the eastern edge of the cavern. Otherwise, the characters must make a successful DC 14 group Dexterity (Stealth) check or a DC 15 group Wisdom (Survival) check to guide their boat safely and inconspicuously to an empty dock. If the group check fails, nearby guards notice the characters but don’t immediately identify them as a threat. However, you can choose to impose disadvantage on any checks the characters make to remain inconspicuous during their first day in Gracklstugh.
Getting Captured
Even after making it inside the city, the characters must tread carefully, as the duergar use the slightest pretext to arrest them. Even trying to haggle with a duergar merchant might inspire a call for the guards to take the characters away. Getting caught stealing is punishable by death on the spot, but guards or the offended party might see some value in enslaving the culprits instead, so the characters can be shackled and shipped beyond the Darklake District. Resisting arrest is a truly bad idea; every duergar around is reinforcement.
If the characters get arrested, you can interrupt their transfer with a random encounter or lead them to other planned encounters. The “Rampaging Giant” encounter (which takes place in the Darklake District) is the most likely event to interrupt a prisoner transfer. Alternatively, an agent of the Keepers of the Flame can stop the guards before they take the characters to Overlake Hold (see “Themberchaud’s Lair” for information regarding the keepers' interest in foreign mercenaries).
Possible offers of employment in the Blade Bazaar can also be turned into timely rescues for the adventurers. Otherwise, they end up in Overlake Hold, interrogated by Errde Blackskull.
Darklake District
The Darklake District gives an illusion of openness. The streets are relatively wide to allow for merchant carts and wagons to pass, and the buildings aren’t as crowded around stalagmites as in the southern districts. Openness doesn’t mean welcoming, however. The duergar who ply their trades here are wary off all the foreigners confined by law to this part of the city.
A wave of heat slams against you as an acrid smog rises to choke the air out of your lungs. The Darklake spreads out beyond a jumble of buildings and streets, reflecting the lights of countless fires burning across the city within hollowed-out columns and stalagmites.
Though the streets are crowded, you move easily within the surging throng of buyers, merchants, and slaves. You aren’t the only outsiders here, as you spy drow, svirfneblin, derro, orcs, and other races in the crowds. The shouting of people blends with the sound of distant hammering to create a constant, distracting din.
Behind the forbidding walls separating the Darklake District from the rest of the city stand the docks, markets, and shops where Gracklstugh’s commerce and trade are conducted. The many duergar merchants—along with drow, svirfneblin, orcs, and others—pay little attention to the characters unless they are looking to do business.
Guards posted at the gates make it clear to the characters that non-duergar are restricted to the Darklake District, and the characters have better luck asking other outsiders for directions rather than trying to engage the duergar locals. They are directed to the Blade Bazaar if they wish to sell anything they might be carrying with them. For gossip and a meal, the Shattered Spire tavern is recommended, while lodging for non-duergar can be had at the Ghohlbrorn’s Lair inn.
At any point during which the characters move from point to point in the Darklake District, they can witness one or more of the following events.
Rampaging Giant
This encounter triggers possible side quests through which the characters can learn about the influence of Demogorgon in Gracklstugh. You can use this event any time during the party’s stay in the city. Holding it for later use gives characters a chance to notice the little things wrong among the duergar, while using it right away can help characters avoid being enslaved if they are arrested at any point during their visit.
The rhythmic hammering of the city’s forges is drowned for a second by a thundering roar and the sound of crumbling rock. Duergar and visitors alike turn to look as a two-headed, gray-skinned giant bursts through a gate, howling madly and lashing out left and right, littering the plaza with rock and stone debris. As he bellows, one of his swings connects with a duergar soldier, whose broken body flies through the air and crashes near you with a sickening crunch.
A stone giant from Cairngorm Cavern has succumbed to a demonic curse that has caused him to grow a disfigured second head. A successful DC 12 Wisdom (Insight) check reveals that the giant is crazed and terrified. Use the stone giant stat block with the following modifications:
- The giant has advantage on Wisdom (Perception) checks and on saving throws against being blinded, charmed, deafened, frightened, stunned, or knocked unconscious.
- The giant is unarmed. As an action, it can make two unarmed strikes (+9 to hit, reach 10 ft., one target). On a hit, the giant deals 13 (2d6+6) bludgeoning damage.
The rampage happens in a broad plaza, so there is plenty of space for the different combatants to maneuver.
The giant moves in the characters' direction and lashes out. Two duergar guards and two Duergar xarrorn respond to the giant’s roaring, racing in to join the fight in the second round. They are well trained and do their best to help, but to avoid additional complexity during the encounter, assume that the duergar act at the end of the initiative order and deal a flat total of 10 damage to the giant each round.
Bystanders take cover at once, but duergar citizens are ready to jump in if the guards fail to contain the threat. The giant ignores characters attacking from range and attacks opponents in melee at random, including the duergar. Both the giant and the guards fight until they drop to 0 hit points.
Development
Without the characters' help, the guards and assisting citizens bring down the stone giant with few casualties. If the characters are prisoners under escort when the giant attacks, the guards who engage the giant are their escort. The characters can use this chance to escape, or they can help, albeit with disadvantage on attack rolls if they are shackled. The duergar are pragmatists and release characters who help them deal with the giant’s threat, but they attempt to arrest them again after the combat is over.
Once the crazed giant is put down, another stone giant comes through the shattered gate, but this one looks perfectly sane. He reaches the fallen giant at the same time as a squad of three Duergar stone guard.
The guards who fought alongside the characters explain the situation, neither downplaying nor exalting the characters' actions. The characters can speak to the newly arrived giant while the duergar confer. The giant introduces himself as Dorhun, apprentice to Stonespeaker Hgraam. He reveals that the fallen giant’s name is Rihuud, and that he was another of the Stonespeaker’s apprentices. Rihuud was “communing with the stone” in Cairngorm Cavern when he went mad, sprouted a second head, and stormed out.
If the party was not previously arrested and didn’t participate in the fight, the Stone Guards start questioning bystanders, who eventually point out the characters as new arrivals to the city.
If the characters knocked Rihuud unconscious instead of dealing a lethal blow, a grateful Dorhun asks them to visit Cairngorm Cavern before they leave the city, informing the Stone Guards of this. The importance of the Stonespeaker means that the Stone Guards will escort the party across the city to meet with him, though they don’t hide their displeasure at doing so.
XP Awards
Divide 1,740 XP equally among the characters if they cooperate with the guards to defeat the two-headed stone giant.
Guests of the Stone Guard
Whenever circumstances see the Stone Guards develop an interest in the party (including being arrested or witnessing the giant’s rampage without taking part), the characters are ordered to follow a squad of duergar to Overlake Hold for further questioning.
From this point, the adventure can take different paths depending on how you want to proceed. Talk to the players about their preference, or decide on your own what happens next:
- Gartokkar Xundorn intervenes on behalf of the Keepers of the Flame, which can lead to a meeting with Themberchaud (see “Themberchaud’s Lair”).
- The characters can continue to Overlake Hold and meet with Captain Errde Blackskull (see “Overlake Hold”).
- The drow scout Xalith approaches the Stone Guards, claiming the characters as escaped property of her mistress, Ilvara (see “Signs of Pursuit” in the “Blade Bazaar” section). The Stone Guards arrest the characters and take them to Overlake Hold, pending negotiations with the drow. At this point, they also meet Captain Errde Blackskull.
- Droki (see “Droki” in the “Blade Bazaar” section) accidentally bumps into the patrol, creating a distraction that allows the characters to escape.
- A successful DC 15 Charisma (Persuasion) check convinces the Stone Guards not to arrest the characters, provided the characters agree to visit Overlake Hold once their business in Gracklstugh is concluded. The party remains under watch at all times by an invisible duergar Stone Guard. If it seems like the characters have done what they came to do, the invisible duergar reminds them to make good on their promise to visit Overlake Hold.
Blade Bazaar
This marketplace is named after the most abundant goods the duergar offer, but the shops here sell almost everything available in the city, along with stalls set up by visiting merchants. The din of people arguing, mostly in Dwarvish, nearly drowns out the hammering coming from the city’s forges, and the crowds here offer a good chance to slip away from pursuers.
Characters can unload some of the treasures they might be carrying. Nonmagical weapons, armor, and shields can be purchased in the Blade Bazaar.
Merchant Madness
Characters who look around the bazaar notice a number of odd things:
- A duergar merchant can’t stop insulting customers when they are trying to sell something, but becomes a picture of politeness when they want to buy.
- A number of duergar merchants give different prices to buy or sell every time they are asked about the same items, and insist that the characters dealing with them are the ones changing their terms.
- A duergar merchant suddenly turns invisible in the middle of a transaction, but keeps speaking as if nothing has happened.
- A duergar merchant threatens to kill the characters as a haggling technique, then denies ever saying so.
- A duergar merchant constantly asks the opinion of a nonexistent twin brother, claiming that he is invisible.
Ylsa’s Deal
Ylsa Henstak is a female duergar member of the Merchant Council. She’s a canny caravan master and prides herself on always arriving at her destination ahead of schedule. If the characters ask around for merchants who know how to reach the surface, they are directed to Ylsa. Though she has no caravans scheduled anytime soon, she does make the characters an offer.
Ylsa invites the characters into her well-guarded office, where she shows them a pile of coins and jewelry from all over the surface world. The hoard consists of 80 gp in mixed coinage, three gold rings worth 25 gp each, and two gem-inlaid necklaces worth 250 gp each. She has tracked the pieces to derro, who use them to pay for food. If the characters can figure out how the derro are getting surface currency and jewelry, Ylsa will provide the adventurers with directions for at least the next stage of their journey, including valuable advice on routes to Blingdenstone (see chapter 6) and the Wormwrithings (see chapter 12).
Droki
Attentive characters can spot a curious figure darting between the stalls and shops of the Blade Bazaar. Every time they roam the market, they have a 20 percent chance to see a derro dressed in rags styled as an imitation of a fancy jacket, wearing a wide-brimmed hat with two tentacles from a displacer beast sewn into the hat’s crown. A large satchel hangs from his shoulder, and he’s always muttering to himself.
Duergar merchants glare scornfully at this derro, and none will discuss him with the characters. If a character asks about him in the Ghohlbrorn’s Lair, a successful DC 12 Charisma (Persuasion) check yields up the name “Droki,” and identifies the wily derro as a courier and supplier of goods who works for disreputable employers.
Catching Droki is the objective of quests from Errde Blackskull (see “Overlake Hold”) and Gartokkar Xundorn (see “Themberchaud’s Lair”), but if the characters pursue the courier openly, he flees for the West Cleft District. Pursuing characters quickly lose sight of the derro as he vanishes into the crowd. See “Finding Droki” in the “Whorlstone Tunnels” section for more information on what Droki is carrying if the characters catch him.
Signs of Pursuit
If the characters arrive in Gracklstugh with a drow pursuit level of 3 or higher (see “Drow Pursuit” in chapter 2), Ilvara has already sent a party ahead of them, guessing correctly that the escaped prisoners might seek refuge with the duergar.
Characters with a passive Wisdom (Perception) score of 15 or higher spot six drow watching them in the Blade Bazaar. One of them is Xalith Masq’il’yr, a female drow allied with House Mizzrym. Any of the party’s NPC companions who know the duergar well can guess that these drow won’t want to attract the duergar’s attention to their “lost property.” Doing so would likely involve having to pay the gray dwarves a reward for the adventurers' capture. This gives the characters a chance to evade their pursuers, but they need to stay out of sight.
Xalith speaks to the duergar only if the characters are arrested. Otherwise, she sends a messenger to Ilvara and makes sure the characters don’t go anywhere without her knowing. If the characters fail to lose themselves in the city (see “Gracklstugh and Drow Pursuit” earlier in this chapter), their pursuit level increases by 1 every 1d4 days until Ilvara arrives.
Alternatively, the adventurers might decide to turn the tables on the drow. Characters might figure out a way to quietly neutralize Xalith and her squad, perhaps tricking them into damaging a duergar merchant’s property or forcing them outside Darklake District, where even drow are forbidden to go. Doing so decreases the pursuit level by 2. However, if combat ever breaks out between the characters and the drow, a squad of five duergar stone guard and five duergar warriors arrive within 1d4 rounds and arrest the lot of them (see “Getting Captured”).
Darklake Brewery
This huge, ramshackle brewery is built of stone blocks stacked to make walls between the petrified stems of a small forest of gigantic mushrooms. Big copper vats steam within, filling the air with a heavy, yeasty stink. Dozens of copper kegs stand nearby, and burly gray dwarves swarm over the place, mashing fungus, mixing fermenting masses, and filling casks with freshly brewed ale. This complex is the workplace and home of Clan Muzgardt, the duergar clan in charge of brewing Darklake Stout and in control of the brewing and importation of other spirits. Non-duergar aren’t welcome inside the brewery.
Darklake Docks
These busy docks are used primarily by flat-bottomed rafts made of zurkhwood and lacquered puffball floats. Some of these ramshackle barges come with oars or paddle wheels. The rafts look ungainly, but each can carry tons of trade goods.
The characters land at the easternmost inlet if they arrive at Gracklstugh by way of the Darklake, near the Ghohlbrorn’s Lair inn. If they instead arrived through a gate and successfully bribed Gorglak, they might come here looking for his contact, Werz Saltbaron.
Assassins Interrupted
The characters spot a male duergar merchant at the end of a pier. Suddenly, two invisible duergar appear next to him and stab him viciously with glowing swords. The assassins' faces are masked and hooded. The characters have 2 rounds to distract the two duergar soulblade before they finish off the merchant.
The merchant is Werz Saltbaron. If the characters save him, he is grudgingly grateful and says he has no idea why the assassins targeted him. A successful DC 12 Wisdom (Insight) check suggests he’s lying. He flees the scene, but not before telling the characters to meet him at the Shattered Spire the following day so he can reward them properly.
The characters have 1 minute to search the assassins before a patrol of four duergar arrives. The glowing weapons wielded by the assassins are nowhere to be found, but one of the assassins has a piece of fish-skin parchment bearing Werz’s likeness drawn in charcoal.
Access to the Whorlstone Tunnels
Hidden next to the easternmost pier, a disabled drainage pipe is the Gray Ghosts' access point to a secret cavern system beneath Gracklstugh (see “Whorlstone Tunnels”). It takes a successful DC 15 Wisdom (Perception) check to notice the pipe beneath piles of refuse. Within, loose bars block the 5-foot-wide passage, but removing them activates an alarm that warns the Gray Ghosts inside the caverns. A character can notice the alarm’s trigger-a thin wire connected to the top of one of the bars-with a successful DC 14 Wisdom (Perception) check, and can disable it with a successful DC 12 Dexterity check using thieves' tools.
Nearly 100 feet into the pipe, a hatch on the floor opens into a rough-hewn well. A ladder extends down 80 feet to another hatch on the floor, which leads to area 8 in the Whorlstone Tunnels.
Overlake Hold
Dunglorrin Torune, which translates as Overlake Hold, is a fortress and temple dedicated to Laduguer carved into the heart of a massive stalagmite on the shore of the Darklake. It is also the home of the Deepking and the center of government. Dunglorrin Torune bristles with forge chimneys from which smoke billows and ledges from which catapults can hurl stones at waterborne invaders. (If necessary, use the mangonel statistics in chapter 8 of the Dungeon Master’s Guide.)
Conscripted by the Stone Guard
If the characters are arrested, they are taken to the hold’s dungeons, where they receive a chance to earn their freedom by serving the Stone Guard.
After waiting a long while in a dungeon cell carved out of impressively thick stone, you are taken to a dark office and met by an imposing female gray dwarf. She is fully armored and bears an insignia you have not seen on any other duergar. She is flanked by two Stone Guards who remain by the door.
“I am Captain Errde Blackskull, commander of the Stone Guard,” she says, giving each of you a calculating look. “Let me start by saying you are worth nothing here in Gracklstugh. Most of those in my command would sell you off in a heartbeat as the cheapest manual labor. However, I’ve learned to make much better use of adventurers like you.”
Search for Droki. Errde explains that her guards have been tracking the movements of a derro named Droki. Despite his presence in the Darklake District, the derro has managed to avoid capture, as if he somehow knows in advance where the duergar patrols will be—invisible or otherwise. All the Stone Guards know is that Droki lives in the West Cleft District, a place the duergar enter only in force and where their presence would likely provoke a chaotic uprising. Errde wants the characters to follow Droki, see what he does and where he goes, and report back. Or if they see an opportunity, seize him and either bring him in for questioning, or kill him and bring back evidence of his activities.
Errde’s tone turns dark as she voices her suspicions that Droki is linked to a conspiracy involving the Council of Savants, and maybe even elements among the clan lairds. She describes in detail how discovering the conspiracy and purging the corrupt will earn her great favor with the Deepking. Errde swears (truthfully) that she will arrange for the characters to get safe passage out of Gracklstugh if they do as she asks.
Search for Corruption. Errde’s suspicions of conspiracy have her looking for signs of corruption creeping among the people of Gracklstugh. She rewards the characters if they bring her evidence of such corruption that has escaped the eyes of her warriors. The characters can build a case if they witness odd events throughout Gracklstugh, such as some of the random encounters and the behavior of merchants in the Blade Bazaar. For every three such events they report, the characters can attempt a DC 15 group Charisma (Persuasion) check, but they only need to succeed once to convince Errde and complete this quest. Errde then promises to outfit the characters with supplies and gear when they leave Gracklstugh, from the Stone Guards' own armory. Each character can claim a total of 350 gp worth of equipment, including weapons, armor, and common potions and scrolls.
Development
If the characters refuse Errde’s offer after being arrested, they spend a few days imprisoned and then are sold back to the drow. Xalith and her squad meet up with Ilvara and then return to Velkynvelve, if the characters can’t manage to escape from their captors.
If the characters accept Errde’s offer, she gives them insignias allowing them to move as far south as Laduguer’s Furrow without being accosted by guards. The adventurers need only to show the insignias discreetly when confronted, and should keep them hidden otherwise. They are then released without fanfare. Errde knows about the stone giants' invitation if the characters spared the twoheaded giant’s life, and advises the characters to heed it before looking for Droki.
The characters' pursuit level is reduced to 0 and remains so while they are in Errde’s employ inside Gracklstugh. If they end their employment, the Stone Guards stop covering for them and their pursuit level increases as normal if Xalith is in town (see “Signs of Pursuit” in the “Blade Bazaar” section). Otherwise, it remains at 0 until some other action raises it again.
Flashing Badges
Working for either the Stone Guard or the Keepers of the Flame grants characters a degree of freedom in Gracklstugh, as they can show the insignia given to them by each faction if they are detained. At least one character in the party must succeed on a DC 14 Charisma (Persuasion) check to convince duergar not to detain the party any longer, but characters who show the insignia have advantage on the check.
The Shattered Spire
A broken stalagmite juts out from the Darklake about forty feet from the shore, forming the foundation of a tavern built with fungi stalks in a manner similar to a log cabin. A bridge woven of rothe wool allows patrons to cross the water to visit.
Meeting Werz
If the characters rescued Werz Saltbaron from the assassins (see “Darklake Docks”), he meets them at the Shattered Spire at the designated date and time. As modest thanks for saving him, he gives each character an obsidian gemstone worth 10 gp. He then offers them a job, delivering a sack full of raw gemstones (worth 100 gp total) to a svirfneblin named Kazook Pickshine in Blingdenstone, no questions asked.
Jimjar, Topsy, and Turvy know of Kazook Pickshine and can provide basic information about the gnome alchemist (see chapter 6). The deep gnomes also recognize that Werz’s gems resemble empty spell gems, similar to those used in the defense of Blingdenstone. The gems, mundane in their current form, are actually raw stones used in the crafting of spell gems. Werz met Kazook in Mantol-Derith (see chapter 9), and the two have been trading recently behind their superiors' backs. He declines to mention this, though, deflecting any questions by mentioning that Blingdenstone is a good place to find a way out of the Underdark.
Bar Fight
While the characters are in the tavern, two duergar who had been just talking business suddenly fly into a rage and start brawling. If the characters don’t intervene to stop the fight, other patrons do. No guards appear unless weapons or spells come out, and the fight stops as soon as any of the brawlers is restrained or knocked unconscious. Neither of the duergar remember why they started fighting.
The Ghohlbrorn’s Lair
This inn is the only establishment in Gracklstugh that accepts non-duergar guests. “Ghohlbrorn” means “bulette” in Dwarvish, and the inn is built inside a small cavern complex beneath the Blade Bazaar at the northern end of the Darklake District. Its halls are cold and damp. A central chamber serves as a dining room, branching out into different small, twisting halls along which the rooms are excavated. It’s dark, cramped, and uncomfortable, but safe and defensible.
Rumor Mill
The inn’s dining hall gives characters a chance to mingle with non-duergar who are visiting Gracklstugh. Characters seeking information can, with a successful DC 10 Charisma (Persuasion) or Intelligence (Investigation) check, find out the following information, or you can simply roleplay their interactions with random patrons.
The general gist of the information is that trade routes out of Gracklstugh have become more dangerous recently. The fauna and more primitive denizens of the Underdark are all riled up about something. Among the tales told by the travelers, second-hand stories about demons attacking isolated settlements are common.
Laduguer’s Furrow
Long ago, an earthquake split the cavern that houses Gracklstugh, leaving a rift nearly two hundred feet deep and five hundred feet wide. Laduguer’s Furrow has a packed-gravel floor and extends roughly a quarter mile beyond the natural walls of the city in both directions. Each end of the rift has a steeply sloping floor, carved with a set of stairs and a wide ramp for both pedestrians and wagons. Vents along the walls release potent gases that sappers of Clan Xardelvar tap for industrial applications, including the crafting of the magical flame lances used by Duergar xarrorn warriors.
The chasm is Gracklstugh’s main residential zone, with homes built on the top part of its north and south sides. Outsiders are normally forbidden from this area.
Abandoned Guardhouses
Near the western gate of Laduguer’s Furrow, the duergar built a series of guardhouses to keep an eye on derro slaves living in the West Cleft. These were abandoned when Deepking Tarngardt, grandfather of the current monarch, liberated the derro, allowing them to spread from the West Cleft District into the East Cleft District. The guardhouses now stand empty, providing an ideal place to lie low and keep an eye on traffic in and out of the eastern derro boroughs.
Great Gates
The openings that Laduguer’s Furrow creates in the walls of Gracklstugh’s cavern are blocked by massive structures of bars and scaffolding, each set with several gates. Gates are guarded by two visible duergar soldiers and 1d4+3 invisible ones.
Chasing Droki
If the characters decide to wait for Droki to enter the West Cleft or somehow follow him here, use the chase rules in chapter 8 of the Dungeon Master’s Guide, adapting the results for urban complications to a cave full of hateful derro. If Droki loses them, the characters must resort to less convenient means of finding the Whorlstone Tunnels.
If the characters do manage to catch Droki in the West Cleft, he drops limp and babbles, but is suspiciously amenable and shows the characters the entrance to the tunnels. See the “Whorlstone Tunnels” section for how to roleplay Droki.
West Cleft and East Cleft Districts
East and west of Laduguer’s Furrow gates are areas that serve as home to Gracklstugh’s unwanted derro population. The West Cleft District was the original abode for the city’s derro slaves and remains a dark and dangerous ghetto. The East Cleft District was more recently settled after the derro earned their freedom, though it is only slightly less rough than West Cleft.
The homes of the derro are mostly burrows carved into the walls and simple structures piled atop one another. The dirty and cluttered streets of both districts formed as dwellings spread and came together, and not as a product of planning. The derro population is much greater and their tunnels extend much farther than the duergar believe. The derro are close to mounting an insurrection, held back only by their own lack of organization and by their leaders in the Council of Savants having grown too used to their privileges to foment rebellion.
Entering Derro Territory
The derro are automatically hostile toward anyone entering their warrens, especially surfacers.
As you pass through the gates, the stench in the air changes from acrid and metallic to fetid and repugnant, the fires of industry replaced by squalor. The homes in this part of Gracklstugh are crudely carved from the rock or are just holes in the walls, arranged in no apparent order. The chatter in the air is unnerving, with hundreds of derro muttering, screaming at each other, and otherwise reveling in their insanity. Those who spot you look at you with a burning hatred.
At the end of each hour the adventurers stay inside either derro area, there is a 25 percent chance that 2d4 derro attack without warning. If the characters kill any derro, the chance of another attack becomes 50 percent every half hour.
Sneaking through the senseless arrangement of the burrows is relatively easy, as the derro are normally too preoccupied with their own mad scheming to notice a group trying not to attract attention. The characters can attempt a DC 10 group Dexterity (Stealth) check, with success negating the need to roll for a possible attack at the end of each hour or half hour.
Other means of subterfuge such as illusions, climbing along the walls, or using flying or levitation magic automatically avoid detection, but invisibility of any kind activates magical wards placed by derro savants to guard against duergar intrusion. When a ward activates in response to the presence of an invisible creature, nearby derro fly into a frenzy, creating a chaotic mob meant to drive away invisible duergar patrols. Derro make active Wisdom (Perception) checks contested by the characters' Dexterity (Stealth) checks if a ward is activated. Characters using
Access to the Whorlstone Tunnels
Between a cluster of hovels in West Cleft lies the most well-used entrance to the Whorlstone Tunnels (see “Whorlstone Tunnels”). A narrow fissure in the chasm wall is hidden by scraps of cloth, gray sheets of canvas, and moldy boxes. The fissure is tall and wide enough for a Medium creature to squeeze through the first 10 feet, and then continues for 50 feet at an average 5 feet in width, with a gentle downward slope.
Ever since the foul irruption of the demon lords into the Underdark, the fissure is easier to find, as it sometimes leaks wisps of eerie fog created by faerzress. Otherwise, finding it requires careful searching and a successful DC 15 Wisdom (Perception) check. Each character can make this check at the end of each hour the party spends in the West Cleft warrens looking for the Whorlstone Tunnels' entrance.
Any attempt to question the locals without an effective means of disguise or manipulation, such as enchantment or illusion magic, is doomed to fail, as the derro are more likely to attack the characters than answer their questions. Even then, the derro are often incoherent, and a successful DC 15 Charisma (Persuasion) check is needed to obtain useful information. A successful DC 15 Charisma (Intimidation) check also works, but has a 50 percent chance of inspiring the derro to flee or attack.
Halls of Sacred Scrolls
The Halls of Sacred Scrolls comprise a temple of Diirinka carved into a stalagmite in Northfurrow District. Here, the derro Council of Savants meets and plots, living in luxurious quarters and hiding such opulence from their fellow derro. All areas of the Halls of Sacred Scrolls except the central worship chamber are forbidden to derro who aren’t savants. Duergar don’t enter this place, whose main doors are false and carved into the rock. The savants enter and leave using spells such as
Cairngorm Cavern
A long tunnel opens in Southfurrow District, extending several hundred feet and into the home of the stone giants of Clan Cairngorm. The tribe is named after the ancient oath of fealty their ancestors swore to the bearers of the Cairngorm Crown, the traditional regalia of Deepkingdom monarchs. The giants lead simple, uncomplicated lives, and their dwellings reflect this.
The stone giants value their privacy, and duergar are normally not allowed inside Cairngorm Cavern. An exception is made for the Deepking, who holds meetings here with the giants' leader, Stonespeaker Hgraam, when necessary.
Audience with the Stonespeaker
If the adventurers helped stop the rampaging giant in the Darklake District (and especially if they didn’t kill him), Hgraam is expecting them by the entrance to the Cairngorm Caverns. Though the stone giant is short on pleasantries, he gives the characters what information he can in response to their questions, including ways to return to the “dreamlands,” as the stone giants call the surface world. Because he has never left the Underdark, the paths he knows have come to him only as whispers through the stone. As such, you can easily shape his advice to your players' plans.
Additionally, Hgraam gives the characters a warning:
“Something evil stirs in the Underdark. The rock itself cries in pain and horror, and a madness creeps from the blackest depths. Pay heed to the signs surrounding you. A cave with two faces. Rock devoured, and the land overgrown. The pebble believes itself flesh. The earth rejects its wards, and the tunnels shake in fury. By these portents, you shall know of evil’s presence and of evil’s face. This is what the stones tell me.”
This cryptic message refers to the demon lords and the madness their presence is spreading, but Hgraam has not deciphered it yet.
Treasure
As the characters prepare to leave, Hgraam calls for his apprentice Dorhun, who arrives bearing a polished crystal the length of a human forearm. Hgraam offers the crystal to the characters as a token of his gratitude, telling them it might be helpful in the future.
The
Themberchaud’s Lair
At the far southeast corner of Gracklstugh’s cavern, the entrance to Themberchaud’s lair is guarded by the Keepers of the Flame. Not that anyone would be foolish enough to trespass into the Wyrmsmith’s home, but ever since the Gray Ghosts stole a red dragon egg meant to hatch Themberchaud’s successor, the Keepers aren’t taking any chances.
For some time now, the Keepers have been actively seeking capable mercenaries in Gracklstugh and taking any opportunity to press them into service. If an agent of the order intervened in the characters' arrest (see “Getting Captured”), the leader of the Keepers of the Flame-Gartokkar Xundorn-is notified by magical messaging. He waits for the characters as they are brought to the dragon’s cavern-but Themberchaud is watching too.
The dragon speaks Dwarvish to its servants as the characters approach. Read the following:
As the duergar priests lead you to a building carved from the stone just outside a huge cave entrance, the ground trembles slightly, and a thunderous voice echoes against every wall.
“Gartokkar,” the voice calls as a reptilian behemoth comes into view, it scales the color of lava, its bright yellow eyes glowing in the shadows of the cave before coming into the light. “You didn’t say I was having surfacers for dinner today.”
The dragon chuckles at his own wit. His massive body gives the distinct impression that he is overweight, indicating eating habits that don’t bode well.
“Foreigners,” the duergar priest says with great reverence, “meet the Father of Flame, the Everburning, and the Foundry’s Heart-Themberchaud, the Wyrmsmith of Gracklstugh.”
Agents of the Wyrmsmith
Like most of his kind, Themberchaud is vain and proud. He’s pampered, but also restless. The adult red dragon has been aware for several years that his handlers are withholding things from him, but rather than demand disclosure, he has waited and observed. He wants agents of his own, and sees the interest of the Keepers in the adventurers as an opportunity.
The dragon demands to speak with the characters in private, with his nervous duergar handlers having no choice but to acquiesce. When they escort the characters into the dragon’s lair, Themberchaud is resting on a mountain of gold. He tells the keepers to leave him alone with the adventurers, hissing that any invisible lurkers will be turned to ash. Once alone, he asks the characters their names, backgrounds, how they found themselves in the Underdark, and the events that led them to Gracklstugh.
Themberchaud makes the characters an offer: become his agents in Gracklstugh, and gain his protection. Their first mission is to do whatever the Keepers of the Flame ask them to - but to report to Themberchaud before reporting to them.
The dragon doesn’t wait for the characters to respond, since his ego can’t accept the notion that anyone would refuse him. He assigns Gartokkar to be their liaison, orders badges of gold be given to them, and sends them off.
Treasure
The characters might be tempted to inspect Themberchaud’s hoard from where they stand, as the dragon doesn’t allow them to get closer than 60 feet in front of him. The hoard consists of 3,000 pp, 20,000 gp, 45,000 sp, 150,000 cp, six 1,000 gp fire opals, ten 500 gp peridots, thirty 100 gp garnets, a gourd containing oil of sharpness, a potion of flying, a potion of longevity, and a potion of supreme healing. The magic items are buried under coins and not visible at a glance. One must dig through the coins to find them.
A character who tries to get closer receives a friendly warning in the form of a growl, a stare, and claws clicking on the floor. Themberchaud uses his breath weapon on any character who tries again, or who attempts to sneak past him and fails. Then he calmly carries on as if nothing happened.
A Task for the Keepers
When the characters are done with Themberchaud, they exit the lair to where Gartokkar waits to take them to the guard house where the Keepers of the Flame keep watch. He darkly asks what business the dragon had with them, but what the characters choose to tell him (and whether they intend to follow up on the dragon’s orders) is up to them.
The power of the Keepers of the Flame derives in equal measure from their psionic abilities, the leadership of the Deepking, and their influence over Themberchaud. They lost face when the Gray Ghosts stole the valuable red dragon egg that would hatch Themberchaud’s replacement, and they have been waging war on the thieves' guild ever since. But with the egg still lost and their control over Themberchaud waning, the Keepers are exploring all options in their war against the Gray Ghosts.
The psionic Keepers have sensed a great disturbance in the Underdark - a phenomenon that Gartokkar compares to a hole having been torn through the world. The Keepers have no idea about the demonic incursion, however, and even if the characters tell Gartokkar what they know, he is fixated on the idea that the Gray Ghosts are behind the disturbance, dismissing anything else as delusions, ignorance, or outright lies.
In his paranoia, Gartokkar wants the characters to confirm the Gray Ghosts' involvement and to bring back whatever powerful magic the thieves used to cause the disturbance. The Keepers have identified a Gray Ghost agent-a derro called Droki, who carries messages and supplies for the thieves' guild (see “Droki” in the “Blade Bazaar” section). Droki uses the West Cleft to contact his employers, and Gartokkar wants the party to follow this derro and locate the Gray Ghosts.
If the characters accept his offer, Gartokkar gives them a holy symbol of Laduguer after an acolyte arrives with gold pins featuring Themberchaud’s profile. The symbol and the badges grant characters the right to travel beyond the Darklake District, though they are still limited from moving freely in the city (see the “Flashing Badges” sidebar). If they refuse, they are turned over to the Stone Guards for arrest and delivery to Overlake Hold.
Whorlstone Tunnels
The Whorlstone Tunnels are a cavern system extending partially underneath Gracklstugh, away from the mines and passages the city’s inhabitants use regularly. The derro savants who first found the tunnels didn’t reveal their discovery to anyone, and to this day only a handful among the Council of Savants and the Gray Ghosts know about them.
The long, gently curving tunnels have relatively regular dimensions. They are known for their unusual rock formations and abundant patches of fungi, and for being suffused with faerzress (see chapter 2).
There are currently two factions using the tunnels for their own ends. The Gray Ghosts have an alchemical laboratory and a fungal garden supplying them with poisons, and the leaders of the guild conceal a secret in the form of a mysterious black obelisk in the farthest cave (see area 16). The other group is a budding cult of derro demon worshipers led by a renegade member of the Council of Savants. Sensing that the demon lords are somehow using faerzress to spread chaos and madness, the demon worshipers have begun conducting rituals to infect Gracklstugh. Intent on weakening the city and breaking the power of King Horgar Steelshadow V, the cultists plan to inflict a curse on the stone giants of Clan Cairngorm that causes them to grow second heads, driving them insane.
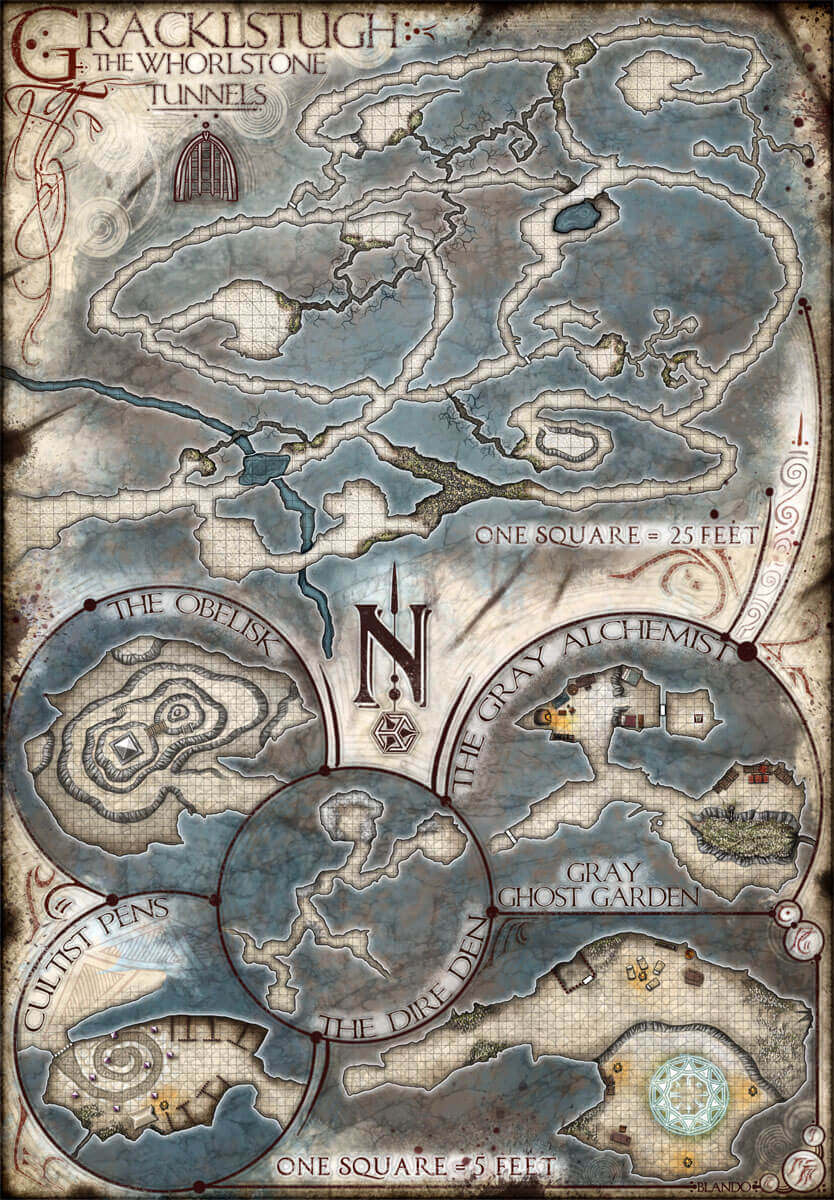
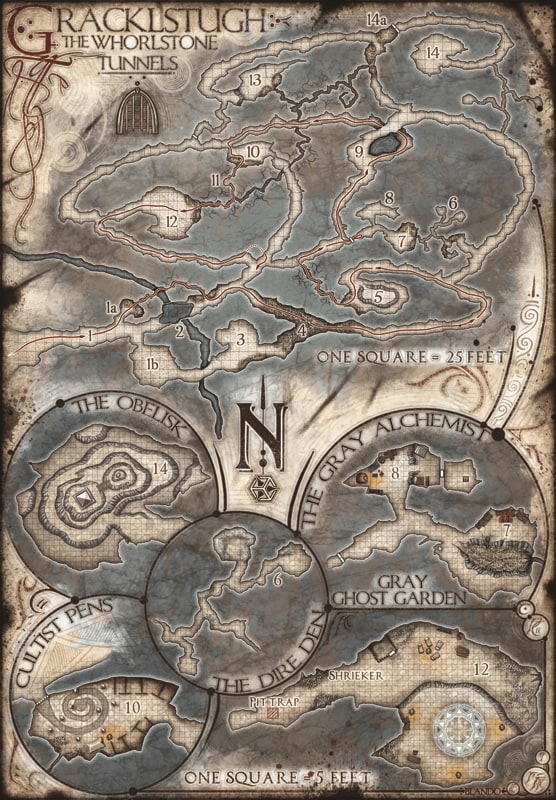
Whorlstone Tunnels: General Features
The following features are prevalent throughout the Whorlstone Tunnels.
Ceilings and Floors. The average ceiling height is 50 feet, dropping to 25 feet in narrow tunnels.
Narrow Tunnels. The narrowest tunnels are barely 2 feet wide at their widest points. A Tiny creature can move through these tunnels unimpeded, while a Small creature must squeeze to pass through them. Medium and larger creatures can’t fit through these narrow passageways.
Faerzress. The Whorlstone Tunnels are suffused with faerzress (see “Faerzress” in chapter 2 for effects). Faerzress has also altered the physical appearance of the complex, creating spiral patterns on the walls and ceilings. These spirals are what give the complex its name. Because of these weird spiraling patterns, saving throws to resist faerzress-induced madness are made with disadvantage.
Foul Water. Water from the Darklake drips from stalactites and trickles through cracks in the walls, forming narrow streams and shallow pools throughout the Whorlstone Tunnels. Any creature that drinks the foul water must succeed on a DC 12 Constitution saving throw or become poisoned. The poisoned creature can repeat the saving throw at the end of each hour to end the effect.
Edible Fungi. Edible fungi (including pygmywort and bigwig) are abundant in the Whorlstone Tunnels. Characters can attempt DC 10 Wisdom (Survival) checks to forage here.
Faerzress-Suffused Fungi
The Whorlstone Tunnels are home to two unique kinds of faerzress-suffused mushrooms: bigwigs and pygmyworts. Any character who studies these mushrooms can identify their magical effects with a successful DC 15 Intelligence (Nature) check, an identify spell, or by trial and error. A single nibble of a mushroom alters a character’s size by a few inches for 5 minutes, so characters foraging for food might discover the mushrooms' magic by accident. The size-altering effects of eating multiple bigwigs or pygmyworts aren’t cumulative, although their durations are. These mushrooms lose their properties if they are taken outside the Whorlstone Tunnels for 1 hour or more.
Bigwig
A bigwig is a four-inch-tall mushroom with a thin stem and a wide purple cap. A creature that eats one can choose to make a DC 12 Constitution saving throw to not be affected by the mushroom’s magic. If the creature fails or forgoes the saving throw, it grows in size as though under the enlarge effect of an
Pygmywort
A pygmywort is a mushroom with a one-inch-long stem and a stubby blue cap with white dots. A creature that eats one can choose to make a DC 12 Constitution saving throw to not be affected by the mushroom’s magic. If the creature fails or forgoes the saving throw, it shrinks in size as though under the reduce effect of an
Whorlstone Tunnels Random Encounters
As the characters explore the Whorlstone Tunnels, they can run into various creatures or hazards. Check for an encounter whenever the characters are moving along a stretch of tunnel or at the end of a long rest. Roll a d20 and consult the Whorlstone Tunnels Encounters table to determine what, if anything, they encounter.
Whorlstone Tunnels Encounters
| d20 | Encounter |
|---|---|
| 1-10 | No encounter |
| 11-12 | 1 carrion crawler |
| 13 | Demon pack |
| 14 | 1 flumph |
| 15 | 1 gray ooze |
| 16 | 1d4 moldy quaggoth spore servants |
| 17 | 1d4 two-headed grimlocks |
| 18 | 1 swarm of insects (centipedes) |
| 19 | 1 xorn |
| 20 | Yellow mold |
Carrion Crawler
There’s a 50 percent chance that the carrion crawler is feasting on the putrid flesh of a dead grimlock and ignores the party unless disturbed. Otherwise, it is scouring tunnels for food and attacks the party on sight. It prefers to attack while clinging to the ceiling.
Demon Pack
This pack consists of a quasit leading 1d4+2 dretch. The quasit turns invisible and tries to escape when only two dretches remain; if it succeeds, the cultists in area 14 are alerted. Replace any subsequent demon pack random encounter with 1d4 derro.
Flumph
This creature telepathically asks the characters to rid the cave complex of the derro cultists (see area 14) because it knows what they’re trying to do and wants to stop them. If the characters agree and seem friendly, the flumph offers to accompany them indefinitely. It will not willingly leave the Underdark, however.
Gray Ooze
There’s a 50 percent chance that this ooze has psionic abilities (use the psychic variant of the gray ooze, as described in the Monster Manual).
Moldy Quaggoth Spore Servants
A patch of yellow mold (see “Dungeon Hazards” in chapter 5 of the Dungeon Master’s Guide) covers each spore servant. Each time a spore servant is touched or takes damage, it releases a cloud of yellow mold spores until the mold patch is destroyed.
Two-Headed Grimlocks
The grimlock living in the Whorlstone Tunnels keep to themselves, feeding on fungi and vermin. The derro have tried to enslave them, without much success. In a weird example of detente, members of the two races have learned to avoid one another. Each grimlock has sprouted a screaming second head, which has no effect on its statistics.
Xorn
This creature has been working its way through the rock of the Whorlstone Tunnels, consuming vast amounts of faerzress-infused stone. The change in the faerzress brought on by the arrival of the demon lords has left the xorn confused and easily angered. It tries to bargain for metal or gems to eat, and attacks if refused. If the adventurers feed the xorn and can communicate with it, the creature can tell them that it sensed a great planar upheaval recently, though it knows nothing about the demons or their spreading madness.
Yellow Mold
The characters notice a patch of yellow mold (see “Dungeon Hazards” in chapter 5 of the Dungeon Master’s Guide) growing on something of interest, determined by rolling a d4 and consulting the Beneath the Yellow Mold table. Tampering with the moldencrusted object causing the yellow mold to release its deadly spores.
Beneath the Yellow Mold
| d4 | Encounter |
|---|---|
| 1 | A humanoid skeleton wearing a ring of water walking on one bony finger (no ring is found on subsequent occurrences of this encounter) |
| 2 | A closed zurkhwood chest containing 1d6 × 100 gp and 1d6 50 gp gems |
| 3 | A humanoid skeleton in tattered leather armor carrying a rusted shortsword and one of the following: a rotted quiver holding 1d20+1 arrows, a leather pouch containing 1d10+2 sling stones, or a zurkhwood case containing 1d4+3 crossbow bolts |
| 4 | A +1 shield (on subsequent occurrences of this encounter, the shield is rusted and nonmagical) |
Swarm of Insects
The characters encounter a swarm of centipedes. Use the Swarm of Centipedes variant described by the Monster Manual.
Finding Droki
If the characters are on a quest to find Droki, read the following boxed text when his path crosses with theirs.
The dirty derro is easy to recognize: a pale face under a floppy hat fitted with two tentacle-like things that bob up and down in time with his brisk pace. He keeps muttering a repetitive series of phrases to himself at different volumes, failing to notice you. “Droki is late! They will be so angry! Stupid, stupid, stupid! Delays, blocks, procrastination, obstructions, pfah! No time, no rhyme, not mine! No! Time!”
Droki has errands to perform. The characters can shadow him or chase him down, but both the Darklake District and the derro territories provide him with abundant places to hide and paths down which he can lose pursuers, and he knows them all. Inside the Whorlstone Tunnels, however, the derro is distracted by ever-present threats, giving the party the best chance to catch him. The characters can fight Droki by the tunnels' entrance or follow him farther in, depending on their end goals. If they follow Droki, he goes to area 1a, eats a pygmywort mushroom, and disappears into a narrow tunnel (see the “Whorlstone Tunnels: General Features” header in “Whorlstone Tunnels”).
Droki’s route takes him all around the Whorlstone Tunnels, and he’s too scatterbrained to notice anyone following him. Droki’s route is marked with red arrows on the map of the Whorlstone Tunnels. He eats a pygmywort mushroom whenever he needs to navigate a narrow tunnel. As he approaches areas 7 and 8, he eats a bigwig mushroom, reverts to normal size, delivers the Gray Ghost parcel (see “Treasure”), and collects his payment from Lorthio the duergar alchemist (see area 8). Droki then heads north to area 9, where he sneaks quietly around the central pool so as not to disturb its occupant. Upon reaching area 11, he greets the derro there before eating another pygmywort mushroom and traveling through the narrow tunnel leading to area 12. He eats another bigwig and reverts to normal size before making his delivery to the cultists in that area. After visiting the cultists, Droki makes his way out of the Whorlstone Tunnels.
If the characters hinder or attack Droki, he screams in fright and knocks his feet together, activating his boots of speed. If a chase ensues, resolve the outcome using the chase rules in chapter 8 of the Dungeon Master’s Guide. Droki has advantage in his Dexterity (Stealth) checks, as he knows the Whorlstone Tunnels well. If he loses the characters, he resumes his errands as if nothing had happened.
If Droki manages to escape, characters can pick up his trail by searching any area through which the derro passed and succeeding on a DC 15 Wisdom (Survival) check.
Roleplaying Droki
Droki hates everyone in general and surfacers in particular. He gnashes his teeth if he has to address the characters, taking every opportunity to be insulting and misleading. If the characters look through his satchel while he’s still conscious, he throws an epic tantrum and becomes intractable until knocked unconscious.
Droki is also obsessed with things happening where and when they should. If he is captured before he runs his errands in the Whorlstone Tunnels, he constantly complains about the characters altering fate by delaying him, and a good tactic to pressure him is to threaten to hold him indefinitely. He prefers to escape than to fight, except if the characters take his satchel.
Treasure
Killing or incapacitating Droki gives the characters the chance to rummage through his belongings. He wears boots of speed and a hat that is one of a kind. He sewed two stuffed displacer beast tentacles to the hat in the hopes of them attacking his enemies on their own, a delusion he volunteers if the characters question him. The hat might be worth something to a collector of oddities, but is otherwise worthless.
Droki’s satchel is made of stitched darkmantle hide and contains the following items:
- 1 gp and 10 sp
- A
Spell Scroll (2nd level) ofsee invisibility - Two potions of healing
- A worthless collection of dead vermin (spiders, centipedes, and the like) in various states of decomposition
- Pages of lizard-skin parchment held together between two leather covers from two different books. The pages are full of mad scribbles and arcane formulas, but a character proficient in Intelligence (Arcana) can study them for 1 hour to discover that they constitute a spellbook containing the
Tenser’s floating disk andfeign death spells. - A strange lump of black metal, which Droki intends to deliver to the Gray Ghosts (see below)
- A scroll in a copper tube and four small pouches containing stone giant toenail clippings and skin flecks, which Droki intends to deliver to the cultists (see below). Each pouch is tagged with a different name, and the scroll contains a list of names matching those on the tags, together with descriptions. One of the names is “Dorhun,” with a description corresponding to Stonespeaker Hgraam’s apprentice. The rest of the names belong to other stone giants of Clan Cairngorm.
The derro might have other items depending on whether he is allowed to make his deliveries and collect his payments, as follows.
Delivery to the Gray Ghosts. Droki intends to deliver the strange lump of black metal to the Gray Ghosts, receiving payment from Lorthio the alchemist (see area 8) in the form of a mithral medallion worth 125 gp. The medallion is a holy symbol of Laduguer, set with a carving depicting an arrow breaking on a shield. Characters not sanctioned by the Keepers of the Flame to carry the symbol will be arrested by the guards (see “Getting Captured”) if they are caught with it in Gracklstugh.
Delivery to the Cultists. Droki intends to deliver the scroll and the pouches of stone giant toenail clippings and skin flecks (ritual components) to the derro cultists (see area 12). Droki is paid for this delivery with a potion of invisibility and an hourglass worth 50 gp.
XP Awards
Capturing the derro and taking him to Errde Blackskull earns the characters 150 XP each.
1. Entrance
The narrow corridor from the West Cleft opens into a long cavern lined with stalactites and stalagmites. Whater drips from the stalactites, forming small pools on the floor.
The glow of faerzress casts an eerie soft light across this cavern, swirling into spiral patterns and casting dancing shadows from the jagged pillars lining the walls. The air smells and tastes slightly metallic, and the sound around you is strangely muted. The dripping of water makes no echo, as if you stood in open air.
This place offers many hiding places for characters to lay in ambush. Faerzress prevents sounds of combat from being heard outside in the West Cleft or farther into the tunnels.
If the characters wait here for Droki, he appears after 2d12 hours. In the middle of that wait, each character must make a DC 14 Wisdom saving throw. On a success, the character feels only a mild discomfort. A character who rolls a natural 20 on the save receives flashes of the future, gaining the benefit of the Lucky feat (see chapter 6, “Customization Options,” in the Player’s Handbook) until the start of his or her next long rest. If the character already has the Lucky feat, he or she gains an extra 3 luck points to spend. On a failed save, a character sees disturbing images within the shimmering faerzress light and has disadvantage on ability checks and saving throws until he or she finishes a short rest outside this area.
If the characters caught Droki in Gracklstugh and brought him here, they must make the saving throw at some point during their interrogation. Knowing the power of the cavern, Droki bides his time, giving nonsensical answers and hissing at the characters. He makes his move to escape after the characters make their saving throws, fleeing by the route described in the “Finding Droki” section.
Development
If Buppido is with the party, he takes advantage of any distraction to slip away, taking refuge in area 1b.
1a. Pool Bypass
A relatively small cave branches off the main tunnel. If the characters are shadowing Droki, read the following boxed text aloud to the players.
Droki stands before a tall yet narrow crack in the wall. He stares at the crack for a moment, then leans down and rummages among the fungi, cackling with glee as he plucks a short mushroom and eats it whole. As he finishes the last bite, you see him shrink down to a doll’s size, then run into the crack.
The far side of the small cavern has a narrow crack in the wall surrounded by patches of pygmywort and bigwig mushrooms (1d10+10 of each). The crack forms the entrance of a narrow, naturally-formed tunnel.
1b. Buppido’s Lair
The derro Buppido discovered the Whorlstone Tunnels months ago but never dared to explore beyond the first couple of chambers. He settled in this area and erected a grisly altar to himself, to support the delusion that he is a god.
If Buppido returns to Gracklstugh, he abandons the characters at the first opportunity and makes his way to this place. If he is here when the characters arrive, read the following boxed text aloud to the players. Modify the text as appropriate if Buppido isn’t present.
As you venture into the cavern, a stench of rotting meat rises. The floor is carpeted with humanoid remains in varying stages of decomposition, arranged in a spiral pattern around the cave’s center. An off-key humming comes from a hunched figure working busily at something on the floor.
“Oh, there you are!” The figure is Buppido. He wipes his hands on his vest and smiles viciously. “I didn’t expect you to find me here, with my shrine nearly finished! And power! My faithful are finally honoring me! Are you…? Yes. Yes, I sense that you are ready to receive my truth into your hearts!”
The humanoid remains on the floor make the entire cavern difficult terrain. Characters can identify the remains as belonging to several derro, deep gnomes, and goblins, as well as a couple grimlocks.
Buppido is a typical derro and attacks the characters regardless of their intentions. On his first turn, he uses a bonus action to channel the power of this “shrine,” raising six skeleton to aid him. The undead assemble from the remains on the floor to form shambling, mismatched bodies. Each skeleton has two skulls, although this has no effect on its abilities.
Buppido fights with insane confidence and seems surprised if the party defeats him, screaming incoherent last words about the end of the world. The skeletons fight until destroyed even if Buppido is defeated first.
If Buppido was killed in Velkynvelve or at some point in the characters' travels through the Underdark, replace him with a carrion crawler feeding on the dead remains.
Development
When the monsters are defeated, the ghost of a deep gnome named Pelek pokes its head up out of the ground, blinks, and then emerges fully. The ghost is friendly and tells the adventurers that Buppido killed him not too long ago, then chopped him into pieces to join the other body parts in the shrine. Pelek explains how he was traveling from Blingdenstone when he fell in with Buppido. He knows little about the Whorlstone Tunnels, but he has observed a shrunken derro with a funny hat (Droki) entering and leaving the narrow tunnels. Pelek doesn’t know about the pygmywort mushrooms.
Pelek asks the characters to take one or more parts of him to Blingdenstone and bury his remains there, so that his spirit can rest. It’s impossible to tell which body parts are his, and looking around is a gruesome task that speaks loudly to Buppido’s madness. Pelek recalls that the strange magic that pervades the tunnels animated one of his severed hands, and it scuttled away through one of the narrow tunnels. (Characters might encounter it in area 13.) Pelek points out that characters can recognize the hand because it was wearing an obsidian ring. If the characters need more reasons to go to Blingdenstone, Pelek adds that the svirfneblin who live there know many ways to the surface.
Treasure
Scattered around the floor are 10 gp, 11 sp, and a damp piece of lizard-skin parchment with the words “Worship Buppido” written in shaky Dwarvish.
2. Diseased Pool
This pool is fed by a river that flows from the Darklake. The river carries many things from the subterranean lake, including the carcasses of countless creatures, fouling the pool (see the “Whorlstone Tunnels: General Features” sidebar).
The tunnel slopes down to the edge of a large pool that fills the cavern ahead. The opposite shore is nearly one hundred feet away, but nothing can be seen beneath the surface of the black water.
The water is heated by a thermal spring and pleasantly warm. However, the pool is disease-ridden. Any creature that starts its turn in the water must make a DC 13 Constitution saving throw. On a failed save, the creature is infected with cackle fever (see “Diseases” in chapter 8 of the Dungeon Master’s Guide). Gnomes are immune.
The characters can try to get around the pool without swimming it, by using magic or climbing along the walls. Climbing the slippery walls of the cavern requires a successful DC 13 Athletics check. On a failed check, a character falls into the water.
3. Parade of Fools
Myconids journeying through the Underdark were attracted to the enriched fungal life in the Whorlstone Tunnels and made a stop here. They are friendly, but there is something seriously wrong with them.
The tunnel opens into a natural cave, wherein you see several fungal creatures dancing to a silent tune. Three of them stand five feet tall, while the others are half as tall. One of the small ones stands apart from the rest, its movements not nearly as frantic. Hunched nearby are two larger creatures that resemble apes covered with mushroom growths and yellow mold.
Characters who know anything about myconids know that myconids don’t dance. If Stool is with the party, it points this out. This group is composed of three myconid adult and five myconid sprout. Stool recognizes one of the sprouts—the one not dancing—as his buddy, Rumpadump (see “Development”). The ape-like creatures are two quaggoth spore servant, and each one is covered with a patch of yellow mold (see “Dungeon Hazards” in chapter 5 of the Dungeon Master’s Guide). Whenever a quaggoth spore servant is touched or takes damage, it releases a cloud of yellow mold spores until its mold patch is destroyed.
The myconids are too swept up in their silent revelry to notice the characters. If the adventurers attack, the myconid adults fight fiercely while the sprouts run and hide. The spore servants join the fray if either they or the myconids are threatened. Otherwise, they remain motionless.
If the characters try to communicate with the myconids, they release rapport spores so that everyone can speak telepathically. The leader of the myconids is an adult named Voosbur, who speaks on behalf of the others. Sharing thoughts with these sentient mushrooms is an odd and strangely intoxicating experience (and feels quite different than the rapport the characters might have shared with Stool). Voosbur happily tells the party how its “troupe” was attracted by the special mushrooms in these tunnels, and it tells the characters about the magical properties of the pygmywort and bigwig mushrooms. Voosbur further explains that the myconids didn’t wander into this area, but arrived here by traveling “through the Lady’s dream.” Voosbur describes “the Lady” as a powerful being that loves and guides all myconids. He offers to share “the Lady’s gift” with the characters, allowing them to travel “through the Lady’s dream” as the myconids do. Characters who accept the offer gain Zuggtmoy’s gift.
If present, Stool tells the characters it has no idea what Voosbur is talking about. Additionally, Sarith Kzekarit starts to act erratically, trying to warn the characters away from the myconids, but unable to shake off the influence of Zuggtmoy’s spores.
The myconid sprout standing by itself is named Rumpadump. It sends a subtle warning as a feeling of distress through its own rapport spores in response to Voosbur’s offer, saying that the other myconids aren’t behaving right.
Roleplaying Rumpadump
Rumpadump is as introverted as Stool is outgoing, preferring to hang back and not use its rapport spores unless absolutely necessary. Whether Stool is present or not, Rumpadump can guide the characters to Neverlight Grove (see chapter 5), where the sovereigns might know of a way out of the Underdark. However, the myconid sprout is worried that Voosbur’s “strange spores” might have infected the rest of the myconids back home.
Development
Voosbur takes no offense if the characters refuse his offer to teach them how to travel “the Lady’s dream,” simply bidding them farewell as the myconids resume their dancing. If the characters have shown Rumpadump any kindness, it asks their permission to join the party, especially if Stool is present. At the same time, Sarith breaks away from the party to join the myconids. The drow turns one last time to give the characters a look of terror and despair before his face loses all expression. He and the dancing myconids then enter a mushroom patch and use the tree stride ability granted by Zuggtmoy’s blessing to vanish from sight.
XP Awards
Award 50 XP to each character if the party parlayed with the myconids.
4. Fungi Thicket
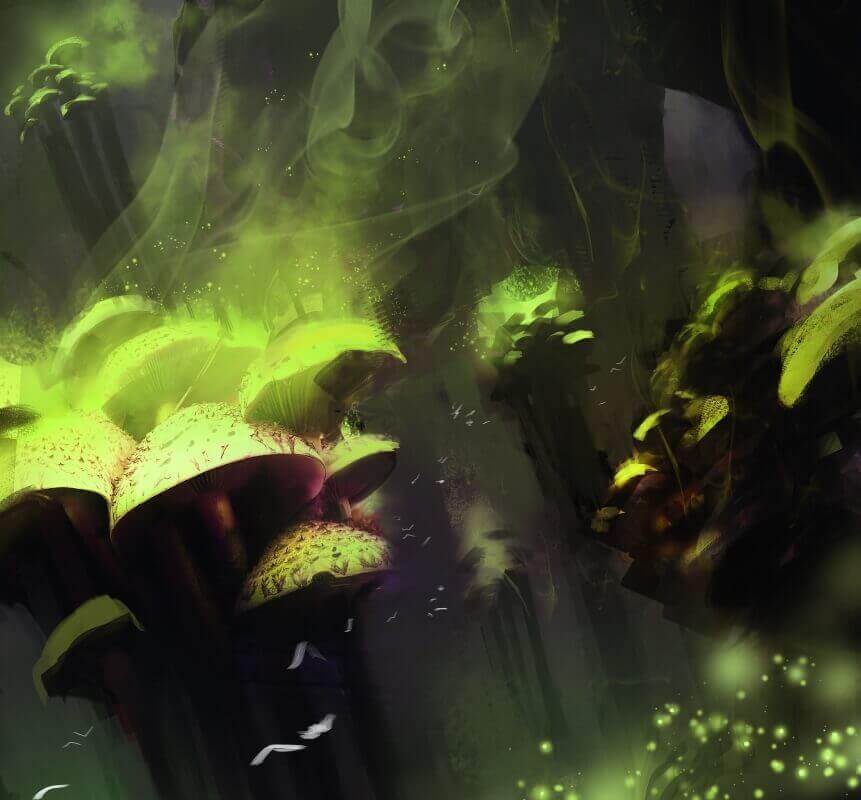
This tunnel juncture is blocked by a thicket of fungi. The thicket is an ecosystem unto itself, with its own challenges for those who wish to cross it.
A dense fungi forest blocks your way, its tallest specimens growing some five feet high. Even as you assess the best way to pass through it, a hissing sound starts to rise-like uncounted tiny voices whispering in tongues you don’t understand.
Although creepy, the hissing sound is harmless, caused by air whistling through perforated mushrooms in the thicket of fungi. The characters can cross this area by forcing their way through it, or by eating pygmywort mushrooms first to move through without disturbing the other fungi present. If the characters are chasing Droki, he uses the thicket to his advantage, eating a pygmywort to sneak his way across. At reduced size, he leaves no trail that normal-sized pursuers can follow.
Tiny creatures can move through the thicket at no penalty. For Small and Medium creatures, the thicket is difficult terrain. While in the thicket, Tiny and Small creatures have half cover against Medium creatures and can hide.
Creatures can negate the movement penalty by destroying the fungi before crossing the thicket. Each 5-foot-square area of fungi has AC 10 and 10 hit points. Any attack that deals fire damage has a 50 percent chance of igniting a torchstalk mushroom (see “area Fungi of the Underdark” in chapter 2).
The first time a Small or larger character reaches the tunnel intersection, two swarm of centipedes emerge from nests under the thicket and attack. Two more swarm of spiders arrive on the second round of combat, plus another swarm of centipedes emerge from nests under the thicket and attack. Two more swarm of spiders arrive on the second round of combat, plus another swarm of centipedes on the third round.
Treasure
The abundance of fungi in the thicket makes it easy to forage here. Among the common, inedible fungi are the following edible and exotic fungi, most of which are described in chapter 2:
- 1d6 barrelstalks
- 3d6 bluecaps
- 1d6 patches of fire lichen
- 1d6 nightlights
- 1d6 Nilhogg’s noses
- 1d6 sheets of ripplebark
- 1d6 timmasks
- 1d6 torchstalks
- 1d6 tongues of madness
- 1d6 trillimacs
- 2d6 bigwigs (see “Faerzress-Suffused Fungi”)
- 2d6 pygmyworts (see “Faerzress-Suffused Fungi”)
Zuggtomoy’s Gift
A myconid with Zuggtmoy’s gift can, as an action once per day, release a 20-foot-radius cloud of demon-tainted spores. Any other creature within the area that isn’t already “blessed” with Zuggtmoy’s gift must make a Constitution saving throw, with a save DC of 8 + the myconid’s Constitution modifier + the myconid’s proficiency bonus. A creature that forgoes or fails the saving throw becomes infected. While infected with Zuggtmoy’s gift, the creature gains the ability to cast a special version of the
Any creature infected with Zuggtmoy’s gift has disadvantage on attack rolls against plant creatures. In addition, whenever an infected creature finishes a short or long rest, it must make a DC 15 Wisdom saving throw. On a failed save, the creature lapses into a state of euphoric bliss. While in this state, the creature can’t take actions, bonus actions, or reactions, and must use all of its movement to dance and twirl about. At the end of its turn, the creature can repeat the saving throw, ending the euphoric bliss effect on a success.
A
5. Raucous Mesa
This chamber was sculpted by faerzress with the side effect of trapping sound.
The glow of faerzress shifts across this chamber as if pushed by an unseen wind. It flows toward and around a large mesa and continues to spiral upward, but the ceiling of the cavern is too dark and high to see. You hear murmurs and whispers coming from atop the mesa, which grow louder as you approach. Its stacked levels resemble steps in a staircase, but a ramp running from top to bottom provides an easy way up.
Climbing the mesa reveals that its steps aren’t concentric circles but the bands of a spiral, rising from the cavern floor to the mesa’s top.
The west wall has a noticeable crack leading to a narrow tunnel, which can be used as a shortcut to area 7 if the characters are small enough to fit through it (see the “Whorlstone Tunnels: General Features” sidebar). Droki uses this narrow tunnel on his travels.
Characters at the top of the mesa hear the murmur of the chamber more clearly, and can recognize it as disparate sounds. They hear the rhythmic clank and roar of Gracklstugh’s forges, the low rumble of Themberchaud’s displeasure, the mad screaming of derro, and even hints and snatches of conversations. The faerzress in this place echoes the sounds produced in Gracklstugh above, creating a storm of noise.
A character can use an action to focus on specific sounds but must make a DC 12 Wisdom saving throw, taking 7 (2d6) psychic damage on a failed save, or half as much damage on a successful one. A character who fails the saving throw by 5 or more gains one level of madness (see “Madness” in chapter 2) as his or her mind is overwhelmed by what is heard.
A character who exceeds the saving throw DC by 5 or more can ask one question about Gracklstugh that can be answered by overhearing any sound or conversation occurring within the previous tenday in the city above or in the Whorlstone Tunnels. This can include discovering Droki’s current location by following his insane mutterings.
A character can focus on the sound in the chamber a number of times equal to his or her Wisdom modifier (minimum 1). After that, the character no longer has the ability to tell sounds apart.
6. Dire Den
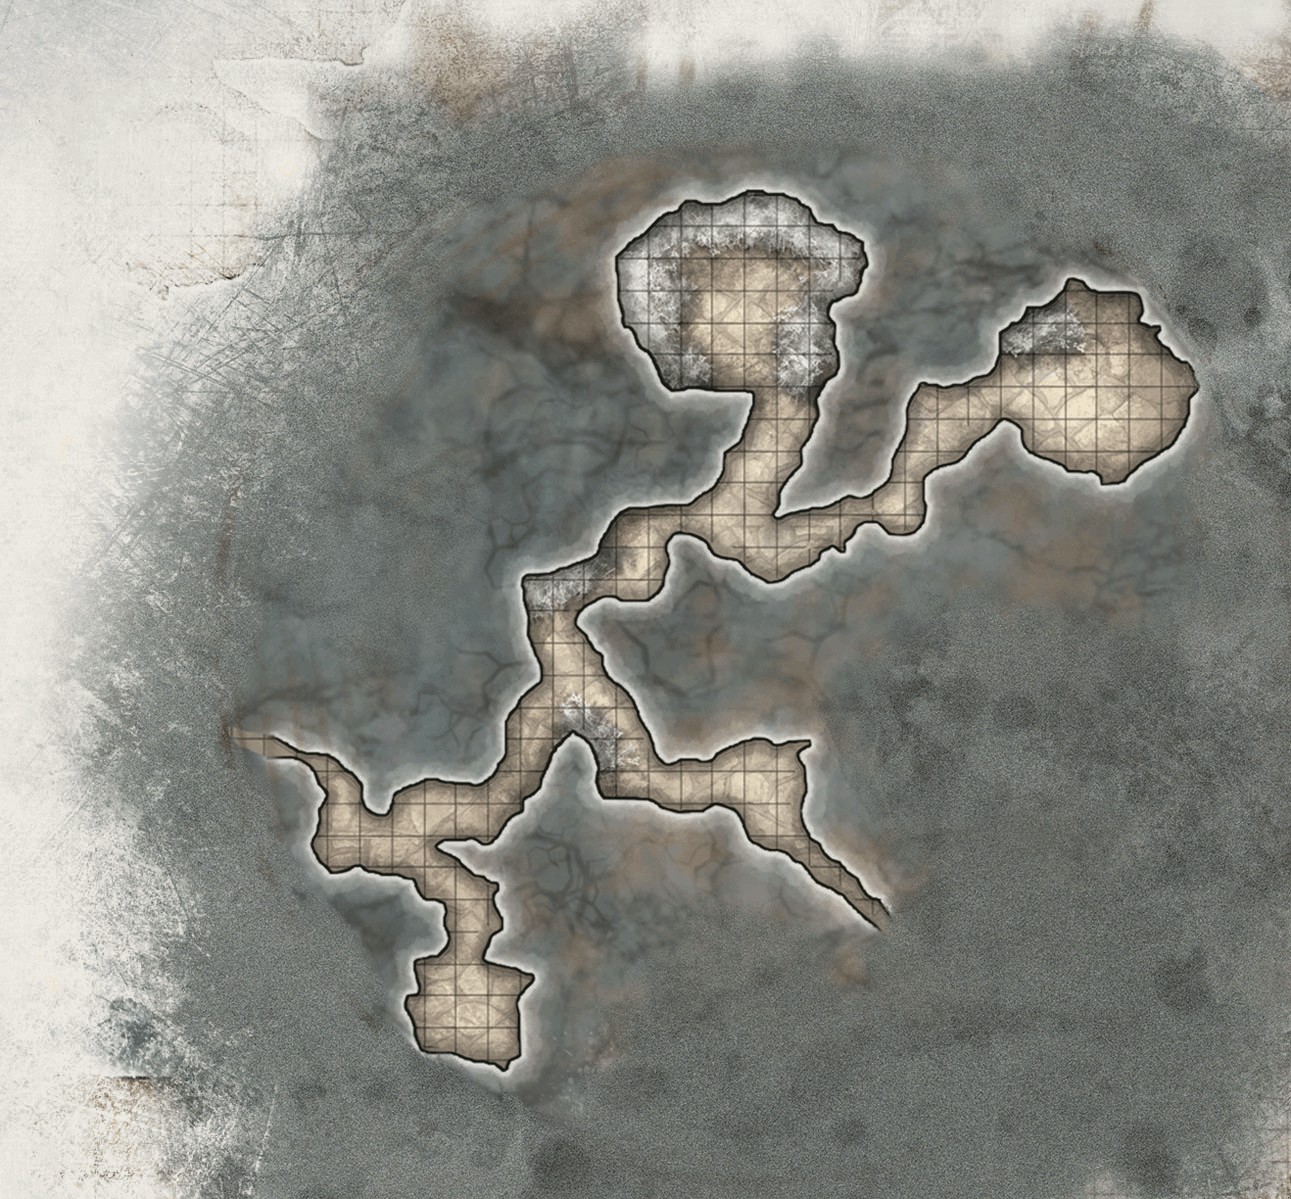
This small network of tiny grottos leads into one of the dens of the Gray Ghosts, but it is the current residence of a warped creature called the Spider King. The characters must travel through narrow tunnels to reach this area (see the “Whorlstone Tunnels: General Features” sidebar).
The glow of faerzress in these tunnels reveals sticky white strands clinging to the walls. The strands become more dense as you move farther in.
The northeastern cave is the lair of the Spider King - a two-headed giant spider warped by demonic influences into a vaguely humanoid shape. This horrific creature uses the giant spider stat block with the following modifications:
- The Spider King has 44 hit points, a passive Wisdom (Perception) score of 14, a Wisdom (Perception) modifier of +4, and the following saving throw bonuses: Constitution +3, Wisdom +2.
- Because of its two heads, the Spider King has advantage on Wisdom (Perception) checks and on saving throws against being blinded, charmed, deafened, frightened, stunned, and knocked unconscious.
The Spider King senses when intruders enter its domain and can’t be surprised by them. Along with two normal giant spiders (its attendants), the Spider King waits in ambush. It moves to the entrance of its chamber in an attempt to keep the characters bottled up, while the two giant spiders approach along the walls and ceiling, getting into position above creatures on the floor. The Spider King and the giant spiders fight to the death, but they don’t follow prey that flees.
Development
Sounds of combat here alert the duergar in area 7.
7. Gray Ghost Garden
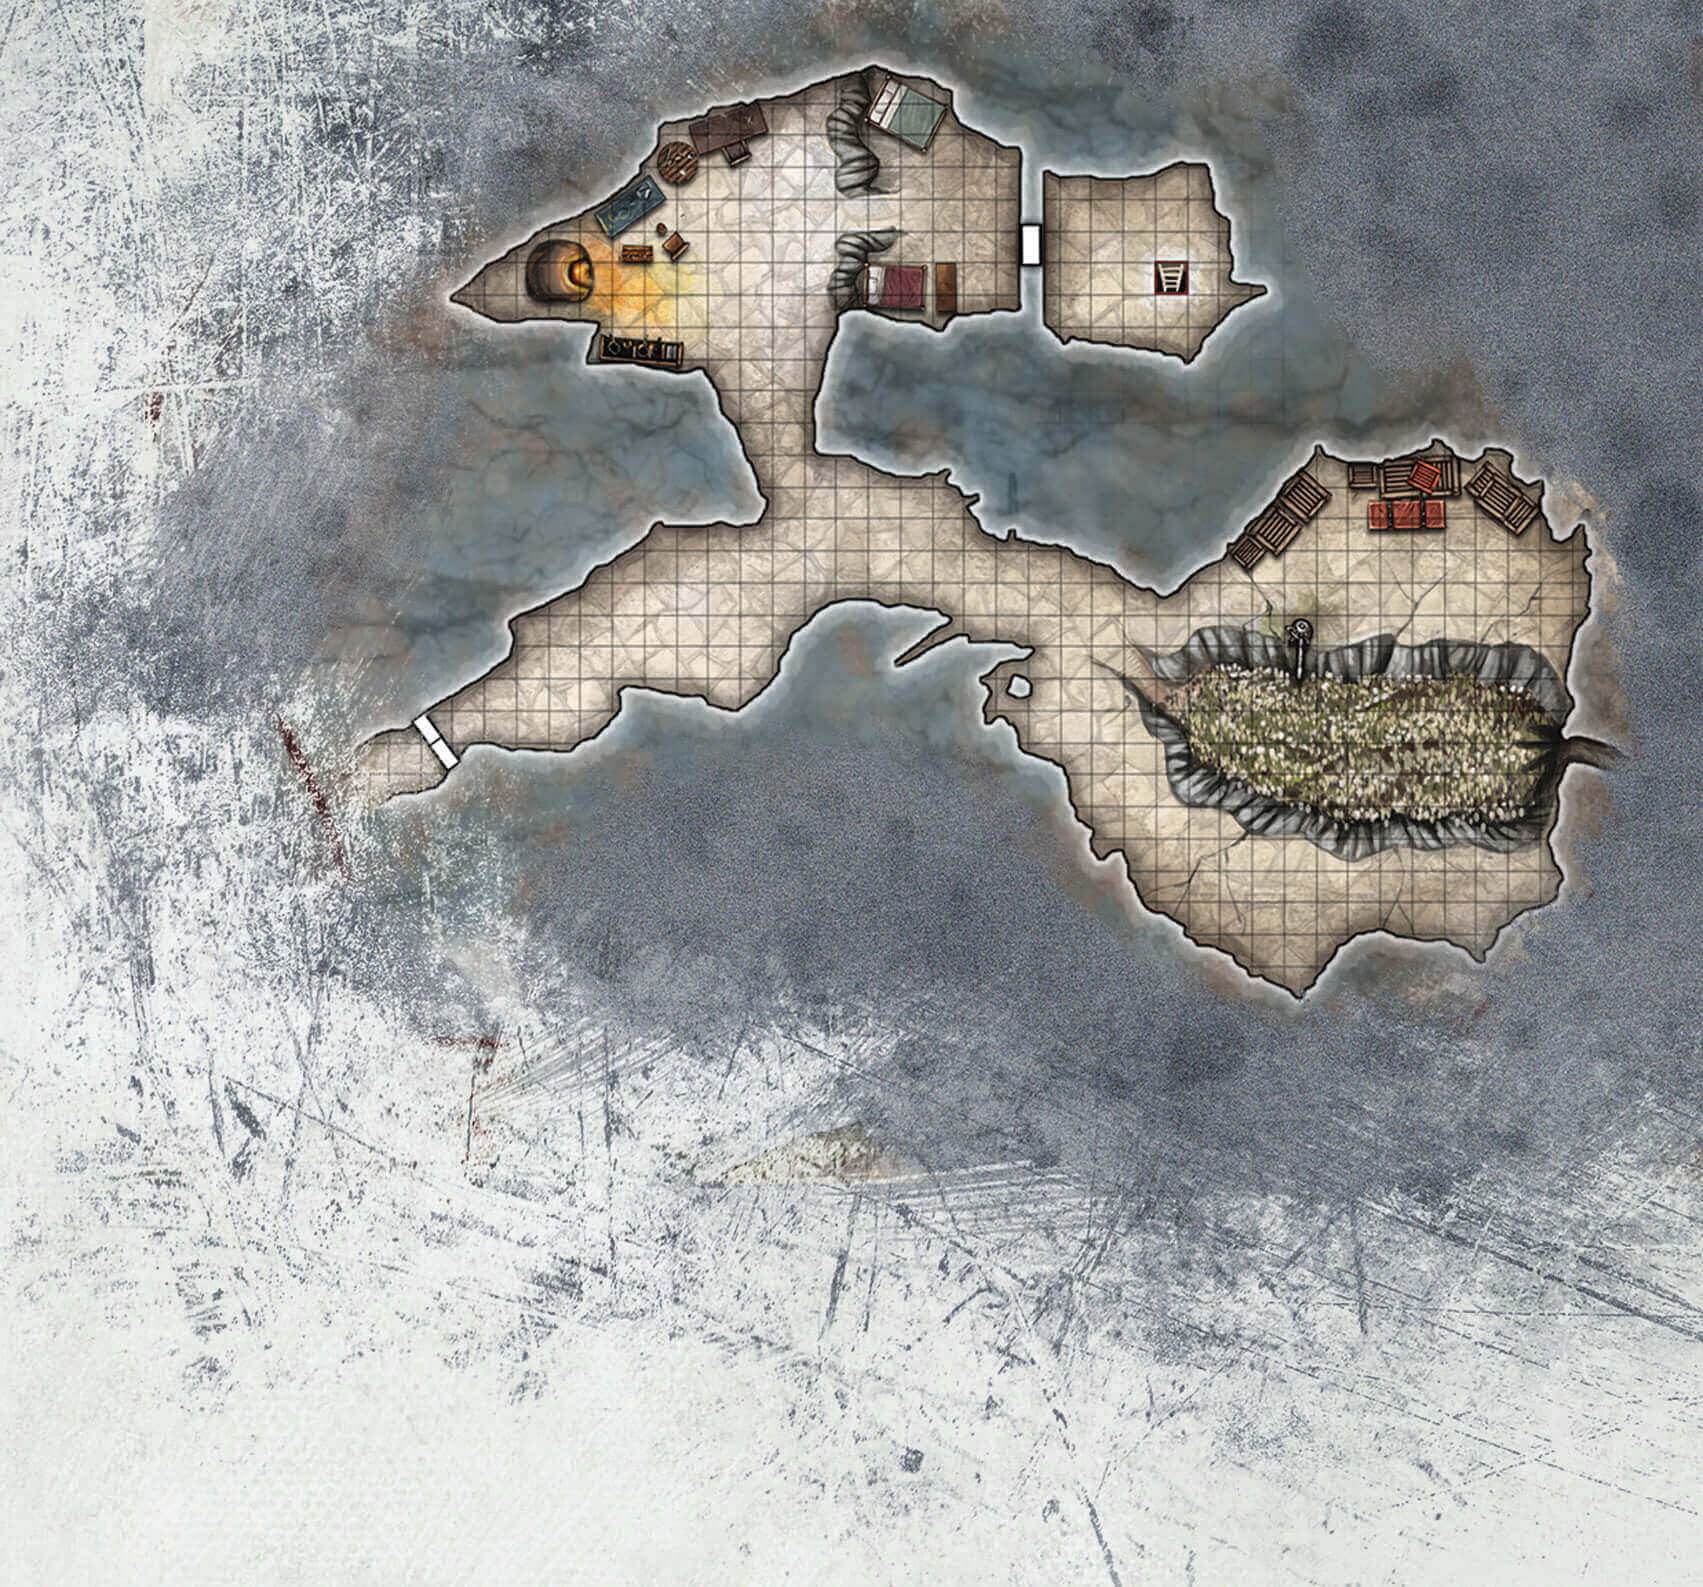
The Gray Ghosts use this chamber to grow a variety of fungi for use in alchemical experiments.
Double doors blocks the western tunnel. The doors are made of thick zurkhwood and reinforced with crudely forged steel. The sturdy lock can be opened with a successful DC 15 Dexterity check using thieves' tools. A successful DC 20 Strength check will break the doors down.
The smell of rot is strong in this room, coming from a large depression at the center, where dozens of fungi of many species grow. A barrel-shaped copper tank sits at the edge of the pit. Attached to the tank is a tall copper pipe that arcs over the pit. Crates line one wall.
Three duergar work here. They are members of the Gray Ghosts who have been assigned gardening duty. They attack as soon as they see intruders. If the characters arrive through the crack in the east wall (see “Fungi Pit”), they can hide among the fungi and try to catch the duergar by surprise. If the characters make a lot of noise in area 6 or force their way through the doors to the west, the duergar turn invisible and attack as soon as the characters arrive.
At the start of combat, two duergar use their Enlarge action while the third opens the valve on the copper tank and aims its nozzle at the characters. During the second round of combat on the same initiative count as the duergar, the duergar alchemist from area 8 joins the fight. If the other duergar fall, the alchemist turns invisible and tries to escape.
Fungi Pit
The pit is 5 feet deep and filled with various kinds of fungi. It is difficult terrain for Small and Medium creatures, and Tiny creatures have half cover while amid the fungi.
A crack in the east wall forms the mouth of a narrow tunnel that leads from the floor of the pit to area 6; see the “Whorlstone Tunnels: General Features” sidebar for more information on narrow tunnels.
The abundance of fungi in the thicket makes it easy to forage here. Among the common, inedible fungi are the following edible and exotic fungi, most of which are described in chapter 2:
- 1d6 barrelstalks
- 3d6 bluecaps
- 1d6 Nilhogg’s noses
- 2d6 sheets of ripplebark
- 1d6 timmasks
- 1d6 torchstalks
- 2d6 trillimacs
- 2d6 bigwigs (see “Faerzress-Suffused Fungi”)
- 2d6 pygmyworts (see “Faerzress-Suffused Fungi”)
A character proficient and equipped with a poisoner’s kit can also collect 1d6 doses of assassin’s blood poison from the fungi pit (see “Poisons” in chapter 8 of the Dungeon Master’s Guide).
Sprinkler Tank
The copper tank is a sprinkler used by the duergar to fertilize the fungi in the pit. The copper pipe that extends from the tank is 10 feet long and can be turned so that its nozzle points in any direction. The nozzle is pointed toward the pit by default.
Any creature can use an action to open or close a valve on the tank, releasing a cloud of pungent fertilizer that fills a 30-foot cube. The cloud grows 10 feet per side each round the valve remains open. The cloud has the same effect as a
As an action or a bonus action, a creature can turn the pipe 90 degrees in any direction.
Crates
The crates along the north wall are made of zurkhwood and stacked 5 feet high, and climbing on top of them costs 5 feet of movement. Most of the crates are empty, but four of them contain harvested, edible fungi. Each crate of fungi weighs 50 pounds, contains the equivalent of 20 days of rations, and can be sold in Gracklstugh or another Underdark settlement for 25 gp.
Development
If the characters keep any duergar alive for questioning, it takes a successful DC 16 Charisma (Intimidation) check to gain an answer to a single question. The characters can ask only three questions total before the surviving duergar become incoherent and start frothing at the mouth-a form of madness brought on by demon-tainted faerzress. Any spell or effect that cures indefinite madness also restores a duergar’s sanity (see “Madness” in chapter 8 of the Dungeon Master’s Guide).
The duergar stationed here are tasked with protecting the fungi garden and helping the alchemist in his work. They use a trapdoor in area 8 to move between the Whorlstone Tunnels and the Darklake Docks in Gracklstugh. They have been ordered not to explore the rest of the Whorlstone Tunnels, though their leaders sometimes go farther into the tunnels on unknown business.
8. Gray Alchemist
The Gray Ghosts have claimed this cave as both a safe house and a laboratory, where their alchemists can work in relative peace and isolation.
This area is surprisingly clean and orderly, split into two levels connected by a ramp made from zurkhwood planks. The upper level contains a fully furnished laboratory, while the lower level has two bunk beds. The wall of the lower level is set with a closed door.
Unless he is drawn to sounds of combat in area 7, a duergar alchemist named Lorthio Bukbukken works on the upper level of this area. Lorthio’s laboratory contains a work table, a desk, a case of shelves lined with vials, and a dome-shaped oven. All furnishings are made of zurkhwood except the oven, which is made of stone.
The lower level is 10 feet below the laboratory and contains two bunk beds and two small chests, all made of zurkhwood (See “Treasure” below for information on the contents of the chests). The door is barred on this side and has closed peepholes at dwarf’s-eye height. Opening the peepholes allows one to see into the room beyond. The bar is easily lifted from this side, but breaking down the door requires a successful DC 20 Strength check.
The room east of the door is empty except for an iron ladder that climbs 60 feet to a stone trapdoor embedded in the ceiling. The trapdoor is unlocked, and above it a narrow, spiraling tunnel leads to the Darklake Docks.
Development
Sounds of combat here alert the duergar in area 7. They use their Enlarge actions before heading this way.
Treasure
If the characters spend 1 hour ransacking the lab, they can assemble two herbalism kits, one poisoner’s kit, and ten healer’s kits. In the (unlocked) zurkhwood chests, they find 1d6 vials of acid, 1d6 flasks of alchemist’s fire, two
Depending on whether or not Droki delivered his parcel and took his payment, the desk contains either a lump of black metal or a holy symbol of Laduguer made of mithral (see “Finging Droki”). The desk also holds alchemical recipes scrawled in Dwarvish on torn strips of parchment. A character who studies these scraps for an hour and succeeds on a DC 15 Intelligence (Arcana) check can piece together the formulas for crafting vials of acid and flasks of alchemist’s fire. The character can gather enough ingredients in the laboratory to craft 1d4 of each. The character who knows the recipe and has the proper ingredients can craft a vial of acid or flask of alchemist’s fire in 1 hour.
A character who searches the desk and succeeds on a DC 12 Intelligence (Investigation) check also finds a letter hidden in a secret compartment. The letter is written in Dwarvish on a patch of lizard hide:
I don’t need your poison anymore. I’ll deal with Werz Saltbaron myself. Bring me an elf blade, one with the swirlies carved on the steel, and I’ll forget you failed me. And I don’t want to see any of your goons near my post. The captain is poking around, and I could use a scapegoat.
-Gorglak
If the characters capture Lorthio and question him about the letter, he reveals one of the following bits of information each time a character succeeds on a DC 13 Charisma (Intimidation) check:
- Gorglak is a warrior of the Stone Guard stationed at one of the outer gates near the Darklake District.
- Gorglak is an avid collector of weird weapons.
- Gorglak is easily bribed.
XP Awards
Presenting Gorglak’s letter to Captain Errde Blackskull earns each character 50 XP for retrieving evidence of corruption within the ranks of the Stone Guard.
Duergar Alchemist
A duergar alchemist carries two vials of acid and two flasks of alchemist’s fire. It uses the normal duergar stat block but replaces the Javelin attack option with the following attack options:
Acid Vial. Ranged Weapon Attack: +4 to hit, range 20 ft., one target. Hit: 7 (2d6) acid damage.
Alchemist’s Fire. Ranged Weapon Attack: +4 to hit, range 20 ft., one target. Hit: 2 (1d4) fire damage at the start of each of the target’s turns. A creature can end this damage by using its action to make a successful DC 10 Dexterity check to extinguish the flames.
9. Fountain of Evil
Foul water from the Darklake spills into this cave, forming a pool. See the “Whorlstone Tunnels: General Features” sidebar for the effects of drinking foul water. The ceiling in this cave is 80 feet high.
The chamber splits into two paths surrounding a large pool, filled by water trickling from stalactites along the ceiling. The western path forms a ramp above the pool’s surface, while the eastern path runs level with the water and continues into a tunnel opening. The water turns darker toward the center of the pool, where it transforms from a gentle swirl into a churning vortex.
A water weird bound to the pool for years has been corrupted by the demonic influence infecting these tunnels, turning it evil and giving it a dark hunger.
The western path slopes upward to a maximum height of 60 feet above the pool’s surface. If the characters take this upper path, the water weird attacks them when they are 30 feet above the surface of the pool, as it was bound here to protect the path leading to area 16. The water weird can command the pool’s water to erupt like a geyser, effectively lifting the water weird up to the characters' level and putting them within its reach. Any character the water weird successfully grapples is dropped in the pool, taking no damage from the fall. The pool is 30 feet deep in the middle and 5 feet deep near the shore.
If the characters follow Droki into this chamber, they see him sneaking carefully along the eastern path. They can attempt to follow him with a group Dexterity (Stealth) check contested by the water weird’s passive Wisdom (Perception) score. If more than half the characters fail the check, the water weird notices them and attacks. If the characters are attacked by the water weird while following Droki, the wily derro realizes he’s being shadowed and makes a run for it.
10. Cultist Pens

The insane derro cultists have been buying cave bears from Underdark hunters and smuggling them through Gracklstugh. For what purpose is anyone’s guess.
A large gate made of iron bars blocks the northwest entrance and is usually locked. One of the derro cultists carries the key. The lock can be opened with a successful DC 15 Dexterity check using thieves' tools. A creature with a Strength of 20 or higher can force the gate open with a successful DC 25 Strength check.
The first thing you notice as you enter the room is a heavy, unpleasant musk in the air, coming from cages assembled from scrap iron on both sides of the chamber. A spiral path circles into the center of the room, marked off by small stone pylons.
Two derro stand by a large cauldron in front of a tent near the cave’s center. Both are talking while apparently ignoring each other. In the cages, three hulking brown bears appear to be resting.
The two derro are cultists. One of them is complaining about “the master” while the other talks about something he once fished out of the Darklake.
The three cave bear are alert, despite appearances to the contrary. Characters hoping to sneak past them must succeed on Dexterity (Stealth) checks contested by the bears' passive Wisdom (Perception) score of 13. On their first turn, the cultists move to free the bears. Each cage is closed with a simple bolt that can be unlatched with an action. Once the first two bears are set free, the third bear breaks out of its cage on its own.
A crack in the south wall leads to a narrow tunnel that wends toward area 12. Medium and larger creatures are too big to fit through this narrow tunnel (see the “Whorlstone Tunnels: General Features” sidebar).
Spiral Path
This path helps to channel the ritual magic the cultists use to tame the cave bears. Though the ritual is currently inactive, the area radiates a faint aura of enchantment under the scrutiny of a
Treasure
Inside the tent are two flea-ridden bedrolls, a zurkhwood bucket containing edible fungi (the equivalent of two days of rations), and a wineskin full of Darklake Stout.
11. Quasit Playground
Some of the cult’s more powerful derro savants keep quasits as familiars, and the wee demons discovered this tunnel network. They use the tunnels as shortcuts to deliver messages across the areas of the Whorlstone Tunnels controlled by the cultists, or simply to hide from their duties. Shrinking down allows the characters to more easily navigate this area.
The narrow tunnel is lit by the same dim, ambient light found throughout this complex. Ahead, you hear the high-pitched cackling of several creatures.
Four quasit are wrestling each other farther along in the tunnel. If they notice the characters, they attack.
When two quasits are reduced to 0 hit points, the two remaining ones turn invisible and flee. However, they make enough noise in doing so for the characters to follow them by sound. If any quasit escapes, the cultists in area 12 can’t be surprised and prepare an ambush.
Development
If the characters manage to capture and interrogate a quasit, the creature readily surrenders the name of Narrak - the derro savant leading the cultists in the Whorlstone Tunnels (see area 12). In exchange for its life, the quasit reveals that the cult plans to curse Gracklstugh’s stone giants with madness as a means to sowing chaos in the city.
XP Awards
Each character earns a special award of 50 XP if the party learns of Narrak’s plans from a quasit.
12. Cultist Hideout
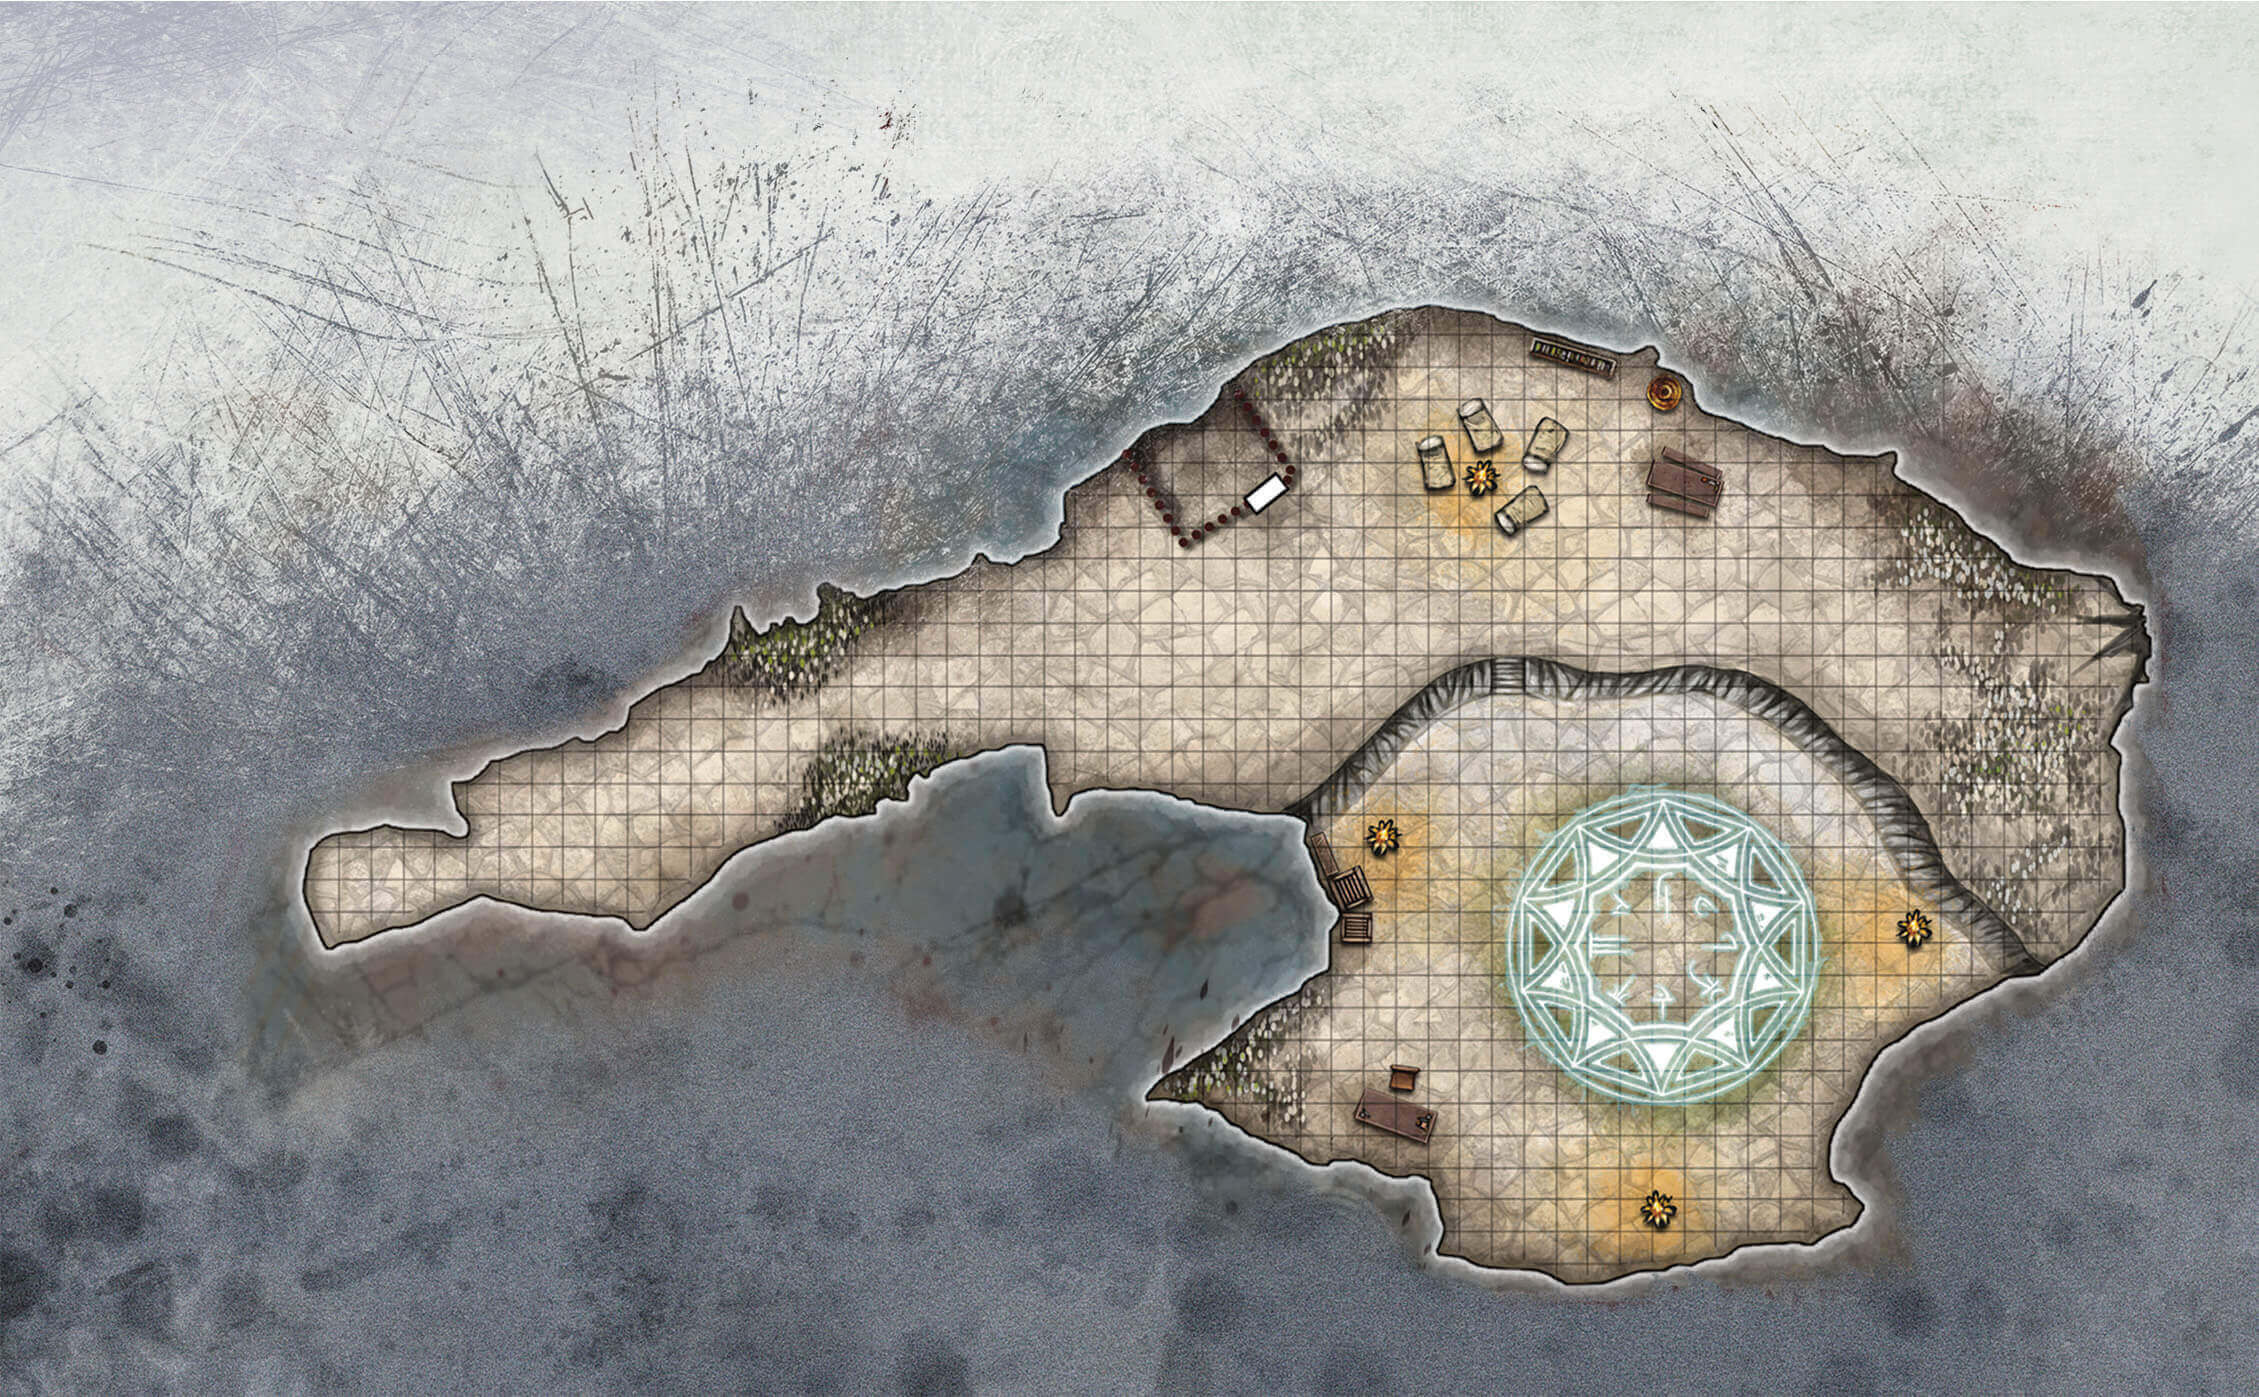
Droki enters this cavern from the east, via a narrow tunnel that comes up through a crack in the cavern floor (see the “Narrow Tunnels” section of the “Whorlstone Tunnels: General Features” sidebar).
West of the cavern is a shrieker that serves as an alarm system (see “Fungi Patches”) and a pit trap (see “Trap”).
The smell of brimstone and foul chemicals emanates from this large chamber. The light of campfires shows a natural platform where five derro are droning a cacophonous chant. A two-headed dog stirs inside a cage, while another derro nearby plays with a crossbow and watches the dog nervously.
A green glow rises suddenly from a magic circle at the center of the platform, where a small humanoid statue is the focus of the chanting ritual. As you watch, a lump sprouts from the statue’s neck, enlarging and reshaping itself with each unholy verse to take the form of a second head.
Narrak, a derro savant, belongs to a fringe group within the Council of Savants using demonology as a path to power. Since the arrival of the demon lords, he has gathered and bullied several apprentices to participate in rituals aimed to sow chaos in Gracklstugh. Narrak knows the stone giants are a pillar of the Deepking Horgar Steelshadow V power, and that cursing them with Demogorgon’s madness will be an appropriate first step toward delivering the entire city to the demon lord.
The cage by the tunnel holds a death dog, watched over by a nervous derro cultist. Atop the platform, Narrak and four more derro cultists are performing a ritual around the statue at its center. The cultists' chanting is punctuated with Narrak calling out the name “Demogorgon!” Also atop the platform, resting comfortably in an fungi-filled alcove (and initially out of the party’s view), is Narrak’s bodyguard - a female ettin named Grula-Munga.
When intruders appear, the cultists cease their chanting and take up positions along the edge of the platform as Grula-Munga rises to her feet and picks up her weapons. At the same time, the cultist standing next to the cage releases the death dog. Narrak continues his part in the ritual until the characters kill the death dog or one of the cultists, at which point he joins the battle. The door to the death dog’s cage is held shut with a simple clasp and requires an action to open.
If any of the quasits escaped from area 11, they warn the cultists that intruders are near. Otherwise, the characters might catch the cultists by surprise. The quasits remain invisible and stay close to Narrak.
Fungi Patches
Fungi is rampant throughout this area, growing in large patches on the floors and walls.
Two thick fungi patches grow by each wall in the western tunnel. Clinging to the north wall is a shrieker that party members can recognize with a successful DC 12 Intelligence (Nature) check. The shrieker starts screaming as soon as anyone comes within 30 feet of it.
The crack in the floor by the east wall is surrounded by a thick fungus patch that is difficult terrain for Small and Medium characters, and provides half cover for Tiny creatures. Growing among the common fungi are 2d6 bigwigs and 2d6 pygmyworts.
Platform
The cavern floor rises to form a natural 5-foot-high platform. A glowing ritual circle dominates the top of the platform. Any non-derro that enters or touches the circle must succeed on a DC 13 Wisdom saving throw or gain one level of madness (see “Madness” in chapter 2). Whether the save succeeds or fails, the creature can’t be affected by the circle in this way again. In addition, non-evil creatures within the circle have disadvantage on attack rolls and saving throws.
The statue within the ritual circle is 2 feet tall, weighs 100 pounds, and looks vaguely like a crouching stone giant with a lump on its neck where a second head is beginning to form. The statue is engraved with profane symbols, with the name “Dorhun” scribed in Dwarvish into its back. A successful DC 16 Intelligence (Arcana or Religion) check allows a character to recognize the profane symbols as being related to Demogorgon.
A search of the platform uncovers a similar but broken statue near a locked iron chest and a pile of books (see “Treasure” for more information on the chest and books). The broken statue is similar to the statue in the circle, except it has the name “Rihuud” carved into its back and its second head is fully formed. If Rihuud is dead, the broken statue turns to dust when the characters touch it. If the characters spared Rihuud’s life, a successful DC 12 Intelligence (Arcana or Religion) check reveals that the second head is a conduit for the curse’s magic, and that removing it and returning it to Stonespeaker Hgraam in Cairngorm Cavern will allow the elder giant to end Rihuud’s curse.
Trap
The tunnel west of this cavern contains a hidden pit (see “Sample Traps” in chapter 5 of the Dungeon Master’s Guide). Debris conceals the lid, which is made of thin zurkhwood that breaks when a creature weighing 50 pounds or more steps on it. (A character of reduced size might not weigh enough to break the lid.) The pit is 10 feet deep, and its floor is covered by a patch of green slime (see “Dungeon Hazards” in chapter 5 of the Dungeon Master’s Guide). Any creature that falls into the pit takes 1d6 bludgeoning damage and automatically fails its Dexterity saving throw to avoid the slime.
Treasure
If the characters return the broken statue (or, at the very least, its second head) to Stonespeaker Hgraam, he gives them an emerald worth 500 gp as a reward, as well as his promise to vouch for them in anything they seek to accomplish in Gracklstugh.
Narrak has a key around his neck that opens the lock on the iron chest, which can also be picked with thieves' tools and a successful DC 17 Dexterity check. The chest contains a jar of
The books have pages made from trillimac caps (see “area Fungi of the Underdark” in chapter 2). They contain the mad scribblings of Narrak and his fellow derro savants. A character proficient in Arcana, Investigation, or Religion can spend 8 hours poring through them; subtract 1d4 hours if the character reads Dwarvish. At the end of this time, the character knows that the books outline two rituals: one that causes a one-headed creature to sprout a second head, and another that allows the grafting of a severed head onto a living creature. The notes fail to mention that the ritual’s caster must be suffering from some form of madness to perform either ritual successfully.
Tucked in one book are two scrolls: one that bears a list of six stone giant names (including Rihuud’s and Dorhun’s) and another that is actually a letter written in broken Dwarvish:
Narrak-
Need more scrolls! Stonespeaker Hgraam has traps traps traps. But Droki is wily too and very small! I can hear talk, and in talk they say names, and I hear names and write names and give you names so you give me time. But you have to give me more scrolls. Magicky spelly scrolls!
-Droki
Additional treasure, depending on whether or not Droki delivered his parcel and took his payment:
XP Awards
Award 100 XP to each character for discovering Demogorgon’s influence on the cultists.
The characters can complete a quest by turning over the books, scrolls, and letter to Errde Blackskull. Award 150 XP to each character when they deliver the items. If the characters ask Errde about Narrak, she tells them that he was a junior member of the Council of Savants.
13. Dumping Pit
Victims of Narrak’s experiments are dumped here. Exposure to the faerzress has begun to animate the corpses.
This cavern is one enormous pit that reeks of death and decomposed flesh. The glow of faerzress is everywhere, seeming to flow like fog around dark shapes shambling across the pit floor. A single derro watches from atop a 15-foot-high ledge. A crack in the southeast wall of the pit leads to a narrow tunnel and is flanked by mounds of fungi and offal.
The pit is 15 feet deep, and the ledge that overlooks it is lined with pointy bits of scrap metal to make any climbing attempt perilous. A creature trying to reach the top of the ledge must succeed on a DC 12 Strength (Athletics) check. On a failed check, a creature takes 3 (1d6) slashing damage and remains in the pit. The pit’s floor is difficult terrain due to the many corpses and body parts strewn around.
A single derro stands on the ledge overlooking the pit, which contains seven shambling zombie - three duergar and four grimlocks. The grimlock zombies are drawn to noise, while the duergar zombies attack any living creatures they see in the pit. Meanwhile, the derro uses its crossbow to take shots at any living creatures it sees.
A crawling claw wearing an obsidian ring on one stubby finger (see “Treasure”) lurks amid the offal mounds. These mounds are difficult terrain to Small and Medium creatures, and the fungi growing atop them provide cover to Tiny creatures. The shriveled gray hand once belonged to Pelek the svirfneblin (see “Development”).
The crack in the southeast wall between the mounds leads to a narrow, meandering tunnel, the floor of which is sunk below a foot of foul water. See the “Whorlstone Tunnels: General Features” sidebar for rules on narrow tunnels and foul water.
Treasure
Faerzress has transformed Pelek’s obsidian ring into a single-use magic item. When a living creature puts it on, the ring disappears, and the creature’s skin becomes as hard as obsidian for the next hour. For as long as the effect lasts, the creature gains the benefit of a stoneskin spell.
Development
If the characters capture and interrogate the derro, he talks willingly if they agree to spare him. He knows as much as the quasits in area 11.
Killing the crawling claw and burying its remains in Blingdenstone lays Pelek’s spirit to rest (see area 1b).
14. Obelisk
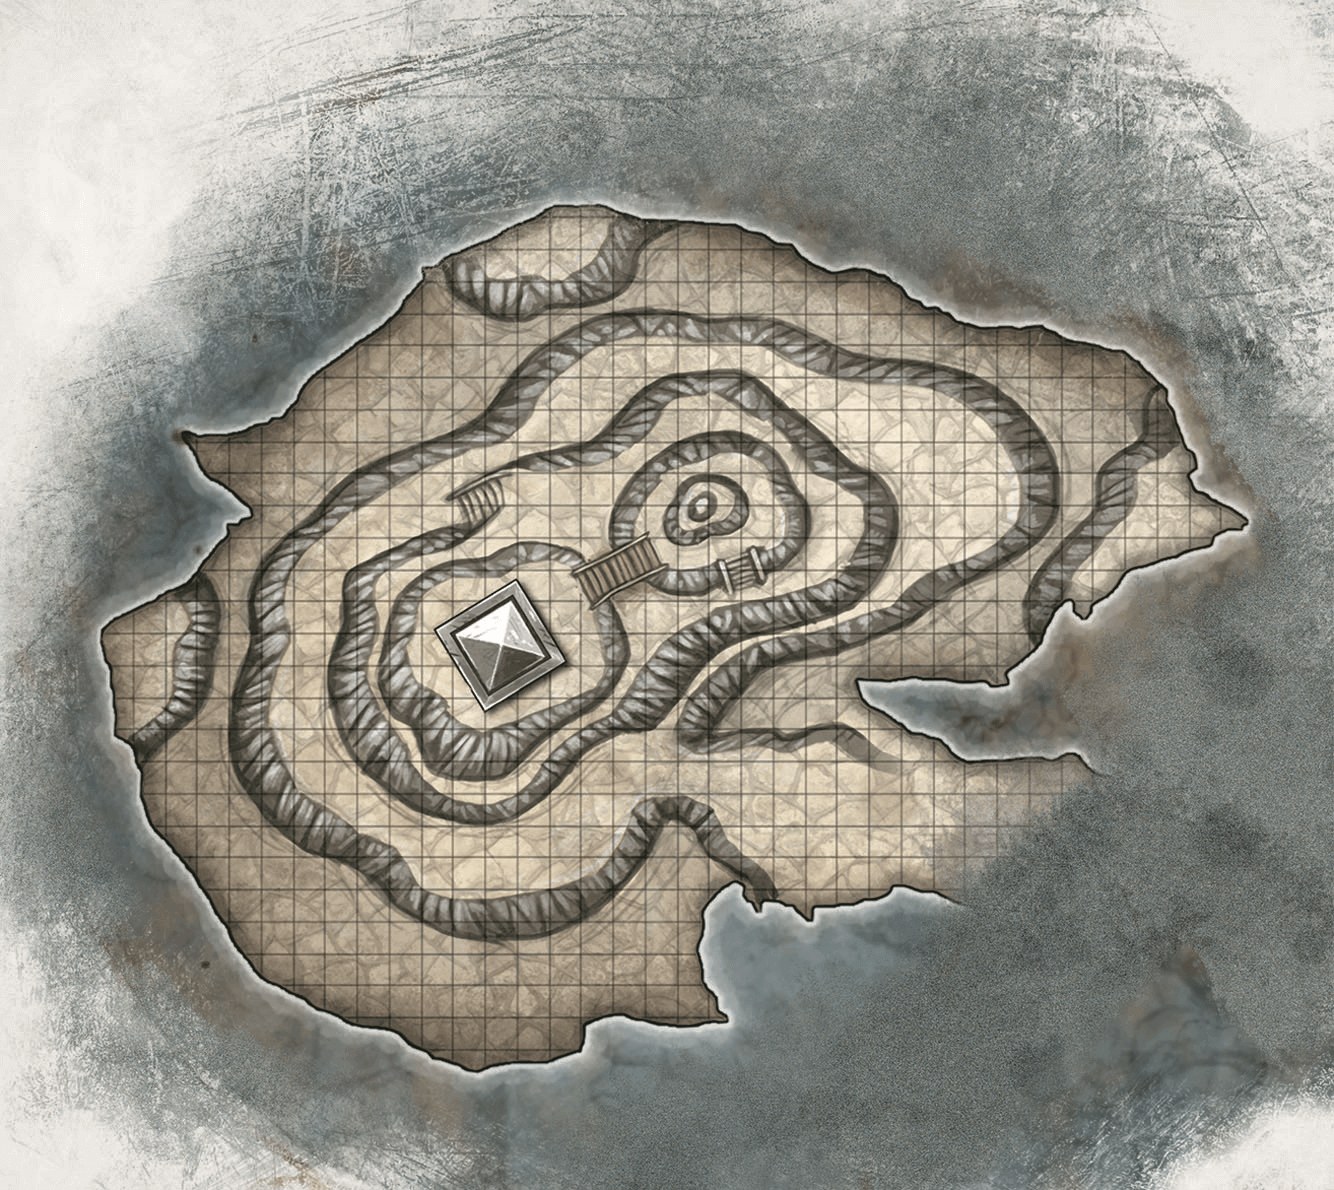
The Gray Ghosts believe that the mysterious obelisk in this cavern is an important source of magical power, and they are intent on rebuilding it. The obelisk was broken long ago. However, shards of the obelisk that appear throughout the Underdark are magically absorbed into it as soon as they touch its metal surface. The leaders of the Gray Ghosts are obsessed with finding missing shards and completing this monolith, but not even they know what will happen when the obelisk is made whole again.
After a steady upward climb, the tunnel opens into a huge, well-lit chamber. The glow of faerzress and bioluminescent fungi compete with shafts of white light that fall upon naturally formed shelves along the walls as well as a rocky mesa at the center of the cavern. Crudely formed ramps connect the different levels of the mesa up to the height of its two topmost tiers, which are linked by a sturdy bridge. Atop one of those tiers sits a large red egg. Atop the other stands a 50-foot-tall obelisk made of smooth black metal with a few noticeable imperfections, as though small parts of it were somehow chipped away.
A female derro stands close to the obelisk, gently patting and stroking its surface. The obelisk flashes once, the glow of faerzress around the cavern flaring in response. The derro squeals with glee as she snatches an object up from the ground, then writes something down in a small notebook.
The chamber is brightly lit, as if by sunlight. The sunlight is just a natural trick caused by crystal growths reflecting and amplifying the light of the bioluminescent fungi growing on the walls. The characters realize this if they climb near the ceiling of the cavern, where the optical trick is easy to discern.
The different levels of the mesa are separated by 10-foot-high cliffs. Climbing a cliff requires a successful DC 12 Strength (Athletics) check. Pliinki, a mad derro savant, stands atop of the mesa. Hidden on a shelf above the cavern’s entrance, a spectator tasked with guarding this area sees the characters as soon as they walk 15 feet into the cavern. The spectator screeches an alarm and attacks, killing non-derro with glee. As it fights, it projects telepathic ramblings into the characters' minds, mostly dealing with how exciting it is to have intruders to kill and how even more exciting things will be when the obelisk is complete.
Pliinki shouts crass obscenities at the characters in a raspy voice while commanding the spectator to dispose of them. Both she and the spectator fight to the death.
Obelisk
Made from a black metal of alien origin, this monolith is perfectly smooth except for the cracks and chipped-off edges where it was splintered by some unknown force. The obelisk is 15 feet per side at its base, stands 50 feet tall, and tapers slowly to a pyramidal cap.
Any character proficient in Arcana can tell that the obelisk’s fractures are leaking quasi-magical energy. The character further understands that feeding magical energy into the obelisk might activate its latent magic. Spending a spell slot of any level while touching the obelisk activates it and teleports everyone on the mesa to a location in the Underdark just outside the northwest gate of Gracklstugh.
The character who expended the spell slot knows the teleport effect can be repeated, but that this power is only temporary - a fluke due to the recent disruption of faerzress throughout the Underdark. Both the potency and the nature of the effect could change within a week or two, and this teleport effect likely bears no relation to the obelisk’s actual purpose.
If the characters took the lump of metal from Droki or the Gray Ghosts, they notice the obelisk is made from the same material. If the lump is touched to the obelisk, it is instantly absorbed, repairing a crack on its surface.
Red Dragon Egg
The egg atop the northeast mesa is an unhatched dragon egg that the Gray Ghosts stole from the Keepers of the Flame. The 4-foot-tall, 3-foot-diameter egg weighs 180 pounds, and without fire to keep it warm, the egg can’t hatch. If and when the egg does hatch, a red dragon wyrmling emerges and bonds with the first creature it sees.
Treasure
The derro savant carries a single gold coin, a stick of charcoal, and a battered notebook with pages made from trillimac (see “area Fungi of the Underdark” in chapter 2). The coin is a shilmaer, an ancient gold coin traded among surface elves. The notebook contains Dwarvish writing, specifically a long list of random items, mostly coins and jewelry. There are no dates, but some entries appear in different handwriting. The last entry describes the “miraculous” appearance of the gold coin.
Development
If the characters capture and interrogate Pliinki, she laughs at their folly as she tells them that the Whorlstone Tunnels are nowhere near the surface. She believes the obelisk was hidden here by Diirinka, the derro god, and that it contains “unimaginable power.” Pliinki and her fellow savants hope to harness the obelisk’s power and use it to conquer Gracklstugh.
If the characters take the dragon egg to Themberchaud, he destroys it and rewards the party with a magical potion or oil plucked from his hoard (See “Agents of the Wyrmsmith” for a description of Themberchaud’s hoard). If the characters return the egg to the Keepers of the Flame, Gartokkar Xundorn promises them safe passage through Gracklstugh if they mention nothing about the egg to Themberchaud.
XP Awards
Taking the coin and the notebook to Ylsa Henstak in the Blade Bazaar fulfills her quest and earns the characters 100 XP each.
If the characters describe the obelisk to Gartokkar Xundorn, he assumes that is what the Gray Ghosts are using to wreak havoc in Gauntlgrym and dispatches a force to study it. Each character earns 100 XP for completing the task set for them by the Keepers. Award each character an additional 150 XP if the party delivers the red dragon egg to either the Keepers or to Themberchaud.
14a. Fungi-Covered Doors
A set of double doors are hidden by a patch of fungi that includes 2d6 bigwigs and 2d6 pygmyworts. Characters west of the doors must succeed on a DC 15 Wisdom (Perception) check to notice the doors behind the fungi. The doors are fashioned from planks of zurkhwood and barred from the east side. A successful DC 20 Strength check allows a character to break through the doors, but this alerts the derro savant and the spectator in area 14.
Leaving Gracklstugh
The characters can gain the means to leave the city - and information to guide them on their journey - from a number of different sources, depending on the NPCs they interact with and the quests they undertake.
Errde Blackskull is true to her word, and she lets the characters leave the city freely if they fulfilled the tasks she set for them. Working for Themberchaud or the Keepers of the Flame leaves the characters in a position where they can at least avoid arrest in the city.
Deciding the next step for the characters depends on what information or quests the characters picked up in Gracklstugh. Heading for Neverlight Grove (see chapter 5) or Blingdenstone (see chapter 6) are the obvious next steps, as both places hold the promise of a route to the surface world. Alternatively, the characters can try their luck in the Labyrinth or the Wormwrithings.
Some of the quests the characters complete have the potential to change the power structure of Gracklstugh. For example, aiding Errde Blackskull and the Stone Guards might grant the characters the privilege of an audience with King Horgar Steelshadow V at some later time. If the characters press Errde, Gartokkar, or Stonespeaker Hgraam for a meeting with the Deepking Horgar Steelshadow V, use the following section to run an encounter in the Deepking’s palace.
Hold of the Deepking
The Hold of the Deepking stands south of Laduguer’s Furrow and north of Themberchaud’s lair. When the characters first lay eyes on it, read the following boxed text aloud to the players.
The Hold of the Deepking is a dark and foreboding edifice lodged between two great columns that rise up into thick clouds of smoke that conceal the cavern ceiling. Giant basalt braziers filled with molten lava bathe the palace facade in a hellish glow, and the thick stone walls bristle with iron turrets and battlements.
There appears to be no one guarding the palace, but this is an illusion. All of the palace guards are invisible, and characters who observe the palace for some time can hear duergar guards in heavy armor marching to and fro.
Two hundred invisible duergar stone guard protect the palace and its king. Fifty stand at attention in perfect rows before the palace, ready to cut down anyone who approaches the palace gates unescorted. Another fifty watch from the turrets and battlements. One hundred more stand guard in the palace and comprise the Deepking’s honor guard.
Audience With the Deepking
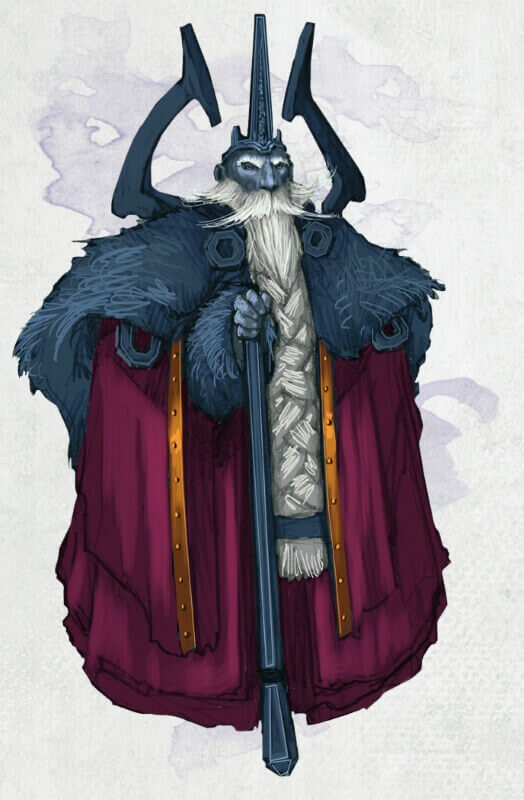
Characters who befriend Stonespeaker Hgraam or complete quests for Errde Blackskull or Gartokkar Xundorn can use their newfound influence to gain an audience with the Deepking Horgar Steelshadow V. Characters escorted to the palace by Hgraam, Errde, or Gartokkar are admitted inside and led past rows of invisible duergar guards to the Deepking’s throne room.
Lava pours down troughs cut into the black basalt walls of this vast hall. The heat is oppressive, and the air reeks of sulfur. Thick black columns support the heavy ceiling, and at the far end of the hall stands an iron throne atop a polished obsidian dais. A crowned duergar encased in armor sits on the throne. Next to him stands a royal consort wearing a gown made of gold coins.
An invisible wall of force stands between the Deepking’s dais and the characters. Whether the Deepking Horgar Steelshadow V is of a mind to fight the demon lords is up to you, although like many other duergar in the city, Deepking Horgar Steelshadow V has been touched by the demon lords' madness. Roll on the Indefinite Madness table in chapter 8 of the Dungeon Master’s Guide to determine Horgar’s flaw.
If the characters attack the Deepking, use the knight statistics in the Monster Manual to represent him, with the following modifications:
- Horgar is lawful evil.
- He speaks Draconic, Giant, and Dwarvish.
- He has AC 20 and wears dwarven plate.
- He has advantage on saving throws against poison, spells, and illusions, as well as to resist being charmed or paralyzed.
- While in sunlight, he has disadvantage on attack rolls, as well as on Wisdom (Perception) checks that rely on sight.
- He has the Enlarge and Invisibility action options of a duergar (see the Monster Manual).
- He wears gauntlets of ogre power, giving him a Strength score of 19 (+4).
- He wields a +2 warhammer instead of a greatsword: +8 to hit, reach 5 ft., one target. Hit: 10 (1d8+6) bludgeoning damage, or 11 (1d10+6) bludgeoning damage if used with two hands. While Horgar is enlarged, the damage increases to 15 (2d8+6) or 17 (2d10+6) bludgeoning damage, respectively.
The Deepking’s royal consort is a succubus in the guise of Shal, a female duergar. The succubus is a loyal servant of the demon lord Graz’zt. Her only task is to make sure no one tries to rid Horgar of his madness. The gown she wears was a gift from Horgar. It weighs 75 pounds and is worth 750 gp.
Development
If the characters expose the succubus as a fiendish spy and help restore Horgar’s sanity, the Deepking becomes friendly toward them and tries to set them against the drow, whom he blames for the spreading madness.