Once the adventurers escape from Velkynvelve, they’ll want to escape the Underdark. Already miles beneath the surface, they must make their way through an endless maze of passages and caverns, avoid pursuit by the drow, and find a route to the world above-all the while dealing with the dangers of the Underdark and struggling to find the resources they need to survive.
This chapter presents guidelines for the characters' travels between the various Underdark locales detailed in the other chapters of Out of the Abyss. Specific areas (including the Darklake region in chapter 3) offer modifications to these guidelines to suit those areas' particular qualities. This chapter also offers guidelines for the drow pursuit of the escaped prisoners, along with additional encounters you can place along the adventurers' route as they travel.
Where to Go?
The players' first question upon escaping from Velkynvelve is likely, “Where do we go next?” The adventurers must find a way out of the Underdark and back to the surface world. Their NPC companions have destinations of their own in mind, and are the ones best able to navigate the subterranean realms. As such, the adventurers will be dependent on their guidance. The NPCs can offer directions and suggestions as follows:
- Buppido knows how to reach Gracklstugh from the southern route out of Velkynvelve. He can also find a route to Gracklstugh from the Darklake. Buppido urges the characters to go to Gracklstugh to acquire better equipment, and out of a desire to return to his people. He also intends to murder the characters one by one along the way, believing them to be divine offerings delivered into his hands.
- Prince Derendil, the delusional quaggoth, can’t offer any useful directions, but he gladly accompanies the party, eager to go to the surface world.
- Eldeth Feldrun is unfamiliar with this region of the Underdark and can’t navigate, but she has a +5 bonus on Wisdom (Survival) checks and can help out in that regard.
- Jimjar can guide the party to Blingdenstone from the north route out of Velkynvelve. The svirfneblin city will give the characters access to the surface, although Jimjar is fine with visiting other interesting places along the way, as well as taking Stool back to its home.
- Ront is unfamiliar with the Underdark and can’t navigate. He’s willing to stick with the adventurers as long as they seek a destination that gets him back to the surface world.
- Sarith Kzekarit is the best potential guide in the group, but also the most deceptive. He can navigate to any region of the Underdark shown on the map, but will encourage the characters to travel to Neverlight Grove (see chapter 5). He claims to want to take advantage of Stool’s offer of sanctuary, but it is actually the influence of Zuggtmoy’s demon-tainted spores upon his mind.
- Shuushar can navigate through the Darklake once the party is within three miles of any part of it. He’s willing to travel with the characters and guide them, and suggests visiting the kuo-toa town of Sloobludop to acquire boats. Shuushar wishes to return to his own people in hopes of guiding them to the enlightenment he has achieved.
- Stool can’t navigate and has no knowledge of the local area, but it desperately wants to return home to Neverlight Grove, pleading with the characters to take it there. It claims that its people will be grateful and offer the party shelter and aid, and describes its sovereign as wise in the hidden ways of the Underdark.
- Topsy and Turvy can navigate to Blingdenstone, but they’re reluctant to do so. As such, they are likely to support any suggestion that will not take them to their former home. Once they feel safer, they’re likely to strike out on their own, just as they were before the drow captured them.
On Their Own
In the event that none of the prisoners who manage to escape with the party can navigate in the Underdark—or none that the characters are willing to heed at any rate—the adventurers will be forced to wander. The party remains lost until the characters encounter creatures able to give them directions or intent on capturing them. Such creatures can include kuo-toa from Sloobludop, duergar slavers or merchants from Gracklstugh, the goblins from the Silken Paths encounter, or even their drow pursuers intent on dragging them back to Velkynvelve.
Underdark Travel
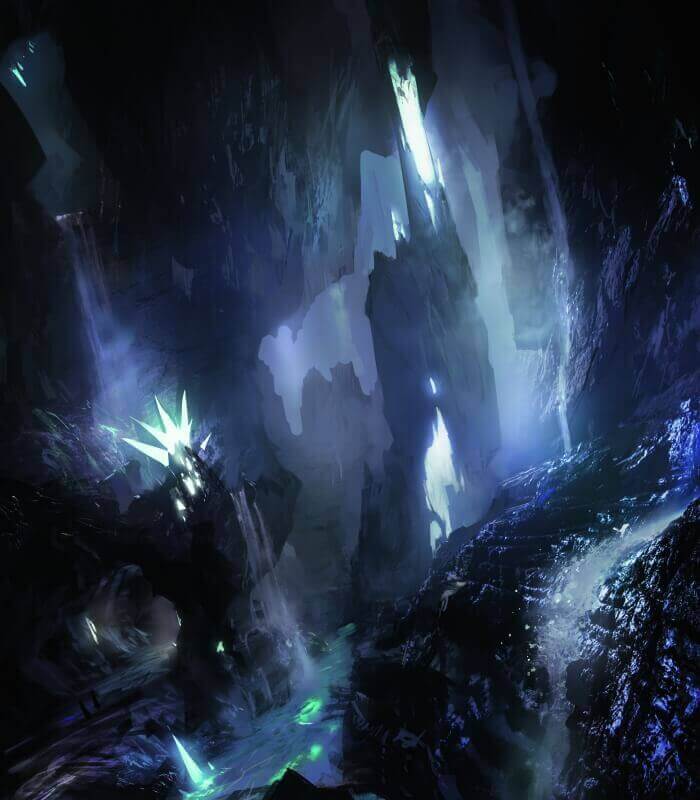
The Underdark is a vast network of caverns, tunnels, vaults, and passages stretching from one end of Faerûn to the other. Its physical features are even more varied than those of the surface world. Subterranean rivers, fungus fields, deep gorges, underground cities, yawning chasms-the adventurers will have to deal with all these features and more.
Much of the party’s travel through the Underdark is handled abstractly, using the rules and advice in chapter 8, “Adventuring,” of the Player’s Handbook. The following specific guidelines apply to travel in the Underdark during this adventure.
Travel Pace
Travel pace in the Underdark is significantly slower than for overland travel. Not only are the tunnels and passages often difficult terrain with uneven surfaces, but routes in the Underdark are rarely direct, and the characters must follow available passages and their various twists and turns, climbs and descents. Creatures that can burrow through solid rock (such as purple worms) move at their normal burrowing speed, but this isn’t likely an option for the party.
Underdark Travel Pace
| Pace | Miles Per Day | Effect |
|---|---|---|
| Fast | 8 | -5 penalty to passive Wisdom (Perception) scores, no foraging |
| Normal | 6 | - |
| Slow | 4 | Improved foraging or able to use Stealth |
A fast pace makes it harder to spot ambushes or items of interest and prevents the characters from foraging, while a slow pace allows the characters to travel stealthily enough to surprise or sneak past creatures they encounter, and improves their chances of successful foraging for food and water.
The Underdark Travel Times table shows the time to travel between the locations in chapters 1 through 6 of the adventure. These times assume that the party moves at a normal pace without stopping (other than for time spent resting or becoming lost). For a fast pace, reduce the travel times by one third; for a slow pace, increase them by one third.
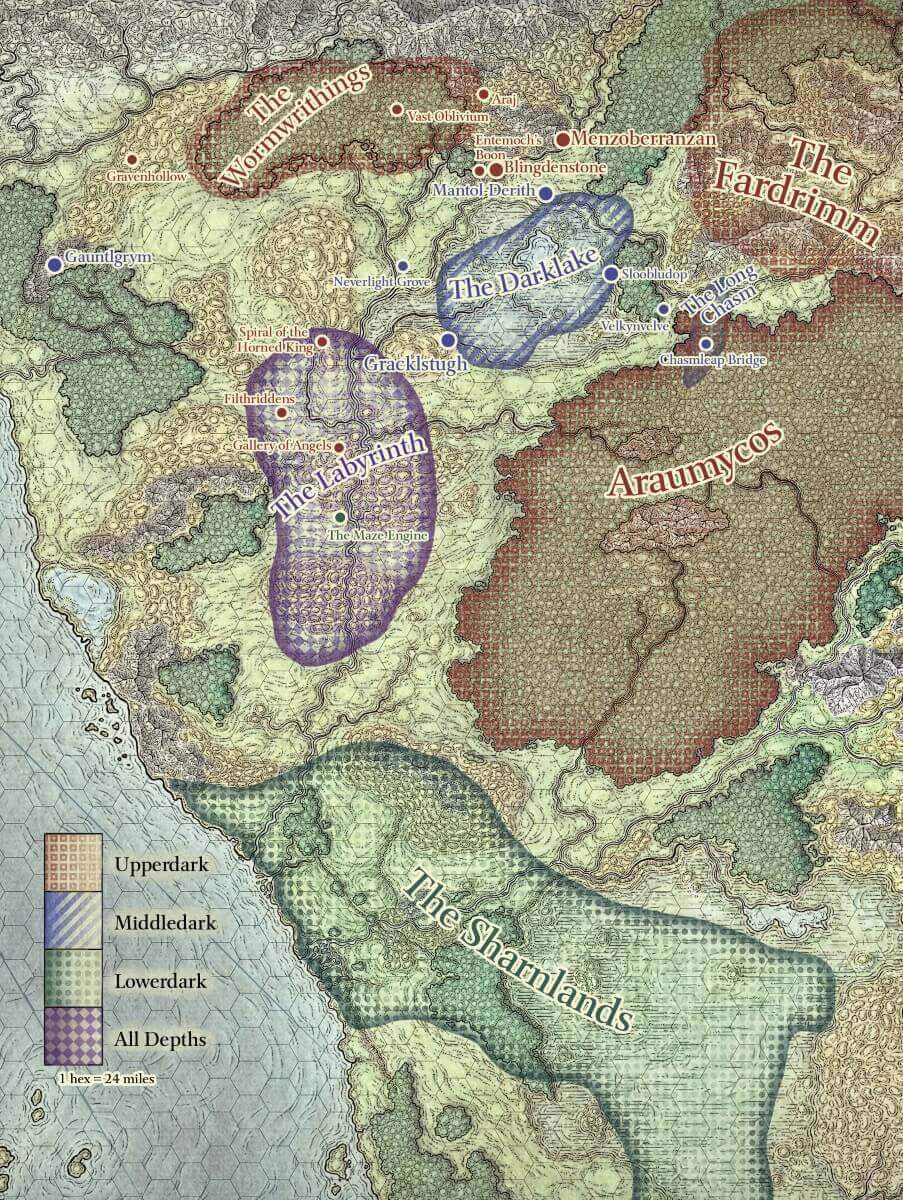
Underdark Travel Times
| Location | Velkynvelve | Sloobludop | Gracklstugh | Neverlight Grove | Blingdenstone | Menzoberranzan |
|---|---|---|---|---|---|---|
| Velkynvelve | - | 8 days | 28 days | 36 days | 30 days | 26 days |
| Sloobludop | 8 days | - | 20 days | 26 days | 20 days | 20 days |
| Gracklstugh | 28 days | 20 days | - | 12 days | 20 days | 27 days |
| Neverlight Grove | 36 days | 26 days | 12 days | - | 16 days | 24 days |
| Blingdenstone | 30 days | 20 days | 20 days | 16 days | - | 8 days |
| Menzoberranzan | 26 days | 20 days | 27 days | 24 days | 8 days | - |
Encounter Setup
When an encounter occurs during the adventurers' journey, a number of factors will play into its setup and potential difficulty.
Space and Marching Order
Ask the players to establish two marching orders for the characters-one for moving single file and one for moving two abreast. Then when an encounter occurs, roll a d6. On a roll of 1-2, the party is traveling through a narrow passageway, so position the adventurers in the single-file marching order. On a roll of 3-4, the characters are traveling through a standard passageway and can use the two-abreast marching order. On a roll of 5-6, the encounter occurs in a large open area, so allow the players to position the characters wherever they like.
Illumination
Roll a d6 to determine how an encounter area is illuminated. On a roll of 1-3, the area is dimly lit by the phosphorescent moss and lichen common in the Underdark, or by faerzress (see “Faerzress”). On a roll of 4-6, the area is dark except for whatever light sources the characters might have.
Noticing Threats
The passive Wisdom (Perception) scores of characters in the party count toward noticing hidden threats only if both the following conditions are met:
- The characters are able to see the threat (due to illumination or darkvision) or otherwise perceive it.
- The characters aren’t engaged in other activities, including navigating or foraging.
A fast pace imposes a -5 penalty to passive Wisdom (Perception) scores to notice threats. You might also decide that only characters in a particular rank of the marching order are able to notice a specific threat.
Surprise
When an encounter occurs, determine if the adventurers or their foes are surprised, as normal. The adventurers can achieve surprise only if all the following conditions are met:
- The encounter occurs while the party is moving (not stopped or camped).
- The party elected the stealth option while moving at a slow pace.
- At least one party member is capable of noticing the threat and communicating it to the rest of the group.
Navigating
Becoming lost is a serious risk in the twisting tunnels of the Underdark, and travelers can wander in circles without knowing it. Creatures unfamiliar with a given region of the Underdark are automatically lost, wandering in a random direction for every 4 hours of travel until they encounter an area they are familiar with (which could be a very long time).
Even creatures that know the routes of the Underdark aren’t immune. For each day of travel, and any time the characters set out again after finishing a short or long rest, the party’s navigator makes a DC 10 Wisdom (Survival) check. If the party is moving at a slow pace, the navigator gains a +5 bonus to the check, while a fast pace imposes a -5 penalty. A failed check result means the characters become lost, wandering in a random direction for 1d6 hours before the navigator can make a new check to find the right path.
Mapping
A character not focused on any other task-including watching for danger while traveling-can record the group’s progress through the Underdark and create a map of the route. Such a map can be a useful resource in later chapters of the adventure when the characters retrace their steps. Having a map allows the party to navigate that area without any chance of becoming lost.
Foraging
Unless they obtain a supply of food and water, the adventurers must forage to survive on their journey. Finding sustenance in the Underdark is difficult but not impossible. Characters can gather food and water if the party travels at a normal or slow pace. A foraging character makes a Wisdom (Survival) check. The DC is typically 15, but might be as high as 20 in some parts of the Underdark. Food and water requirements for characters are described in chapter 8, “Adventuring,” of the Player’s Handbook.
In addition to foraging, spells such as
Creature Food Yield
| Creature Size | Food Gained |
|---|---|
| Tiny | 1 lb. |
| Small | 4 lb. |
| Medium | 16 lb. |
| Large | 32 lb. |
The characters' need to forage and acquire supplies serves as a motivator to drive them to explore and visit different parts of the Underdark. The more desperate their need becomes—as levels of
Time-Keeping
With no sunlight, visible sky, seasons, or weather in the Underdark, most characters can only track the passage of time based on their periods of rest. Most Underdark creatures do the same (if they care about timekeeping at all), unless there is a local means of keeping time.
Faerzress
An unusual magical energy the drow call faerzress pervades much of the Underdark. The origin of this mysterious arcane power is unknown. Legend claims it is an ancient elven magic dating back to the time when the dark elves were first exiled from the world above. The drow and other Underdark creatures use the properties of areas suffused with faerzress to protect their settlements.
Areas suffused with faerzress can range in size from a few dozen feet across to several miles in diameter, and feature the following effects:
- Areas suffused with faerzress are always filled with dim light.
- A creature in an area suffused with faerzress has advantage on saving throws against any divination spells. If a divination spell doesn’t allow a saving throw, the caster must succeed on a DC 15 Constitution saving throw to cast the spell. Failing this save means the spell is wasted and has no effect.
- Any creature attempting to teleport into, within, or out of a faerzress-suffused area must succeed on a DC 15 Constitution saving throw. On a failed save, the creature takes 1d10 force damage and the teleportation attempt fails. Even if the save succeeds, the teleportation attempt can suffer a mishap as if the destination was known only by description, regardless of how familiar the destination actually is. See the table in the teleport spell for more information.
- Areas suffused with faerzress have become tainted by the chaos of the demon lords. When a spell is cast in a faerzress-suffused area, the caster rolls a d20. On a roll of 1, the spell has an additional effect, determined by rolling on the Wild Magic Surge table in chapter 3, “Classes,” of the Player’s Handbook.
Though faerzress can’t be dispelled, its effects are temporarily suppressed in the area of an antimagic field.
Equipment
The equipment the characters have on hand will depend on what they were able to salvage or steal in their escape from Velkynvelve. Indeed, one of the primary reasons for the party to visit known settlements in the Underdark is to acquire proper equipment and provisions.
Crafting
Characters can use downtime during their travels to craft equipment, provided they are proficient with the necessary tools and have access to them (see “Downtime Activities” in chapter 8 of the Player’s Handbook). Having to improvise tools doubles the crafting time, and some items require materials that are hard to find in the Underdark, including wood and other surface-world plants. Leather, bone, or zurkhwood (see “area Fungi of the Underdark” later in this chapter) might substitute in some cases. Crafting can include modifying scavenged or salvaged items to fit other needs, such as creating a makeshift suit of armor from gathered pieces of armor and other materials.
Components
Spellcasters might be without material components for their spells (see “Components” in chapter 10 of the Player’s Handbook). They can acquire component pouches and spellcasting focuses from defeated enemy spellcasters, settlements, and traders, or they can craft such items during their downtime activities while traveling.
Madness
At the best of times, the Underdark is a bizarre, alien, and inhospitable world, but the influence of the demon lords has transformed it into a domain of madness and chaos. Faerzress acts as a catalyst, spreading the demon lords' madness throughout the Underdark.
Once the party escapes Velkynvelve and strikes out into the Underdark, begin taking into account the effects of demonic madness on the characters' sanity (see “Madness” in chapter 8 of the Dungeon Master’s Guide). At various times in the adventure, characters will be called upon to make a saving throw to resist some madness-inducing effect. In addition, you can have one or more characters make a saving throw against madness whenever one of the following events occurs:
- The characters encounter or witness something particularly alien or disturbing (such as a demon lord).
- The characters stay in a faerzress-suffused area for a long time (eight or more consecutive hours).
- A character takes psychic damage, particularly in an area suffused with faerzress.
In Out of the Abyss, madness is measured in three levels:
Madness Levels
| Level | Effect |
|---|---|
| 1 | Bout of short-term madness (lasts 1d10 minutes) |
| 2 | Bout of long-term madness (lasts 1d10 × 10 hours) |
| 3 | Bout of indefinite madness (lasts until cured) |
A creature’s madness level starts at 0. When the creature fails a madness saving throw, its madness level increases by 1, and the creature immediately suffers the level’s effect (as determined by rolling on the Short-Term Madness, Long-Term Madness, or Indefinite Madness table in the Dungeon Master’s Guide, as appropriate). When the effect ends, the creature’s madness level doesn’t change. Any time the creature’s madness level increases, it suffers the effect of the new level.
If a creature with level 3 madness fails a madness saving throw, its madness level becomes 1. In this way, characters can potentially accumulate multiple forms of madness.
Bouts of short- and long-term madness can be cured as described in the Dungeon Master’s Guide. Given the demonic source of the madness,
Death
Allowing the chips to fall where they may in combat emphasizes the challenging nature of this adventure. However, if the characters start falling just as fast, you might want to give the players some opportunities to return dead characters to life during the lower levels of their progress through Out of the Abyss.
- A
Spell Scroll (5th level) ofraise dead can turn up among some treasure, either when it is needed or for the characters to save for later. A successful DC 15 spellcasting ability check is required for a lower-level character to use such a scroll. - A strange faerzress effect can bring a fallen character back to life, but not without a cost. The restored character’s madness level increases by 1 upon being restored to life (see “Madness” earlier in this chapter).
- If a fallen character’s body is lost or left behind, the party’s drow pursuers find it. The drow high priestess casts
raise dead on the corpse so that the character can be questioned. The character might escape later, or can be reunited with the other adventurers in a later chapter of the adventure when the drow catch up to them.
If a player character is permanently slain, think about the ways a player might introduce a new character to the party in the midst of a journey through the Underdark.
- Convert one of the group’s existing nonplayer character allies-including fellow escaped prisoners from Velkynvelve-into a player character. Drow, dwarf, and deep gnome characters are all easily playable. You can even allow a player to take control of a more unusual NPC until a new character can join the group. This is particularly suitable if the player has already been managing that NPC (see “A Motley Crew” in chapter 1).
- A creature encounter could reveal a potential new party member, such as a surface dweller lost in the Underdark or sent there to investigate rumors of strange happenings. An escaped slave from another Underdark settlement is another possibility.
- A monster encountered by the party might be holding other victims or hostages (a giant spider with a still-living victim wrapped up in its web, or troglodytes holding prisoners destined for their larder, for example). Once the monsters are defeated, a former captive might join the group.
- Characters might meet up with new party members in any of the Underdark settlements they visit during the adventure, particularly visitors or locals with a strong reason to leave in a hurry.
Fungi of the Underdark
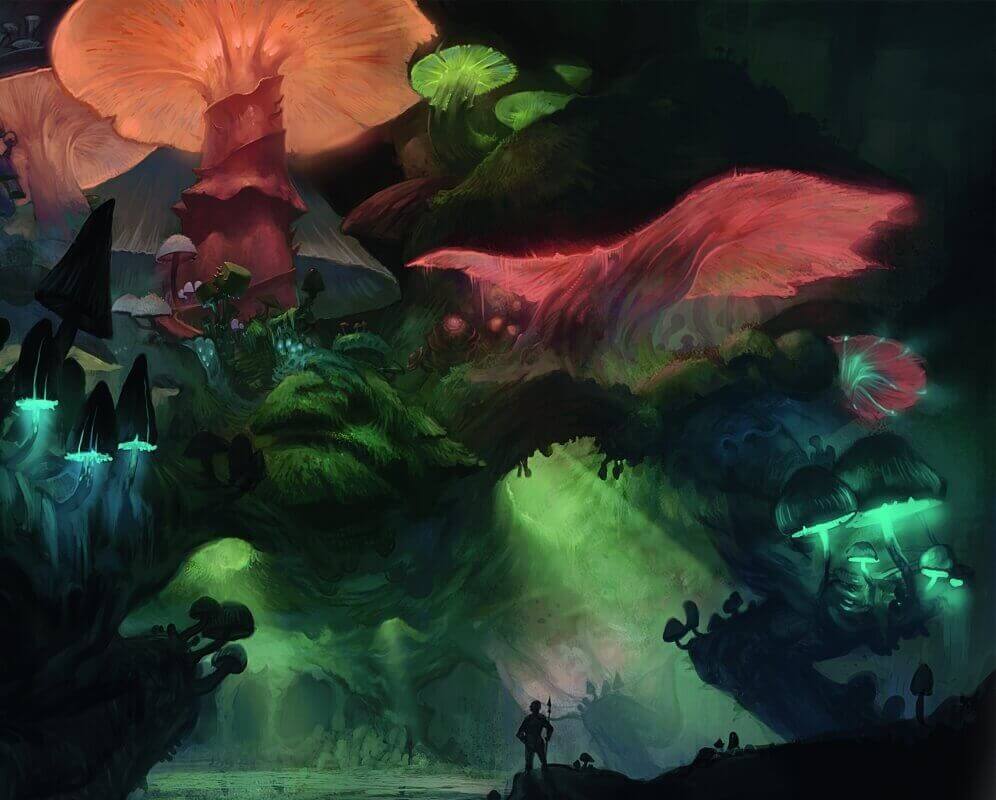
The Underdark is home to a tremendous variety of fungi with a variety of different uses. Characters can encounter different examples of the Underdark’s flora in their travels. Identifying a species of fungi and its potential uses requires a successful DC 15 Intelligence (Nature) check, but Underdark inhabitants are familiar with many of these species automatically.
Edible Fungi
Edible fungi provide food and water. Basic food and water requirements for characters are covered in chapter 8, “Adventuring,” of the Player’s Handbook.
A barrelstalk is a large, cask-shaped fungus that can be tapped and drained of the fresh water stored within it. A single barrelstalk contains 1d4+4 gallons of water and yields 1d6+4 pounds of food.
Dubbed the “grain of the Underdark,” a bluecap is inedible, but its spores can be ground to make a nutritious, bland flour. Bread made from bluecap flour is known as sporebread or bluebread. One loaf is equivalent to 1 pound of food.
Pale orange-white in color, fire lichen thrives on warmth, so it grows in regions of geothermal heat. Fire lichen can be ground and fermented into a hot, spicy paste, which is spread on sporebread or added to soups or stews to flavor them. Duergar also ferment fire lichen into a fiercely hot liquor.
Ripplebark is a shelf-like fungus that resembles a mass of rotting flesh. It is surprisingly edible. Though it can be eaten raw, it tastes better roasted. A single sheet of ripplebark yields 1d4+6 pounds of food.
A trillimac is a mushroom that grows to a height of four to five feet, and has a broad gray-green cap and a light gray stalk. The cap’s leathery surface can be cut and cleaned for use in making maps, hats, and scrolls (its surface takes on dyes and inks well). The stalk can be cleaned, soaked in water for an hour, then dried to make a palatable food akin to bread. Each trillimac stalk provides 1d6+4 pounds of food.
A waterorb is a bulbous fungus that grows in shallow water. A mature waterorb can be squeezed like a sponge, yielding a gallon of drinkable water and a pound of edible (if chewy and somewhat tasteless) food.
Zurkhwood is a massive mushroom that can reach a height of thirty to forty feet. Its large grain-like spores are edible and nutritionally equivalent to 1d4+4 pounds of food, but zurkhwood is more important for its hard and woody stalks. Zurkhwood is one of the few sources of timber in the Underdark, used to make furniture, containers, bridges, and rafts, among other things. Skilled crafters can use stains, sanding, and polishing to bring out different patterns in zurkhwood.
Exotic Fungi
The fungi species described in this section have strange properties but no nutritional value.
A nightlight is a tall and tube-shaped bioluminescent mushroom that grows to a height of 1d6+4 feet and emits bright light in a 15-foot radius and dim light for an additional 15 feet. A nightlight that is uprooted or destroyed goes dark after 1 round. If a living nightlight is touched, either by a creature or an object, its light goes out until it is touched again.
A Nilhogg’s nose is a small mushroom that grants any creature that eats it advantage on Wisdom (Perception) checks based on smell for 1d4 hours. However, the creature suffers disadvantage on saving throws against effects based on smell for the same amount of time.
A bioluminescent green moss that grows in warm and damp areas, ormu is particularly common near steam tunnels and vents. It sheds dim light in a 5-foot radius, and can be harvested, dried, and made into a phosphorescent powder or pigment.
Also known as “the devil’s mushroom,” a timmask is a two-foot-tall toadstool with orange and red stripes across its beige cap. Uprooting or destroying a timmask causes it to expel a 15-foot-radius cloud of poisonous spores. Creatures in the area must succeed at a DC 14 Constitution saving throw or be poisoned. While poisoned in this way, the creature is under the effect of a
Tongue of madness is an edible fungus that looks somewhat like a large human tongue. A creature that eats a tongue of madness must succeed on a DC 12 Constitution saving throw or compulsively speak aloud its every thought for the next hour. The effect can be ended with a lesser restoration spell or similar magic.
A one- to two-foot-tall mushroom with a combustible cap, a single torchstalk burns for 24 hours once lit. There is a 1-in-6 chance that a torchstalk explodes when lit, bursting into a cloud of fiery spores. Creatures within 10 feet of an exploding torchstalk take 3 (1d6) fire damage.
Barrelstalk
A barrelstalk is a large, cask-shaped fungus that can be tapped and drained of the fresh water stored within it. A single barrelstalk contains 1d4+4 gallons of water and yields 1d6+4 pounds of food.
Bluecap
Dubbed the “grain of the Underdark,” a bluecap is inedible, but its spores can be ground to make a nutritious, bland flour. Bread made from bluecap flour is known as sporebread or bluebread. One loaf is equivalent to 1 pound of food.
Fire Lichen
Pale orange-white in color, fire lichen thrives on warmth, so it grows in regions of geothermal heat. Fire lichen can be ground and fermented into a hot, spicy paste, which is spread on sporebread or added to soups or stews to flavor them. Duergar also ferment fire lichen into a fiercely hot liquor.
Ripplebark
Ripplebark is a shelf-like fungus that resembles a mass of rotting flesh. It is surprisingly edible. Though it can be eaten raw, it tastes better roasted. A single sheet of ripplebark yields 1d4+6 pounds of food.
Trillimac
A trillimac is a mushroom that grows to a height of four to five feet, and has a broad gray-green cap and a light gray stalk. The cap’s leathery surface can be cut and cleaned for use in making maps, hats, and scrolls (its surface takes on dyes and inks well). The stalk can be cleaned, soaked in water for an hour, then dried to make a palatable food akin to bread. Each trillimac stalk provides 1d6+4 pounds of food.
Waterorb
A waterorb is a bulbous fungus that grows in shallow water. A mature waterorb can be squeezed like a sponge, yielding a gallon of drinkable water and a pound of edible (if chewy and somewhat tasteless) food.
Zurkhwood
Zurkhwood is a massive mushroom that can reach a height of thirty to forty feet. Its large grain-like spores are edible and nutritionally equivalent to 1d4+4 pounds of food, but zurkhwood is more important for its hard and woody stalks. Zurkhwood is one of the few sources of timber in the Underdark, used to make furniture, containers, bridges, and rafts, among other things. Skilled crafters can use stains, sanding, and polishing to bring out different patterns in zurkhwood.
Nightlight
A nightlight is a tall and tube-shaped bioluminescent mushroom that grows to a height of 1d6+4 feet and emits bright light in a 15-foot radius and dim light for an additional 15 feet. A nightlight that is uprooted or destroyed goes dark after 1 round. If a living nightlight is touched, either by a creature or an object, its light goes out until it is touched again.
Nilhogg’s Nose
A Nilhogg’s nose is a small mushroom that grants any creature that eats it advantage on Wisdom (Perception) checks based on smell for 1d4 hours. However, the creature suffers disadvantage on saving throws against effects based on smell for the same amount of time.
Ormu
A bioluminescent green moss that grows in warm and damp areas, ormu is particularly common near steam tunnels and vents. It sheds dim light in a 5-foot radius, and can be harvested, dried, and made into a phosphorescent powder or pigment.
Timmask
Also known as “the devil’s mushroom,” a timmask is a two-foot-tall toadstool with orange and red stripes across its beige cap. Uprooting or destroying a timmask causes it to expel a 15-foot-radius cloud of poisonous spores. Creatures in the area must succeed at a DC 14 Constitution saving throw or be poisoned. While poisoned in this way, the creature is under the effect of a
Tongue of Madness
Tongue of madness is an edible fungus that looks somewhat like a large human tongue. A creature that eats a tongue of madness must succeed on a DC 12 Constitution saving throw or compulsively speak aloud its every thought for the next hour. The effect can be ended with a lesser restoration spell or similar magic.
Torchstalk
A one- to two-foot-tall mushroom with a combustible cap, a single torchstalk burns for 24 hours once lit. There is a 1-in-6 chance that a torchstalk explodes when lit, bursting into a cloud of fiery spores. Creatures within 10 feet of an exploding torchstalk take 3 (1d6) fire damage.
Narrating the Journey
As the adventurers make their way through the Underdark, it helps to improvise descriptions of what they experience to add flavor to the journey. As you do, try to stress two key points.
First, the trek is long and arduous. The party is traveling underground, over incredibly difficult and rough terrain, without any of the comforts of the surface world. Food and water are scarce. The darkness never ends. The players should feel as though their characters are in peril throughout their travels, never knowing when something is set to leap at them from the shadows.
Second, the Underdark is an exotic, alien landscape unlike anything found on the surface world. Throughout its twisted passageways and impossibly large caverns, characters might find bizarre reminders of lost and forgotten civilizations, unearthly flora and fauna, and incredible geography. Little is as it seems, and much is difficult to explain, or even to describe.
Drow Pursuit
A party of drow from Velkynvelve pursue their escaped prisoners into the Underdark. The drow priestess Ilvara becomes increasingly obsessed with the adventurers, believing they are involved in some secret conspiracy, or perhaps some test of her worthiness. The longer the pursuit, the more determined she is to retake them and have the opportunity to teach them the error of defying her.
The drow party consists of Ilvara (drow priestess of Lolth), the drow elite warrior Jorlan and Shoor, and the junior priestess Asha Vandree (use the priest stat block in the Monster Manual, but add the Fey Ancestry, Innate Spellcasting, and Sunlight Sensitivity features of the drow stat block). The hunting party also includes four drow warriors who serve as forward scouts. If any of the drow NPCs did not survive chapter 1, replace them with newly arrived reinforcements from Menzoberranzan under the command of Ilvara, or another priestess of her caliber.
Narrow Escapes
If an encounter with the drow is going badly and you don’t want the characters recaptured, you can always have fate intercede on their behalf with another encounter or event offering a distraction.
For example, a wandering stone giant, a purple worm, or a pack of savage gnolls whipped into a frenzy by Yeenoghu might show up just as the drow have the characters cornered, giving them a chance to run. Likewise, a minor earthquake (caused by instability from the demonic incursion or a wild magic surge) might cause a cave-in, cutting off a tunnel between the party and their pursuers, and dropping the pursuit level by 1 or 2.
Don’t do this so often that the players feel they haven’t earned it, but use it as an option to keep the pursuit going rather than coming to an anticlimactic conclusion.
Tracking the Party
The drow must track the party through the Underdark on foot, as there are no mounts available at Velkynvelve and Ilvara doesn’t wait for an already-late relief detachment from Menzoberranzan to arrive. This limits how quickly the dark elves can move to catch up, since they must seek out signs of their quarry’s passage, occasionally doubling back to pick up their trail again.
Pursuit Level
The closeness of the drow pursuit is measured by a pursuit level. It begins at 4, with the drow not far behind the characters. If the pursuit level reaches 5, the drow forward scouts catch up to them, and the drow leaders arrive not long thereafter (see “Catching Up”). If the pursuit level drops to 0, the party has eluded the drow until circumstances bring both factions into contact again (see “Eluding Pursuit”).
Characters can increase or decrease the pursuit level in the following ways:
- Decrease the pursuit level by 1 for each day the party travels at a fast pace.
- Decrease the pursuit level by 1 if a character spends time covering up the party’s trail that day, requiring a successful DC 16 Wisdom (Survival) check.
- Decrease the pursuit level by 1 each time the characters cross or traverse some feature that obscures their trail, such as a subterranean river.
- Decrease the pursuit level by 1 if the party splits into two or more groups. Each group becomes a separate party for purposes of determining random encounters and whether or not the group becomes lost.
- Increase the pursuit level by 1 each time the party has a random encounter with one or more creatures, unless the encounter is bypassed or avoided entirely.
- Increase the pursuit level by 1 for each day the adventurers travel at a slow pace.
- Certain terrain encounters increase or decrease the pursuit level. See the individual descriptions in the “Random Encounters” section.
The players might come up with additional ways of evading pursuit. Adjudicate these as you see fit. For example, if the characters convince a randomly encountered creature to let them pass by telling them about the wealthy drow following them, you might reduce the pursuit level by 1 as the drow are forced to deal with the encounter before they can resume tracking the party. Similarly, the adventurers could lay traps to slow down their pursuers, or they might convince a friendly creature to lie to the drow about which way the party went.
If you choose to skip over a few days of travel (as described under “Summarizing Travel” later in this chapter), the pursuit level doesn’t change during that time.
Catching Up
When the pursuit level reaches 5, the drow forward scouts spot the party. At this point, the pursuit might become an encounter if the characters spot the drow and engage them. The characters might try to run, at which point a chase ensues (see “Chases” in chapter 8 of the Dungeon Master’s Guide), or they might stand and fight. They might even try to set up some sort of ambush, since the front ranks of the party are likely out of sight of the drow when they first catch up.
If the adventurers flee and successfully escape, they lower the pursuit level to 4 and begin avoiding their pursuers again. If they fight the drow, run the encounter. The drow scouts focus on maintaining close pursuit and peppering the characters with poisoned hand crossbow bolts. After 1d6+4 rounds, the remainder of the drow party (Ilvara, Asha, Jorlan, and Shoor) catches up and joins the encounter.
Eluding Pursuit
If the adventurers lower the pursuit level to 0, the drow lose the trail unless circumstances allow them to locate the characters again. This might include the characters spending a day or more in a place where they are recognized, or where they talk openly about their escape from Velkynvelve. If the characters pass through an area watched over by drow scouts or spies, Ilvara will inevitably hear word of the characters' location. When this occurs, increase the pursuit level to 1 and begin tracking it again as the drow pick up the trail once more.
Capture
The drow try to capture the escaped prisoners if at all possible, since Ilvara wants the pleasure of teaching them a lesson about disobedience. If the dark elves reduce any characters to 0 hit points, those characters are knocked out rather than dying (see “Knocking a Creature Out” in chapter 9 of the Player’s Handbook). Even if one or more of the characters are accidentally killed, Ilvara is obsessed enough to cast raise dead to restore them to life (assuming the character’s soul is willing to return).
Captured characters are disarmed, their hands bound with spider-silk rope, and gagged. The drow march them back to Velkynvelve unless Menzoberranzan is closer, in which case Ilvara takes them there instead. The characters will need to come up with a new plan of escape, ideally before Ilvara has the opportunity to torture them or sell them into slavery in the City of Spiders. If they escape her clutches again, the drow priestess continues her pursuit until she is dead or the party leaves the Underdark (see chapter 7).
Random Encounters
Each day of travel through the Underdark, check twice to see if the characters encounter anything unusual: once while they are traveling, and again while they are camped or resting. Roll a d20 and consult the Random Encounters table to determine what, if anything, they encounter. Characters might encounter special terrain, one or more creatures, or a combination of the two.
Any random encounter that occurs while the party is camped is automatically a creature encounter, in which case determine the encounter by rolling a d20 and consulting the Creature Encounter table.
Random Encounters
| d20 | Encounter |
|---|---|
| 1-13 | No encounter |
| 14-15 | Terrain (roll once on the Terrain Encounters table) |
| 16-17 | One or more creatures (roll once on the Creature Encounters table) |
| 18-20 | Terrain encounter featuring one or more creatures (roll once on the Terrain Encounters table, then roll once on the Creature Encounter table) |
Terrain Encounters
The Underdark contains dangerous hazards and wondrous terrain. Special terrain rules are explained after the table.
Terrain Encounters
| d20 | Encounter |
|---|---|
| 1 | Boneyard |
| 2 | Cliff and ladder |
| 3 | Crystal clusters |
| 4 | Fungus cavern |
| 5 | Gas leak |
| 6 | Gorge |
| 7 | High ledge |
| 8 | Horrid sounds |
| 9 | Lava swell |
| 10 | Muck pit |
| 11 | Rockfall |
| 12 | Rope bridge |
| 13 | Ruins |
| 14 | Shelter |
| 15 | Sinkhole |
| 16 | Slime or mold |
| 17 | Steam vent |
| 18 | Underground stream |
| 19 | Warning sign |
| 20 | Webs |
Creature Encounters
Keep the party’s level in mind when fleshing out these encounters, and allow the characters to retreat from or avoid an encounter that is too great a challenge. Escape should come at a cost, however. Characters fleeing their camp to avoid a creature encounter might be forced to abandon food and water supplies, for example.
Creature Encounters
| d20 | Encounter |
|---|---|
| 1-2 | Ambushers, reroll this encounter if the characters are resting |
| 3 | Carrion crawler |
| 4-5 | Escaped slaves |
| 6-7 | Fungi |
| 8-9 | Giant fire beetles |
| 10-11 | Giant “rocktopus” |
| 12 | Mad creature |
| 13 | Ochre jelly |
| 14-15 | Raiders |
| 16 | Scouts |
| 17 | Society of Brilliance |
| 18 | Spore servants |
| 19-20 | Traders |
Boneyard
The characters come upon an eerie cavern littered with countless bones of various creatures. Whether the site is a natural graveyard for some Underdark species or the former lair of a fearsome predator, the characters can potentially gather useful material for crafting among the bones.
When the party enters a boneyard, roll a d20 and consult the table to determine what creatures, if any, are present. The undead rise up out of the bones and attack when the first characters are halfway across the cavern.
Boneyard Encounter
| d20 | Encounter |
|---|---|
| 1-14 | No encounter |
| 15-18 | 3d4 skeletons |
| 19-20 | 1d3 minotaur skeletons |
Cliff and Ladder
A cliff 2d4 × 10 feet high blocks the party’s passage, but a rolled-up rope ladder is visible at the top. If someone can climb the cliff-requiring a successful DC 15 Strength (Athletics) check-and toss down the ladder, the characters can proceed. Otherwise, they lose a day’s travel finding another route. If the characters remove the ladder once they are at the top, they decrease the drow pursuit level by 1.
Crystal Clusters
The adventurers pass through a faerzress-suffused area containing fist-sized chunks of quartz that shed dim light in a 10-foot radius. A sharp blow to one of the crystals, including throwing it so it impacts a hard surface, causes it to burst in a 10-foot-radius flash of blinding light. Any creature within the radius must succeed on a DC 10 Constitution saving throw or be blinded for 1 minute. A creature blinded by this effect repeats the Constitution saving throw at the end of each of its turns. On a successful save, it is no longer blinded.
The characters can harvest up to twelve of the crystals in total, but taking the time to do so increases the drow pursuit level by 1.
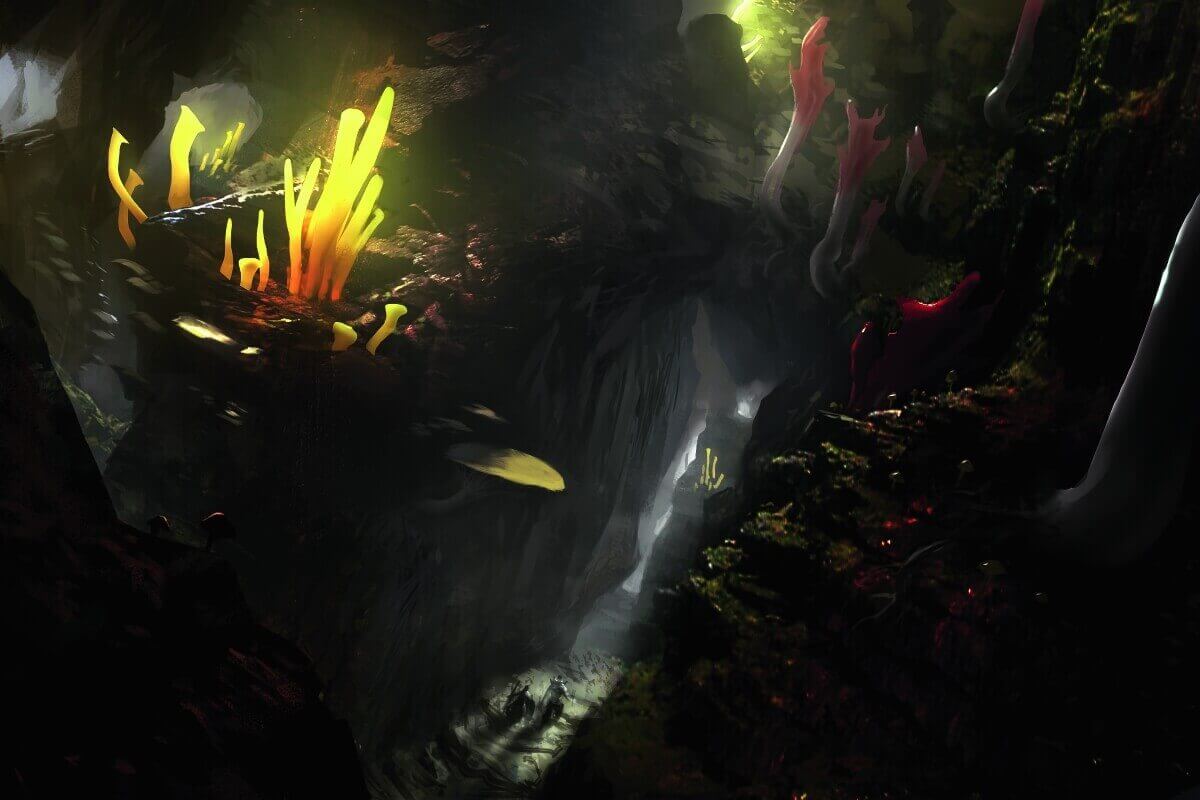
Fungus Cavern
The adventurers stumble upon a cavern filled with fungi and mushrooms of all sizes and types. See “area Fungi of the Underdark” and choose some interesting examples.
Gas Leak
The adventurers come upon a cavern with a dangerous natural gas leak. Any member of the party with a passive Wisdom (Perception) score of 14 or higher detects signs of the gas. The characters' travel pace for the day is slowed by half as they circumvent the area, but there are no ill effects. If the gas goes undetected, each character in the area must make a DC 12 Constitution saving throw, taking 5 (1d10) poison damage on a failed save, or half as much damage on a successful one. Any open flames brought into the area cause the gas to explode. Each creature in the explosion must make a DC 15 Dexterity saving throw, taking 10 (3d6) fire damage on a failed save, or half as much damage on a successful one.
Gorge
The characters must make a difficult climb down a gorge 2d4 × 100 feet deep and up the other side, or find a way around it. Their travel pace for the day is slowed by half unless they come up with a plan to cross the gorge quickly.
High Ledge
The characters must walk along an 18-inch-wide ledge that skirts a ravine 2d6 × 10 feet deep. The party’s travel pace for the day is slowed by half, and each character must succeed on a DC 10 Dexterity saving throw to avoid a fall. Precautions such as roping everyone together let each character make the save with advantage. Increase the pursuit level of the drow by 1.
Horrid Sounds
For hours, the party’s travel is plagued by terrible shrieks, moans, and incoherent gibbering echoing through nearby passages, without any apparent origin. Each character must make a successful DC 11 Wisdom saving throw. On a failed save, the character’s madness level increases by 1.
Lava Swell
As the party traverses a long and winding corridor, a tremor opens up a lava-filled fissure behind them. Each character must make a DC 10 Dexterity saving throw to avoid the lava swell, taking 21 (6d6) fire damage on a failed save. Decrease the drow pursuit level by 1.
Muck Pit
The adventurers must wade through a broad, 3-footdeep pit of slimy muck. The muck is difficult terrain and characters have disadvantage on Dexterity saving throws while within it, but their travel pace for the day is slowed by half if they go around it.
Rockfall
As the adventurers make their way through a long, twisting cavern, a tremor sets off a rockfall. Each party member must attempt three DC 12 Dexterity saving throws, taking 10 (3d6) bludgeoning damage on each failed save. Any incapacitated creature not moved out of the area is buried under rubble, taking an additional 1d6 bludgeoning damage at the end of each of its turns until the creature is dug out or dead. Decrease the drow pursuit level by 1.
Rope Bridge
A ravine 2d4 × 10 feet wide and 2d4 × 10 feet deep cuts across the party’s path, spanned by an old rope bridge. If the characters cut the bridge after they pass, the drow pursuit level decreases by 1.
Ruins
The adventurers come across a small ruin hidden in the Underdark. This might be the creation of a subterranean race or a surface ruin that collapsed and sank long ago. If the characters search the ruins, there is a 50 percent chance of them finding 1d4 trinkets (see chapter 5, “Equipment,” of the Player’s Handbook). Roll on the Trinkets table or choose appropriate ones.
Shelter
The party stumbles upon a cave that is sheltered and easily defended. If the characters camp here, they can finish a long rest without any chance of an encounter while they are resting.
Sinkhole
One random party member steps on and collapses a sinkhole, and must succeed on a DC 12 Dexterity saving throw to avoid falling into a 20-foot-deep pit and taking 7 (2d6) bludgeoning damage. Climbing out of the pit requires a successful DC 15 Strength (Athletics) check.
Slime or Mold
As the adventurers pass through a small cavern, they encounter a patch of slime or mold. Roll a d6 and consult the table to determine what type of slime or mold is present (see “Dungeon Hazards” in chapter 5 of the Dungeon Master’s Guide for details on these threats).
Slime or Mold Encounter
| d6 | Encounter |
|---|---|
| 1-3 | Patch of |
| 4-5 | Patch of |
| 6 | Patch of |
Steam Vent
A hot steam vent erupts beneath a random party member, who must succeed on a DC 12 Dexterity saving throw or take 7 (2d6) fire damage.
Underground Stream
A waterway 2d4 × 5 feet wide cuts across the party’s path. The stream is shallow and easily crossed, and the characters can drink and refresh their water supplies. Edible fish inhabit the stream, so that the DC of any foraging attempts for food in this area is reduced to 10. Crossing the stream reduces the drow pursuit level by 1.
Warning Sign
The characters enter a cavern dotted with stalagmites and stalactites. Those with a passive Wisdom (Perception) score of 11 or higher spot the following sigil carved into one of the stalagmites:
The sigil is a drow warning sign that means “Demons ahead!” Any non-drow creature that touches the symbol must make a DC 10 Wisdom saving throw. On a failed save, the creature’s madness level increases by 1. If the characters take a long rest within one mile of the warning sign, roll a d20 and consult the table to determine what, if anything, they encounter at the end of their rest.
Warning Sign Encounter
| d20 | Encounter |
|---|---|
| 1-14 | No encounter |
| 15-16 | 1 invisible barlgura |
| 17-18 | 3d4 dretches |
| 19-20 | 1d2 shadow demons |
Webs
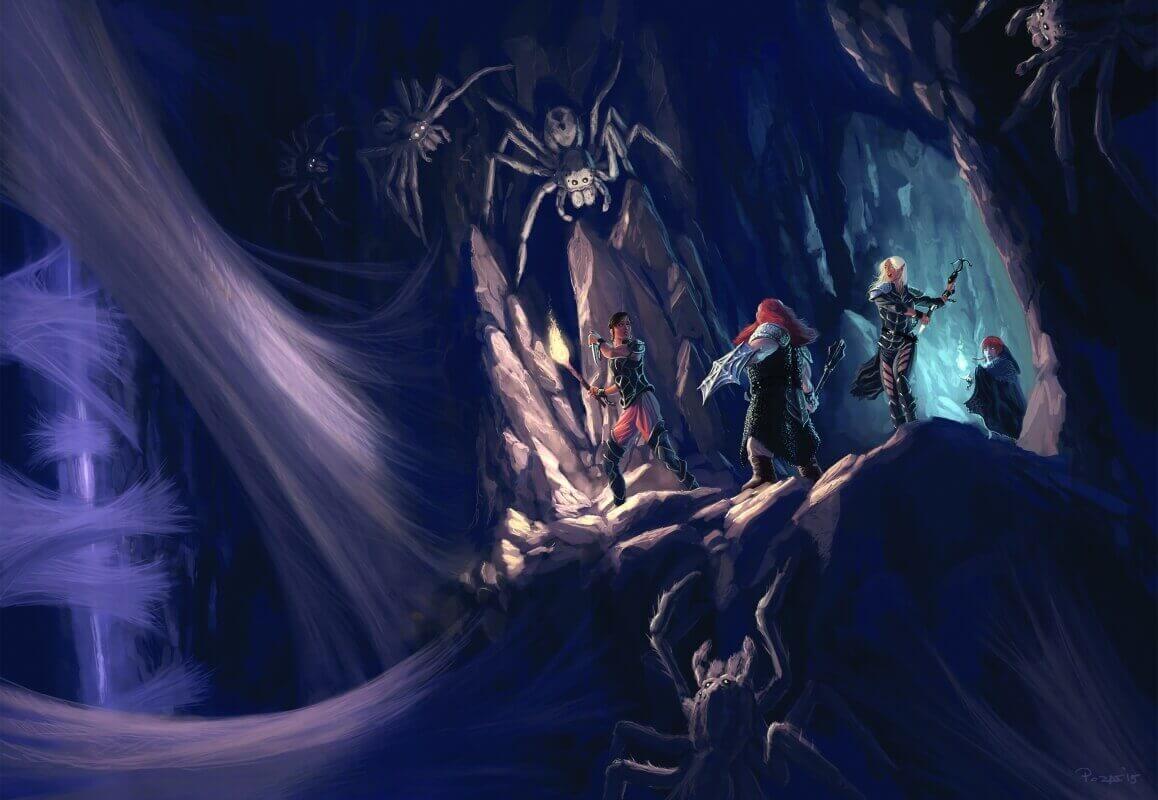
Sticky webs fills a passage (see “Dungeon Hazards” in chapter 5 of the Dungeon Master’s Guide). The webs extend for hundreds of feet. Unless the characters come up with a plan for clearing the webs quickly, the party’s travel pace for the day is halved as the characters are forced to cut their way through or find an alternate route.
Check for an encounter when the party enters the webs. On a roll of 1-2 on a d6, the characters encounter 1d4 giant spiders lurking among the webs.
Web Encounters
| d6 | Encounter |
|---|---|
| 1-2 | 1d4 Giant Spiders |
| 3-6 | No Encounter |
Ambushers
One or more creatures attempt to ambush the party as it makes its way through the Underdark. Roll a d20 and consult the table to determine what the characters encounter.
Ambushers
| d20 | Encounter |
|---|---|
| 1-2 | 1 chuul lurking in a pool of water |
| 3 | 1d6 giant spiders clinging to the walls or ceiling |
| 4-5 | 1 grell floating near the high ceiling |
| 6-9 | 1d4 gricks hiding in a crevice or fissure |
| 10-15 | 1d4 orogs perching on ledges |
| 16-17 | 1d6 piercers masquerading as stalactites |
| 18-20 | 1 umber hulk bursting out of a nearby wall |
If the ambush occurs in the monster’s lair, there is a chance that characters searching the area find something of interest or value. Roll a d20 and consult the table below to see what, if anything, they find.
Ambusher Lair Discoveries
| d20 | Discovery |
|---|---|
| 1-10 | None |
| 11-12 | A humanoid skeleton or corpse clutching a salvageable, nonmagical weapon (your choice) |
| 13-14 | A humanoid skeleton or corpse wearing a salvageable suit of nonmagical armor (your choice) |
| 15-17 | 1d6 50 gp gems |
| 18-19 | A humanoid skeleton or corpse carrying a random magic item (roll once on Magic Item Table B in chapter 7 of the Dungeon Master’s Guide) |
| 20 | A monster hoard containing 2d6 50 gp gems and one or more random magic items (roll 1d4 times on Magic Item Table C in chapter 7 of the Dungeon Master’s Guide) |
Carrion Crawler
The characters encounter a carrion crawler scouring tunnels and caves for food.
There is a 25 percent chance that the crawler is domesticated and outfitted with a leather saddle and harness, though there’s no sign of the rider. A character can approach and mount the carrion crawler without being attacked by succeeding on a DC 13 Wisdom (Animal Handling) check. While in the saddle and harness, a rider can remain mounted on the carrion crawler as it crawls across walls and ceilings.
Escaped Slaves
These slaves have been wandering the Underdark since their escape from Gracklstugh or Menzoberranzan. They are scrounging for food and water. Roll a d4 and consult the table to determine what the characters encounter. Elf, dwarf, and human slaves are friendly; if given food and water they’ll join the party. Goblin slaves are hostile and likely to attack.
Escaped Slaves
| d4 | Encounter |
|---|---|
| 1 | 1d2 moon elf commoners |
| 2 | 1d3 shield dwarf commoners |
| 3 | 1d4 human commoners |
| 4 | 1d6 goblins |
Fungi
Roll a d6 and consult the table to determine what kinds of fungi the characters encounter.
Fungi
| d6 | Encounter |
|---|---|
| 1-2 | 1d4 gas spores |
| 3-4 | 1d4 shriekers |
| 5-6 | 1d4 violet fungi |
There’s a 25 percent chance that a gas spore carries a memory fragment from a dead beholder in its spores (see the gas spore’s description in the “Fungi” entry of Monster Manual). This memory can be of anything you wish, or you can roll a d4 and consult the Beholder Memories table.
Beholder Memories
| d4 | Memory |
|---|---|
| 1 | A tense negotiation with drow, ending with the beholder agreeing to allow the drow safe passage through “the Vast Oblivium” in exchange for help ridding its lair of a deep gnome infestation |
| 2 | Chasing svirfneblin thieves through the tunnels of its domain to recover stolen gemstones |
| 3 | A fierce battle against a wizened drow archmage, ending with the beholder suffering a grievous injury |
| 4 | Spying on a drow ranger with two gleaming scimitars and a black, quadrupedal animal companion |
Giant Fire Beetles
The characters encounter 3d6 giant fire beetle scouring tunnels and caves for food. Characters in need of light sources can harvest the glowing glands of slain beetles.
Giant Rocktopus
This creature is a giant octopus that has evolved to live and thrive on land. It can alter its coloration to appear as a rock formation, and it tends to lurk in crevices and fissures, attacking smaller creatures that wander near. It has a walking speed of 20 feet and a climbing speed of 10 feet, loses its Hold Breath feature, and replaces its Underwater Camouflage feature with the following feature:
Camouflage. The octopus has advantage on Dexterity (Stealth) checks.
Mad Creature
The party encounters a creature driven insane by the influence of the demon lords. Roll a d4 and consult the table to determine what appears. Then roll on the Indefinite Madness table in chapter 8 of the Dungeon Master’s Guide to determine the nature of the creature’s madness. If cured of its madness, the creature behaves in accordance with its alignment.
Mad Creature
| d4 | Encounter |
|---|---|
| 1 | 1 deep gnome |
| 2 | 1 drow |
| 3 | 1 duergar |
| 4 | 1 stone giant |
There is a chance that the mad creature has something of interest or value in its possession. Roll a d20 and consult the table below to see what, if anything, it has. The creature doesn’t part with the item willingly.
Mad Creature Possessions
| d20 | Possession |
|---|---|
| 1-10 | None |
| 11-13 | A 10 gp gem |
| 14-15 | A gold ring worth 25 gp |
| 16-17 | An obsidian statuette of Lolth worth 100 gp |
| 18-19 | A random magic item (roll once on Magic Item Table A in chapter 7 of the Dungeon Master’s Guide) |
| 20 | A random magic item (roll once on Magic Item Table B in chapter 7 of the Dungeon Master’s Guide) |
Ochre Jelly
As the characters move through a series of caves, they attract the attention of a ochre jelly. The ooze follows the characters, attacking when they stop to take their next rest. Characters in the back rank of the marching order who have a passive Wisdom (Perception) score of 14 or higher spot the ooze following them.
Raiders
This group of raiders from the surface ventured into the Underdark looking for riches and got lost. Roll a d6 and consult the table to determine what appears. The raiders are initially hostile toward the party, though clever characters might try bribing them for safe passage or information.
Raiders
| d6 | Encounter |
|---|---|
| 1-2 | 1d6 human bandits and 1 human bandit captain |
| 3-4 | 2d4 goblins and 1 goblin boss |
| 5-6 | 1d6 orcs and 1 orc Eye of Gruumsh |
There is a chance that the leader of the group has something of interest or value. Roll a d20 and consult the table below to see what, if anything, the leader of the raiders has in its possession.
Raider Leader Possessions
| d20 | Possession |
|---|---|
| 1-5 | None |
| 6-10 | 2d6 10 gp gemstones in a pouch |
| 11-14 | 2d6 50 gp gemstones in a pouch |
| 15-17 | 1d4 torchstalks (see “area Fungi of the Underdark") |
| 18-19 | 1d4 waterorbs (see “area Fungi of the Underdark") |
| 20 | A random magic item (roll on Magic Item Table B in chapter 7 of the Dungeon Master’s Guide) |
Scouts
Each of these groups is in the Underdark on a secret mission. Roll a d6 and consult the table to determine what appears.
Scouts
| d6 | Encounter |
|---|---|
| 1-2 | 1 drow |
| 3-4 | 1d4 myconid adults |
| 5-6 | 1d6 shield dwarf scouts |
The drow scout is searching for escaped slaves. If he spots the party, he’ll attempt to avoid notice and take away information regarding the group’s location (see “Drow Pursuit”).
The myconid scouts are indifferent toward the party and unwilling to discuss their mission or their travels with the adventurers.
Shield dwarf scouts are friendly if the party includes one or more surface dwellers. They are willing to give the party a day or two’s worth of food and water rations.
Society of Brilliance
The characters stumble upon a member of the Society of Brilliance, a sect of highly intelligent monsters that have banded together to solve all of the Underdark’s problems. The society is investigating areas suffused with faerzress to ascertain whether it has something to do with what the society fears is some kind of “demonic incursion.” Roll a d10 to determine which society member the characters encounter.
Society of Brilliance
| d10 | Encounter |
|---|---|
| 1-2 | Y the derro savant |
| 3-4 | Blurg the orog |
| 5-6 | Grazilaxx the mind flayer |
| 7-8 | Skriss the troglodyte |
| 9-10 | Sloopidoop the kuo-toa archpriest |
Every member of the Society of Brilliance has an alignment of neutral, an Intelligence of 18 (+4), and fluency in multiple languages including Dwarvish, Elvish, and Undercommon (although Grazilaxx prefers to communicate using telepathy). Its statistics are unchanged otherwise. Members are erudite and talkative, preferring diplomacy and debate over violence (though they defend themselves if attacked).
Each society member can cast the teleport spell once per day, but the intended destination must be within 30 feet of another society member. This teleport effect can be disrupted (see “Faerzress” earlier in the chapter), which is how society members sometimes end up in far corners of the Underdark, separated from their fellows.
Members of the Society of Brilliance are aware that paths to the surface world exist but haven’t explored any of them (their concerns are with the Underdark, after all). If the characters seem intent on reaching the surface, a society member might suggest they look for a guide in one of the Underdark’s larger settlements, such as Blingdenstone or Gracklstugh. The society member can provide detailed verbal directions that characters can follow to reach whichever Underdark settlement they desire. However, the society member can’t guarantee that the route is safe. If characters are searching for something else, the society member provides whatever assistance it can.
Spore Servants
One or more creatures killed and reanimated by Zuggtmoy’s spores observe the characters as they pass by. The spore servants don’t communicate and don’t attack except in self-defense. Roll a d10 and consult the table to determine what the characters encounter.
Spore Servants
| d10 | Encounter |
|---|---|
| 1-3 | 1d4 drow spore servants |
| 4-6 | 1d6 duergar spore servants |
| 7-8 | 1d4 hook horror spore servants |
| 9-10 | 1d8 quaggoth spore servants |
Traders
These traders ply the tunnels of the Underdark, traveling from settlement to settlement. Roll a d4 and consult the table to determine what appears.
Traders
| d4 | Encounter |
|---|---|
| 1 | 2d4 deep gnomes |
| 2 | 2d4 drow |
| 3 | 2d4 duergar |
| 4 | 2d4 kuo-toa |
Deep gnome and drow traders have a 50 percent chance of having half their number in giant lizards as mounts and pack animals. Duergar traders have a 50 percent chance of having half their number in male steeders as pack animals. If there are male steeders present, there is a 50 percent chance that the traders are escorted by a duergar kavalrachni astride a female steeder (see appendix C for both).
The traders carry goods worth 5d4 × 10 gp plus ten days of provisions per member of their party; they are willing to sell up to 20 percent of either. If drow traders see the adventurers and have the opportunity to report it, increase the drow pursuit level by 1.
Summarizing Travel
Instead of checking for random encounters every day, you can skip over or summarize parts of the characters' journey. Roll 1d6+1 for the number of days between encounters, with the usual chance of the encounter being a terrain encounter, a creature encounter, or both (as described under “Random Encounters”). For example, if roll a result of 4, you would tell the players: “You’ve been making your way through the tunnels and passages for four days…” before describing the circumstances of the encounter to them.
With this approach, encourage players to describe what their characters do—or even see and experience—during the intervening time. In addition to downtime activities such as crafting, characters have plenty of opportunities for interaction. If the players are handling the roles of some or all of their nonplayer character companions (see “A Motley Crew” in chapter 1), ask them to elaborate on the activities of those characters as well, filling in details as you see fit. Players can also suggest and spin out stories about things their characters have experienced during the intervening time, including arduous climbs, swinging across gorges, or dodging piercers, and you can do the same. This additional storytelling aspect adds color and background to the journey while keeping the pace relatively brisk.
Set Encounters
You can use the following four encounters during the party’s travels in the Underdark between the locations in chapters 3 through 7, inserting them as desired. They provide more detailed challenges for the characters, as well as giving them chances to encounter some potential allies. If the characters need an XP boost as they work through subsequent chapters, these encounters can help provide it.
The Silken Paths
The Silken Paths are a network of spider webs crisscrossing a 500-foot-deep, 2,000-foot-wide chasm that stretches for nearly five miles. The major strands of the webs are traversable but, due to the fact that old webs disintegrate over time and the giant spiders inhabiting the chasm are constantly spinning new ones, the Silken Paths are ever-changing.
The chasm has numerous passages at varying heights leading away from it. It is rare for a web strand to connect one opening with another on the same “level.” Characters navigating the Silken Paths need to follow sloping strands as well as climb and cross over several strands to reach their intended destination. This is quite hazardous, but there simply isn’t any easy way around the chasm. The characters can easily get lost in the mass of strands stretching across the chasm unless they have help.
The Web Runners
The Web Runners are a pair of thrill-seeking goblin named Yuk Yuk and Spiderbait. They have lived in the Underdark for as long as either can remember, with much of their time spent treasure hunting and surviving in the Silken Paths. The goblins are prone to daring (and often foolish) stunts. That either of them is still alive is a testament to their luck and skill. Modify their statistics as follows:
- Both goblins are neutral.
- Add Acrobatics +6 and Athletics +3 to the goblins' list of skills.
- The goblins have advantage on checks made to avoid being surprised.
The goblins notice the adventurers as they approach the Silken Paths and are willing to act as guides and helpers-for a fee, of course. They’ll settle for 2 gp per day each, but Yuk Yuk (who does all the negotiating) is just as likely to ask for something flashy belonging to one of the characters. He might also ask for some unspecified favor, to be paid when the goblins and the adventurers get to wherever they’re going and part ways. He might ask for first pick of any loot the party uncovers in the Silken Paths, and will expect and ask for a share of the treasure regardless.
Yuk Yuk and Spiderbait each carry a gourd of grease, which they apply to their feet so that they can “surf the webs.” While sliding down webs, they move at twice their normal walking speed.
The Web Runners are as good as their word when it comes to their services, and they can teach the characters a thing or two. While they travel with the two goblins, the characters have advantage on checks made to avoid being surprised. The goblins know the Silken Paths well enough not to become lost in them.
If the adventurers make a good impression on the Web Runners and if the party’s goals appear to offer interesting opportunities to do new and dangerous things, the goblins offer to stay on after crossing the Silken Paths, and to help guide the characters through the Underdark. The two won’t leave the Underdark, however. Yuk Yuk will try to negotiate a suitable fee, but the goblins might simply tag along, content to earn any fair share of whatever the party acquires.
Silken Path Encounters
For every 500 feet the party travels through the webs, check for a random encounter by rolling a d6. An encounter occurs on a roll of 1 unless one or more party members are carrying light sources, in which case an encounter occurs on a roll of 1-3. Roll on the Silken Paths Encounters table or choose a suitable encounter when one occurs.
Silken Paths Encounters
| d12 | Encounter |
|---|---|
| 1 | Cocooned lightfoot halfling |
| 2 | 1d4 darkmantles |
| 3 | 1d4 drow and 1d4 quaggoth slaves |
| 4-8 | 2d4 giant spiders |
| 9 | 1 mimic |
| 10 | 1 spectator |
| 11-12 | Web break |
Silken Paths: General Features
As characters traverse the Silken Paths, keep in mind the following features.
Difficult Terrain. Any creature with a climbing speed can walk along the webs at that speed. For all other creatures, the webs are difficult terrain. Any creature that falls can potentially become entangled in the webs (see “Falling”).
Falling. Whenever a creature takes damage while traversing the Silken Paths, or whenever the webs upon which it is walking break, the creature must make a DC 15 Dexterity saving throw. On a successful save, the creature manages to avoid a fall by grabbing nearby web strands. On a failure, the creature falls 1d10 × 10 feet. If the distance fallen is less than the distance to the chasm floor, the creature becomes entangled in webs and restrained; otherwise, it hits the floor and takes damage from the fall as normal. A restrained creature can make a DC 12 Strength saving throw at the end of each of its turns, freeing itself and ending the restrained condition on a success. Another creature can use its action to help a restrained creature within its reach, granting advantage on that creature’s next saving throw to end the effect.
Light. The chasm is dark. Carrying a light source attracts hostile creatures, increasing the chance of an encounter to 1-3 on a d6.
Fire. Webs burn away when exposed to any attack or effect that deals fire damage. This causes several strands to break, and all creatures within 30 feet of the affected area must make a saving throw to avoid falling (see “Falling”).
Cocooned Halfling
The characters find a still-living lightfoot halfling cocooned in webbing. He is poisoned and paralyzed for the next hour.
Fargas Rumblefoot was a member of an adventuring band looking for a long-lost tomb when they were attacked by a pack of mad gnolls. Fargas escaped, got lost in the Silken Paths, and was attacked by the spiders. If rescued, he promises to show the characters the way to the tomb in exchange for a share of its treasures (see “Lost Tomb of Khaem” later in this chapter). Fargas is a chaotic good halfling spy. In addition to his armor and weapons, he carries a
Darkmantles
These subterranean hunters swoop down and attack the party.
Drow and Quaggoth Slaves
These hateful drow and their murderous quaggoth slaves are navigating the Silken Paths on their way through the Underdark. If Derendil is with the party, he can use an action to make a DC 15 Charisma check, turning the quaggoth slaves against their drow masters on a success. If the drow are disposed of, Derendil can repeat the check to turn the surviving quaggoths into his followers. Should Derendil perish, these quaggoths can’t be controlled and fight to the death.
If any drow escape the encounter, increase the pursuit level of the party’s drow pursuers by 1.
Giant Spiders
giant spider are the most common inhabitants of the Silken Paths, and they are drawn to vibrations in the webs that indicate potential prey.
Mimic
This creature pretends to be an iron chest entangled in the webs. When the characters draw close to examine it, the mimic attacks.
Spectator
Freed from its service to a long-dead drow wizard, this mad aberration now floats through the web-filled chasm. It communicates with the characters telepathically, warning them about “demons rising in the dark.” The creature becomes increasingly paranoid and convinced that the characters are themselves demons, come to bind it into servitude, at which point it attacks and tries to destroy them.
Web Break
A strand of web under one randomly determined party member snaps. Each creature walking on that web strand must make a DC 15 Dexterity saving throw as described under “Falling” in the “Silken Paths: General Features” sidebar. Immediately check for another encounter after the saving throws are resolved.
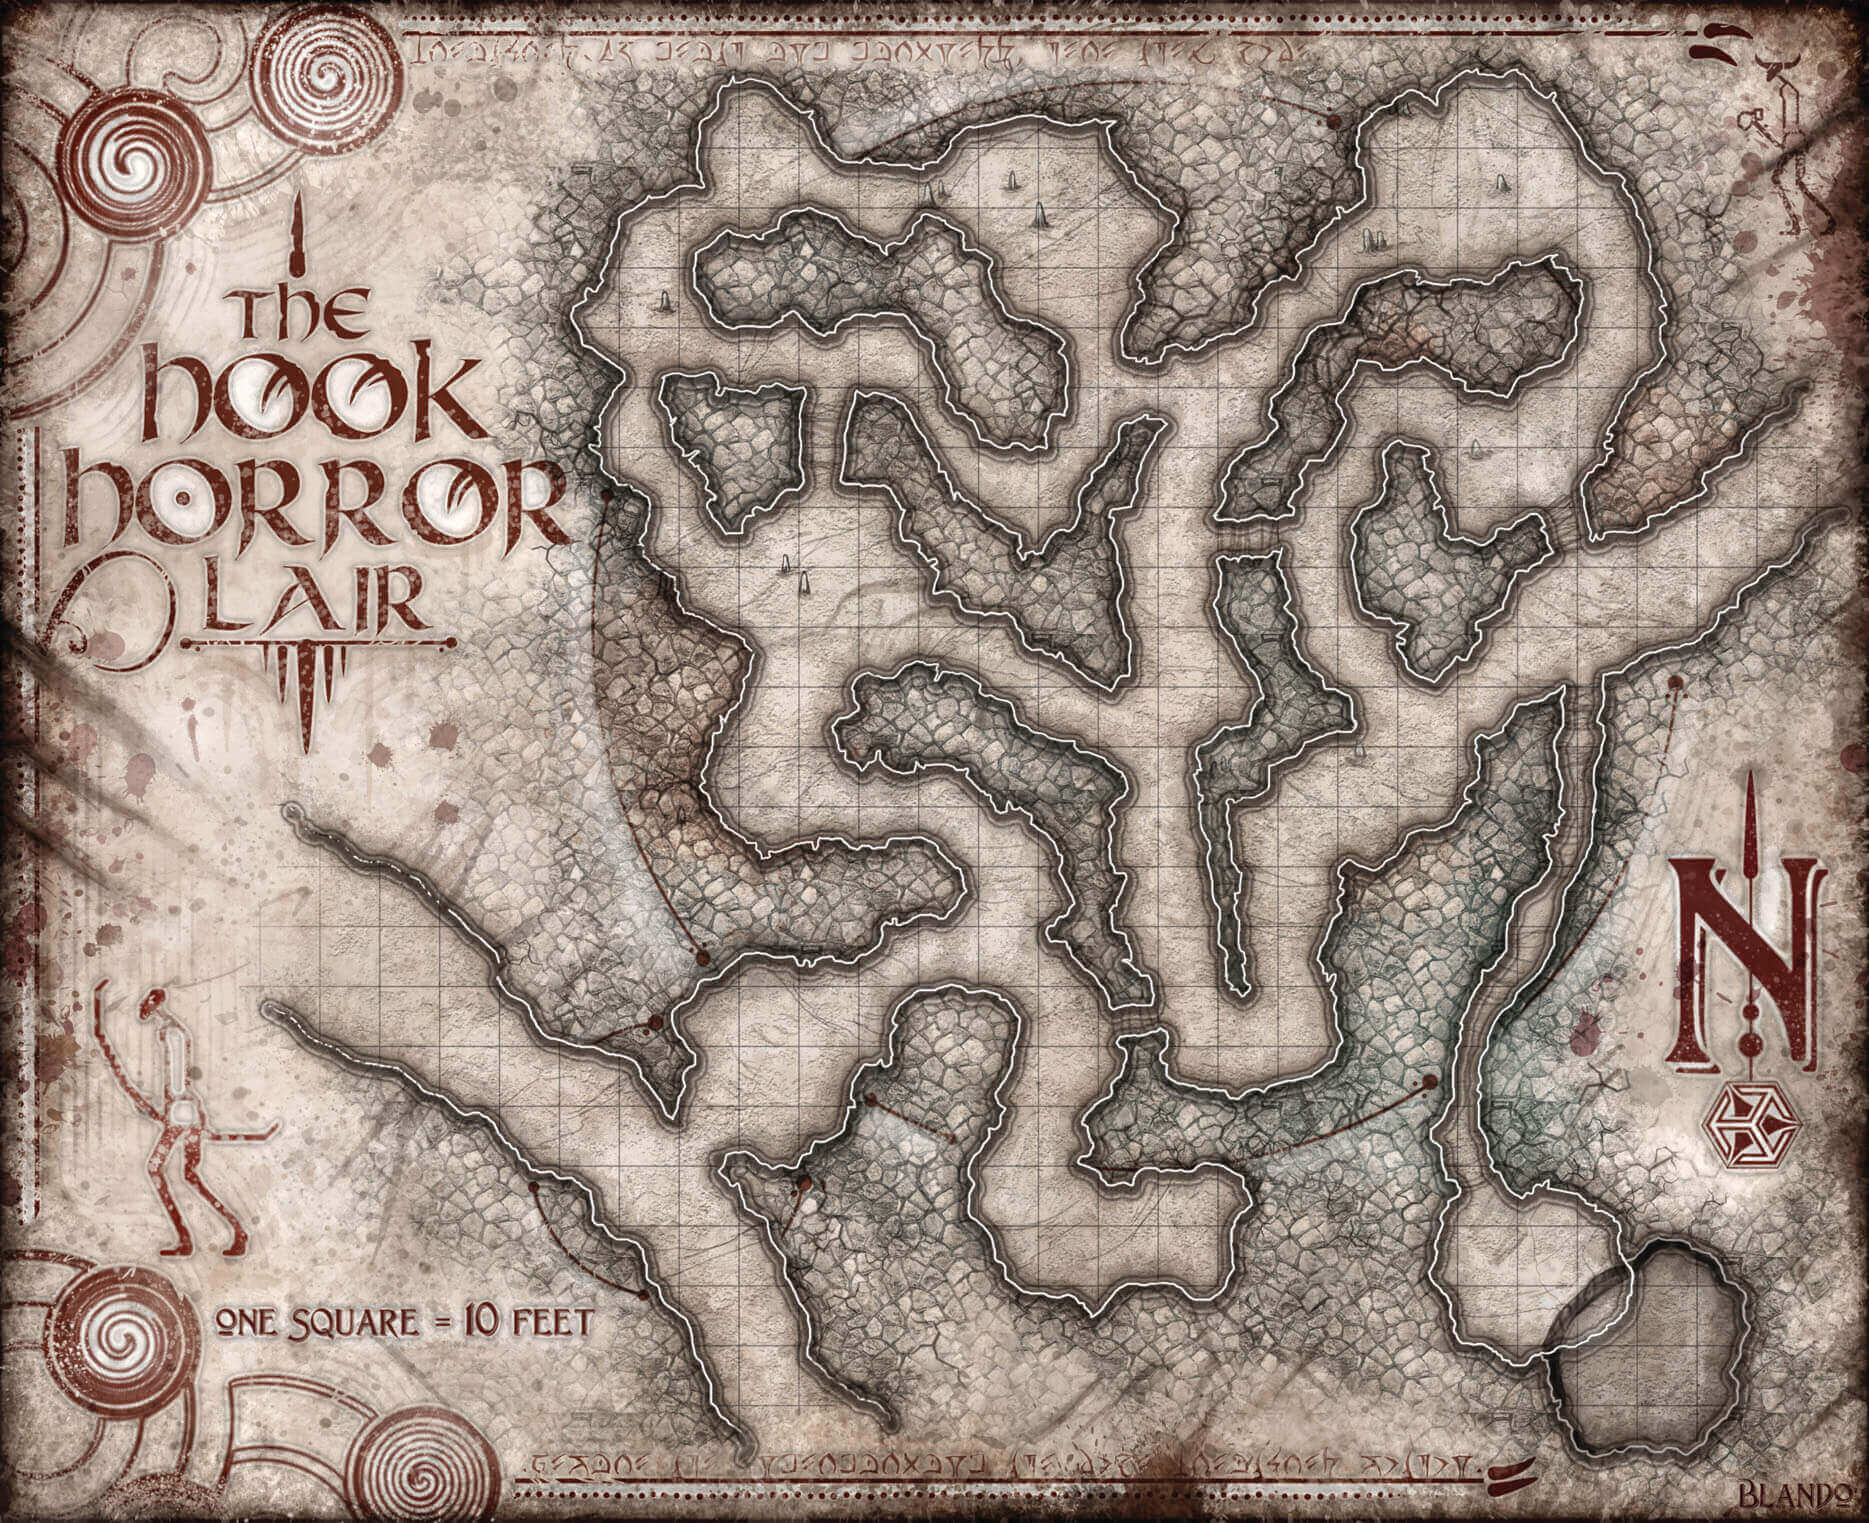
Hook Horror Hunt
The characters enter an area where a band of gnolls lured to the Underdark by the demon lord Yeenoghu are hunting a mated pair of hook horrors. Having left guards at the main entrance to the lair (area 5), the gnoll pack lord has split its remaining hunters into two groups, both of which are attempting to flush out the hook horrors to win the right to tear them apart.
The adventurers wander into the area from a second entrance to the caverns (area 1) and become embroiled in the hunt. Whether they choose to avoid the hunting party, aid the hook horrors, or negotiate their way out of the situation is up to the players.

Hook Horror Maturation
| Age | Size | Notes |
|---|---|---|
| Infant (up to 1 month) | Tiny | AC 10; 4 (1d4+2) hit points; speed 10 ft., climb 10 ft.; Str 9 (-1); no effective attacks; Challenge 0 (0 XP) |
| Young (1-3 months) | Small | AC 11; 11 (2d6+4) hit points; speed 15 ft., climb 15 ft.; Str 12 (+1); hook attacks are +3 to hit, have a reach of 5 ft., and deal 3 (1d4+1) piercing damage on a hit; Challenge 1/4 (50 XP) |
| Juvenile (3-6 months) | Medium | AC 13; 39 (6d8+12) hit points; speed 20 ft., climb 20 ft.; Str 15 (+2); hook attacks are +4 to hit, have a reach of 5 ft., and deal 5 (1d6+2) piercing damage on a hit; Challenge 2 (450 XP) |
| Adult (6+ months) | Large | See the Monster Manual |
Hook Horror Lair: General Features
As characters explore the hook horror lair, keep in mind the following features.
Light. The tunnels are completely dark, which doesn’t hinder either the gnolls or the hook horrors.
Tight Passages. Tunnels marked “P” on the map are narrow enough that Large creatures such as the hook horrors must squeeze through them, spending 1 extra foot of movement for every foot of passage. Medium or smaller creatures can move through such areas normally.
1. Hook Horrors
The characters hear clacking noises as they approach this point in the passageway. Suddenly, two hook horror dash from the side passage, moving from area 2A toward area 3. The hook horrors attack only in self-defense and are more afraid of the giggling, rampaging gnolls than they are of the characters.
The gnolls are two chambers behind the hook horrors, reaching this point on the following round, unless the characters move toward them (in which case the two groups converge in area 2A).
2A. Gnoll Hunters
Four gnoll move into this area the round after the hook horrors move past the party, then follow their quarry into area 1 on the following round.
The gnolls can’t resist attacking any other creatures that cross their path while shrieking “Sacrifices for Yeenoghu!” in their own tongue. (Even if no one in the party speaks Gnoll, the name of the demon lord is clearly recognizable.)
Development
Sounds of combat or calls from the gnolls might attract their pack mates in areas 2B and 5.
2B. Gnoll Hunters
The rest of the gnoll hunters race through these caverns in search of the hook horrors. Unless they are drawn elsewhere, four gnoll and a gnoll pack lord are here.
Treasure
The gnoll pack lord carries two bloodstones worth 50 gp each and a brown tourmaline worth 100 gp.
3. Cornered
The fleeing hook horrors make their way here, where they wait in ambush for any creatures that follow them. The passage is narrow enough that Medium creatures must move single file through it. The cave appears to be a dead end, and the hook horrors fight to the death against any creatures that enter.
Characters who take the time to search the cave spot a hole in the 10-foot-high ceiling (marked C on the map), which requires a successful DC 12 Strength (Athletics) check to climb up into. It leads to area 4.
4. Hook Horror Nest
The sandy floor of this cavern holds a clutch of four 1-foot-diameter eggs with rocky outer shells, all halfburied in a shallow pit. These are hook horror eggs, and any character that touches an egg can feel it trembling.
Each hour, there is a 10 percent chance that one of the eggs hatches. The infant hook horror that emerges imprints on the first creature it sees. It thereafter follows that creature around like its parent, demanding to be fed. If the characters manage to keep the hook horror alive, it eventually reaches adulthood after six months. Track its growth using the Hook Horror Maturation table.
5. Gnoll Camp
The gnolls have a small camp set up here to prevent the hook horrors from fleeing in this direction.
Three gnoll guard the camp and attack any creatures emerging from the tunnels that are not of their kind.
The Oozing Temple
A tremor causes a cave-in and traps the adventurers in a maze of tunnels with no obvious way out. With a dwindling air supply and water rising in the tunnels, the characters are forced to find a means of escape. Complicating matters, part of the maze belongs to a forgotten temple that now serves as the lair of servants of the demon lord Juiblex.
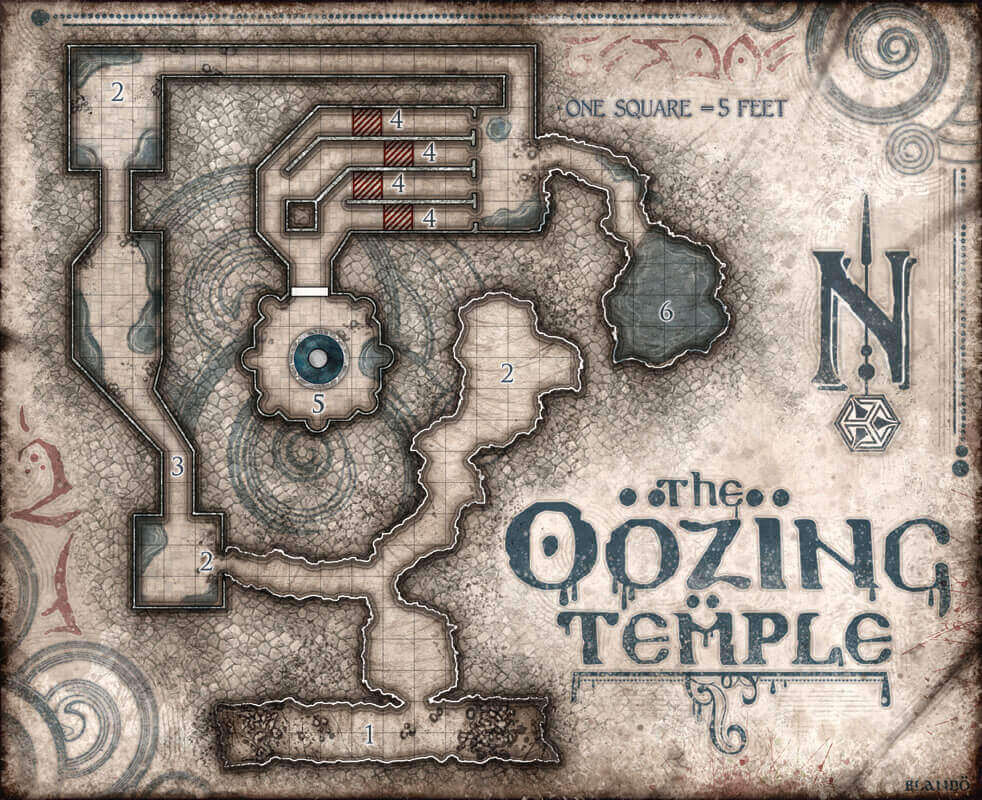
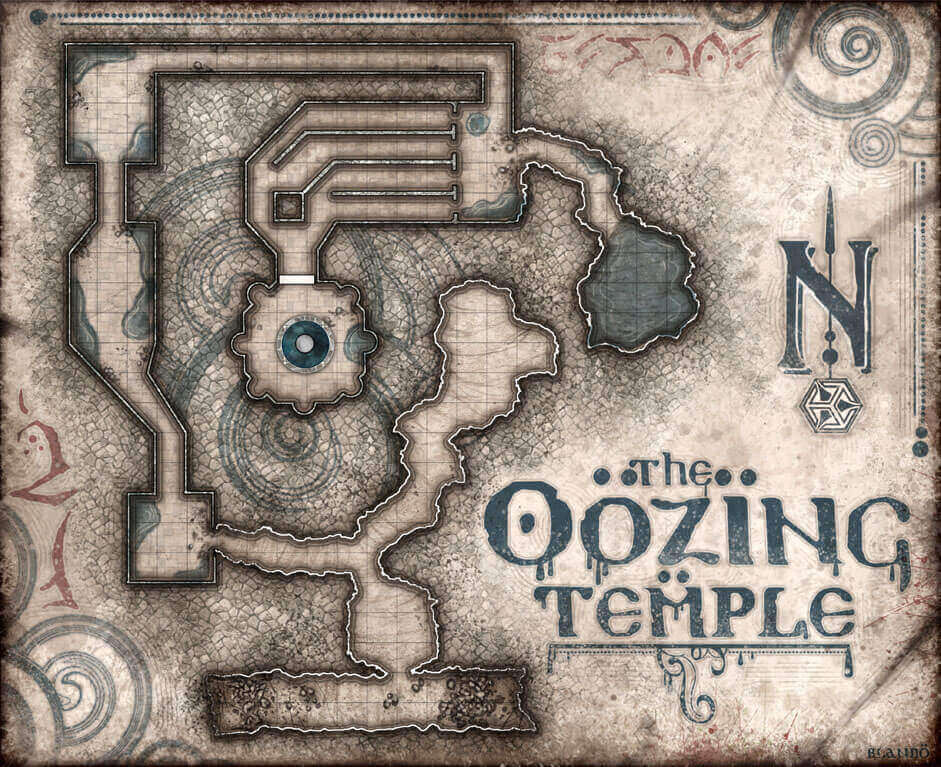
The Oozing Temple: General Features
As characters explore the Oozing Temple, keep in mind the following features.
Light. Except where specified otherwise, the tunnels and chambers are dark.
Air. The air is stale and perceptibly thin. The temple contains enough air for the oozes, plus 160 hours of breathable air for one creature, divided by the number of creatures present. For example, a party of four adventurers has 40 hours of air. Characters who are at rest and not undertaking activities such as moving or fighting consume half as much air.
Once half of the breathable air is consumed, the characters suffer one level of
A lit torch or its equivalent uses up air as a character does. Briefer but hotter magical effects consume 1 hour of air per die of fire damage per round. For example, a fireball spell that deals 8d6 fire damage consumes 8 hours of air, while a fire bolt that deals 1d10 fire damage consumes 1 hour of air per use.
Water. In addition to running low on air, the characters become aware that the tunnels and chambers are filling with water flowing in from area 6. The water rises at a rate of 1 foot per hour, meaning most of the tunnels and chambers will be completely flooded within 10 hours. Areas filled with waist-deep water are difficult terrain for the characters. Once the water is over their heads, they have to swim.
1. Boxed In
As the characters make their way through a 10-foot-high tubular passage, a tremor shakes the area and drops part of the ceiling on them. Each party member must succeed on a DC 13 Dexterity saving throw or take 5 (1d10) bludgeoning damage from falling debris.
Once the dust clears, the characters realize that fallen rock has buried both ends of the passageway. However, a new passage has opened in one of the walls, offering a possible escape route. It’s clear that the route the party was following has been permanently blocked by tons of rubble, and runs the risk of triggering another collapse if the characters attempt to dig out.
2. Dripping Death
Whether finished stone or rough rock, the walls of these 10-foot-high areas glisten with dark, dripping water.
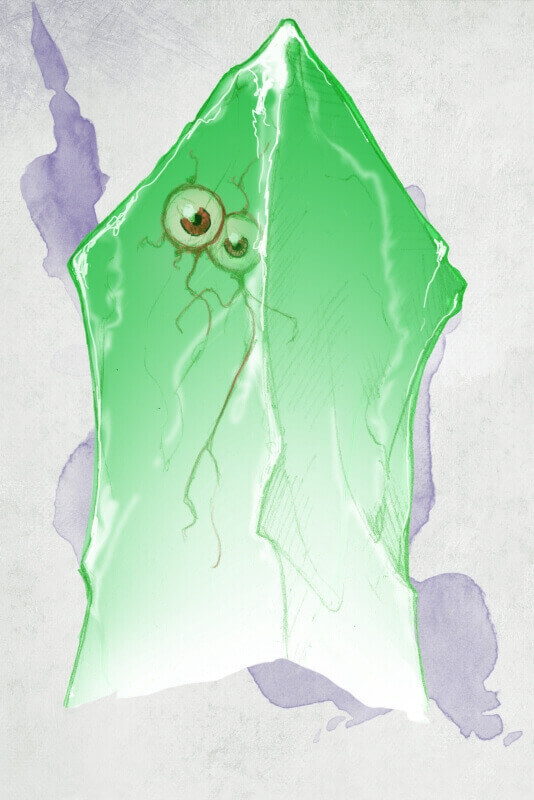
Each of these keyed areas holds a gray ooze that pours through cracks in the ceiling to attack any creatures that enter.
3. Glabbagool
This area contains the skeletal remains of a drow, along with a dark metal mace and a scattering of coins. However, the characters are quick to notice that these items appear to hover above the stone floor.
All the visible items are trapped within the body of a gelatinous cube named Glabbagool - or at least, that’s what it has chosen to call itself. Unlike most gelatinous cubes, this monster has an Intelligence of 10 (+0) and telepathy out to a range of 60 feet (see the Monster Manual introduction for telepathy rules).
Juiblex’s arrival in the Underdark has granted Glabbagool sentience and awareness. The ooze is genuinely curious about other creatures and wants to learn more about the world. It defends itself if attacked, but doesn’t otherwise try to harm the characters, instead asking who they are, where they come from, and why they have come to the temple.
Other oozes won’t attack Glabbagool, so it can block a passageway to help the adventurers fend them off. However, the cube can’t safely move past characters in a passageway. Glabbagool might ask to accompany the adventurers if it likes or is intrigued by them. Unfortunately, the ooze’s speed of 15 feet means that characters accompanied by it can travel only at a slow place (see “Travel Pace” at the beginning of this chapter).
Treasure
Glabbagool’s body contains a mace along with 14 ep and the mostly digested body of a drow. It will disgorge the items for the characters if they win its trust.
The mace is a common magic item. While attuned the weapon, its wielder can use an action to make the head of the mace alight with green flame, or use an action to extinguish the flame. While the mace is “lit,” it glows as brightly as a torch and deals an extra 1 fire damage on a hit.
4. Pudding Pits
This chamber is divided into four hallways and floored with heavy flagstones, the walls carved with worn and faded bas-reliefs. These show strange, swirling shapes that might be waves, tentacles, or some combination thereof.
Trap
The squares marked on the map have been undermined, leaving a 10-foot-deep pit beneath each one. A successful DC 15 Wisdom (Perception) check enables a character to notice that the stone is weakened.
More than 50 pounds of weight on an undermined area causes it to collapse. A creature standing in the area must succeed on a DC 11 Dexterity saving throw to grab the edge of the pit, after which the creature must succeed on a DC 11 Strength (Athletics) check to scramble out. On a failed saving throw or a failed check, the creature falls into the pit and takes 1d6 bludgeoning damage.
At the bottom of each pit is a black pudding, which attacks any creature that falls in. If denied a victim, or if it devours a fallen creature quickly, the pudding climbs up the sides to attack any dangling creatures, or to move into the hallway in search of prey.
5. Fountain of Madness
This room contains a stone fountain with a raised edge. The basin contains shallow, brackish water. At the center of the pool, the rubble of a broken statue rest atop a pedestal. All that remains recognizable are a pair of clawed stone feet clutching the pedestal’s top. Carved into the walls are seven niches. Water seeps into one niche through a crack in the wall. The two niches that flank it are empty. Strange, formless sculptures occupy the four remaining niches.
The “sculptures” are actually four gray ooze held in magical stasis. They liquefy and attack when any one of them is touched or damaged.
Treasure
Hidden beneath the dark waters of the fountain are 112 sp, 41 gp, three green-gold bracelets worth 25 gp each, a drow +1 dagger (the hilt has a spider design), a potion of greater healing, and a vial containing oil of slipperiness.
6. Water Chamber
Characters approaching this rough-walled cave hear the sound of pouring water. The water enters through cracks in the 10-foot-high ceiling. Given the rate at which the water flows in, the characters can easily conclude that the cracks were caused by the tremor they experienced, and it’s only a matter of time before the water floods the entire complex.
The water rises at a rate of 1 foot per hour until the tunnels are completely flooded. However, chipping away at any of the cracks causes more of the ceiling to collapse, doubling the amount of water pouring into the complex but also revealing a diverted underground river that is the source of the water. Once the water level rises to the ceiling, the flow is slowed and the characters can swim upward for 30 feet to reach the water’s surface. They find themselves in a larger cavern from which they can resume their journey.
Development
If Glabbagool is with the party, the intelligent gelatinous cube floats upward as the water rises and squeezes through a crack in the ceiling to escape the flooded temple and remain with the characters.
Lost Tomb of Khaem
In ages past, at the height of Faerûn’s great empires of magic, the half-elf sorcerer Brysis of Khaem was interred in a floating tomb. After the fall of the empire of Netheril and its flying cities, Brysis’s tomb plummeted into a crevasse and wound up in the Underdark, where it has remained for centuries. The rise of the demon lords has awakened Brysis from the eternal sleep of death as a wraith, served by specters who were once her loyal retainers. Brysis yearns to accumulate enough life force to leave the confines of her tomb, to which her spirit is bound.
The adventurers might discover the tomb by accident or with the aid of Fargas Rumblefoot, the halfling from the Silken Paths encounter. Either way, when they’re nearby, read the following to the players:
A soft feminine voice sounds out in your mind suddenly, faint and distant.
“Hello? Is someone there… ? Oh please, I need your help! I have been trapped in the dark for so long… so very long. Please, won’t you help to free me?”
The characters receive an impression of the direction to the entrance of the tomb, but the mysterious voice doesn’t respond to any queries. As they follow the voice, a narrow side passage takes them to a dirty marble wall with a deep-set door made of bronze-encased stone, green with age (see the “Lost Tomb of Khaem: General Features” sidebar).

Lost Tomb of Khaem: General Features
As characters explore the Lost Tomb of Khaem, keep in mind the following features.
Ceilings. Room ceilings are 15 feet high. The hallways connecting them are 10 feet high.
Doors. Each door in the tomb is a 10-foot-by-10-foot slab of solid marble encased in a thin layer of beaten bronze. The bronze has turned green with age. The door pivots on a central axis, creating narrow openings on either side while open. The door is also heavy and tightfitting, requiring a DC 15 Strength (Athletics) check to open or close.
Light. Except as otherwise noted, the interior of the tomb is dark.
Chaotic Magic. The tomb was crafted during an age of high magic, and it has become suffused with faerzress. The ancient and chaotic energy now permeating the structure causes any spell cast within the tomb to trigger a roll on the Wild Magic Surge table in chapter 3, “Classes,” of the Player’s Handbook.
1. Entrance Room
A stone diorama stands to the right of the entrance, depicting the sorcerer Brysis Khaem as a Netherese noble in her prime, surrounded by attendants, slaves, and other trappings of wealth and power. A vista of fantastic floating cities covers the wall to the left of the entrance.
Staircase and Landing
Across from the entrance, empty stone torch sconces flank a dusty staircase descending 20 feet to a landing. Set into the back wall of the landing is a Netherese calendar stone. Beyond this landing, the staircase resumes its descent, stopping at three more landings of bare stone and descending a total of 100 feet before arriving at area 2.
2. Shrine
The stairs lead down to this shrine, where shreds of dusty tapestries lie scattered across the floor. Friezes on the walls are defaced with deep gouges, making them unrecognizable. An altar of pale gray marble stands gouged and cracked against one wall.
A successful DC 13 Intelligence (Investigation) check reveals that the damage to this room is relatively recent, and that the creatures that caused it left no tracks of any kind in the layer of dust on the floor.
3. Servants' Sarcophagi
Four stone sarcophagi mark the resting places of Brysis’s most faithful servants. The lid of each sarcophagus bears the sculpted image of a robed human figure in repose. Brysis’s four servants have arisen at her command as specter. If anyone touches or otherwise disturbs a sarcophagus, all four specters emerge from their sarcophagi, howling in fury, and attack. The specters can pursue their prey beyond the confines of the tomb, if necessary.
Opening a sarcophagus lid requires a successful DC 17 Strength check and reveals treasure within (see “Treasure”).
A character inspecting the northeast sarcophagus and succeeding on a DC 15 Wisdom (Perception) check notices that the sarcophagus is built on hidden stone rollers. It can be moved aside with a successful DC 10 Strength check to reveal a 4-foot-square hole in the floor, and in the ceiling of a similarly sized chamber directly below this one (area 5). If the characters move the sarcophagus but leave the chamber without exploring the tomb below, they hear the same telepathic voice that called out to them initially, saying, “Please! Don’t leave! I’m here, below!”
Treasure
Each sarcophagus contains mummified remains, the tattered remnants of ancient burial garments, and treasure of Netherese origin.
The northeast sarcophagus contains two gold bracelets worth 50 gp each and a ceremonial wand (nonmagical) made of chiseled ivory worth 25 gp.
The northwest sarcophagus contains an onyx ring worth 50 gp and a silver necklace set with two azurites and a carnelian worth 250 gp.
The southwest sarcophagus contains a ewer made of beaten gold worth 25 gp and a walking stick worth 75 gp. The walking stick is made of varnished yew with a golden handle shaped like a scorpion.
The southeast sarcophagus contains a gold censer with platinum filigree worth 250 gp.
4. False Tomb
Stone blocks standing against the western and eastern walls are carved with niches, inside which rest a dozen clay canopic jars containing desiccated organs. These organs belong to Brysis’s servants, who are entombed in area 4.
In the middle of the room rests a wide stone sarcophagus atop a black marble bier. The lid of the sarcophagus is inlaid with dust-covered mosaics depicting great floating cities high above a beautiful landscape. The lid of the sarcophagus looks incredibly heavy but is made lighter by an ancient spell that has survived to this day. The lid can be pushed aside with a successful DC 10 Strength check. The sarcophagus contains a life-sized statue of Brysis, sculpted and painted to make it appear that she is sleeping comfortably. The statue is affixed to the inside of the sarcophagus with sovereign glue and can’t be moved. There is no treasure to be found.
Trap
Opening the sarcophagus triggers a magic mouth spell that calls out in a booming voice, “You have disturbed the tomb of Brysis of Khaem! Accursed are you, most miserable of creatures!” Each creature in the room, whether it hears the booming voice or not, must make a DC 15 Charisma saving throw. On a failure, the creature is cursed with disadvantage on attack rolls and saving throws. The creature can repeat the saving throw after 24 hours have elapsed, ending the effect on itself with a successful save. Otherwise, a remove curse spell ends this effect, as does destroying the wraith in area 5.
If Brysis’s wraith is destroyed, both the magic mouth and the curse on the sarcophagus cease to function.
5. True Tomb
Brysis’s true tomb is hidden below area 3 and has murals on the walls decorated with rich pigments and inlays of semiprecious stones. A gilded sarcophagus stands atop a stone bier along the west wall. An invisible stone chest rests at the foot of the sarcophagus. Characters searching the area thoroughly locate the chest. The chest becomes visible within an antimagic field, and a successful dispel magic (DC 19) also ends the invisibility effect.
Brysis of Khaem has arisen as a murderous wraith, bound to her tomb until she can steal enough life force to leave it. She arises from within the sarcophagus and attacks when creatures enter this chamber. She gloats about how the characters' deaths will free her from this prison, and how her victims will serve her even in death.
On initiative count 1 in the round in which Brysis attacks, the characters hear the telepathic voice that first called to them. “In the sarcophagus! I can help you!” See “Treasure” for more information.
Treasure
The thin gold sheath covering Brysis’s sarcophagus can be pried loose and is worth 250 gp. Inside the stone sarcophagus, lying atop Brysis’s withered and mummified corpse, is a magic sword called
The stone chest is unlocked and contains the other treasures Brysis took with her into the afterlife: 4,000 sp, 1,200 gp, eleven zircons (worth 50 gp each), a