In the culmination of Out of the Abyss, the heroes implement Vizeran DeVir’s scheme to take on the demon lords. The archmage’s ritual draws the demon lords together to fight to the death, leaving Demogorgon victorious but weakened as the adventurers face off against the Prince of Demons. Even wounded and weakened, though, Demogorgon is a legendary foe, and the fate of the Underdark and all Faerûn rests on the adventurers' final battle.
Readying the Plan
Over the course of their adventures, the characters have collected the components needed to create the talisman at the center of Vizeran DeVir’s summoning ritual:
- The intact and unhatched egg of a purple worm (from the worm hatchery in chapter 13)
- The central eye of a beholder (from Karazikar in the Vast Oblivium in chapter 13, or some other source).
- Six feathers from six different angels (from the petrified angels in the Labyrinth in chapter 14)
- The heart of a goristro (from the demon slain by Yeenoghu in chapter 14)
- Thirteen timmasks sprouted from the footprint of a greater demon (from Araumycos’s cavern in chapter 16, or elsewhere)
- Gromph Baenre’s grimoire (from Sorcere in chapter 15)
- A few drops of blood or ichor from a demon lord (from Yeenoghu’s battle with the goristro in chapter 14, or from fighting Juiblex in chapter 16)
After Vizeran DeVir uses these components to create the talisman known as the dark heart to draw forth the exiled demon lords from across the Underdark, he expects the adventurers to plant it in Menzoberranzan. Having learned from Vizeran’s apprentice Grin Ousstyl of the archmage’s secret goal to see the city destroyed, the characters might decide to place the dark heart talisman elsewhere, determining the battlefield for their confrontation with the demon lords (see “Let This Be Their Battlefield”).
Option: Jimjar’s Last Gamble
If the adventurers need some extra help in their epic final battle at the end of the campaign, consider the following option involving Jimjar, the deep gnome gambler they met in the drow slave pen in chapter 1 of the adventure.
“Jimjar” isn’t at all who he appears. He is, in fact, a god or other great power in disguise-or the Chosen of such a power-and has been watching the heroes since their first encounter in Velkynvelve. His reasons for doing this are his own, but when push comes to shove, he can give the heroes some help in overcoming the demon lords.
At an opportune moment, Jimjar shows up (even returning from death if he appeared to perish earlier in the adventure) and gives the characters a vote of encouragement, telling them, “I bet you can do this.” Each character gains inspiration and a blessing of wound closure (see “Other Rewards” in chapter 7 of the Dungeon Master’s Guide). Jimjar disappears afterward, potentially putting in one last appearance at the end of the adventure to hint as to his true nature before vanishing into the Underdark.
Who is Jimjar really? That depends on your characters and the campaign, but one of the characters' patron deities is a good possibility. He might also be a gnomish god such as Garl Glittergold or Callarduran Smoothhands, known tricksters and shapeshifters, and foes of demons and their ilk. The more important thing is that he serves as a “lucky charm” for the characters when they need him. This option works particularly well if the adventurers have been kind to the sometimes annoying deep gnome over the course of the campaign, earning his respect and gratitude.
Broken Heart
If the characters lose or destroy the dark heart, they either have to go through the process of gathering the necessary components to make a replacement, or abandon Vizeran’s plan. See “Loose Threads” later in this chapter for ideas about what to do if the plan never gets off the ground.
Enacting the Plan
Once the dark heart is in place, the ritual can begin. The adventurers and their allies take up a position not far from the dark heart, close to where the demons will appear. Where exactly depends on the placement of the talisman and the adventurers' own tactics and plans. They can use a
Vizeran (assisted by Grin if the apprentice is available), performs the complex ritual in the sanctum of his tower. The ritual causes the dark heart to radiate a summons throughout the Underdark using the faerzress-an irresistible call drawing the demons toward it. When the ritual reaches its conclusion at the end of nine hours, portals of faerzress form. All the demons and demon lords in the Underdark are drawn through those portals, appearing together in the area around the dark heart talisman.
Enraged by being forcibly summoned yet again by a ritual, the demons fly into a frenzy once they see each other, beginning a battle to the death. As each demon’s material form is destroyed, its essence is banished back into the Abyss. The task of the adventurers is to be close at hand but not get caught up in the battle until one demon lord is left standing, weakened and spent from the conflict. That becomes the adventurers' cue to attack and destroy the last demon lord, banishing it to the Abyss if they succeed.
Option: The Lesser of Two Evils
If you want to pose a moral dilemma for the characters, have Vizeran tell them that the ritual needs a final component, to be delivered while it is performed: the sacrifice of an innocent sentient being, whose blood will fuel and activate the ritual’s fiendish magic. Will the adventurers willingly sacrifice one life to stop the demon lords from threatening the Underdark and the whole of Faerûn?
This kind of moral dilemma can add significant drama to the story. However, it can also be played out as a red herring-by having it be something Vizeran asks for even though it’s not necessary. The drow archmage might be testing the characters to see how far they’ll go, or he could be afflicted with madness that makes him believe such a sacrifice is necessary even though it isn’t.
A character can figure out the truth with a DC 20 Intelligence (Arcana) check, or by consulting Gromph Baenre’s grimoire (see chapter 15). Alternatively, Grin Ousstyl can tell the characters the truth, enraging his master as a result.
Staying Behind
One or more of the characters might choose to stay with Vizeran during the nine-hour performance of the ritual, whether to guard against treachery or to reclaim Gromph’s grimoire once the ritual is done. If this is the case, you can add some action for those who remain behind by having a small number of the demons summoned by the ritual attracted to the site of the ritual rather than the location of the dark heart talisman. Alternatively, agents of Quenthel Baenre or Jarlaxle can attack Araj when the ritual is complete, wanting to silence Vizeran before he can reveal what he knows about Gromph Baenre (see chapter 15).
Vizeran might also learn of Grin Ousstyl’s betrayal of information to the adventurers, and choose to eliminate him immediately after he’s served his purpose in assisting with the ritual. This might lead some characters back to Araj to aid the drow apprentice.
Let This Be Their Battlefield
The players can choose where their characters confront the demon lords by deciding where to set the dark heart talisman. Vizeran’s preference is anywhere in Menzoberranzan, because he wants all drow to see the poisoned fruits of their misplaced worship of Lolth. However, from what Grin Ousstyl tells them in chapter 15, the adventurers should learn that the talisman can be placed in any location.
Wherever the players decide to place the talisman, their characters must travel to that location while Vizeran makes his final preparations for the ritual. Given their experiences in the Underdark, the adventurers should be able to think of a number of likely sites for the final battle. A few likely options are discussed here.
Araumycos
At the center of the network of caves and passages inhabited by Araumycos, the cavern where Juiblex and Zuggtmoy battled in chapter 16 is a good potential site. If the vast fungal colony is already dead or badly damaged by its abuse at Zuggtmoy’s hands, it’s in no position to object. Otherwise, it opposes becoming a battlefield out of a sense of self-preservation. Unleashing the demons within Araumycos does considerable damage to the fungal colony, but doesn’t destroy it.
Neverlight Grove
If the characters inform the myconids of their need for a place to stage a daring last battle, Sovereign Basidia or another myconid representative might offer Neverlight Grove. The ranks of the myconids have been decimated by Zuggtmoy’s depredations and the fetid wedding, and many fear their beloved caverns are corrupted. They are willing to seek a new home (perhaps in the caverns of Araumycos) and grateful enough to the heroes that they will sacrifice their old home to help them.
Sloobludop
The ruins of the kuo-toa settlement (see chapter 3) could become the site of the final fight against the demon lords. Shuushar the Awakened can be convinced to help evacuate the remaining inhabitants if asked. The nearby Darklake creates its own challenges, particularly given the presence of ixitxachitl loyal to Demogorgon.
Araj
Characters looking to double-cross Vizeran - or those with a sense of poetic justice - might hide the dark heart somewhere in the drow archmage’s tower or the surrounding cavern. This reduces the number of bystanders, contains the demons and their battle, and ensures Vizeran’s enmity.
Confronting the Demon Lords
The demon lords are some of the most powerful foes a party of adventurers could face. Indeed, any one of them at full strength could wipe out a group of 15th-level characters with ease. Fortunately for the heroes, the goal of Vizeran’s plan isn’t to fight multiple demon lords, but to turn them against each other. With the right combination of preparation, timing, and execution, the characters set the trap that Vizeran springs with his ritual-and hope whichever demon lord survives is weakened enough for them to destroy it.
Allied Forces
Vizeran is needed to perform the ritual, placing him far from the battle and leaving him with three levels of
Most of the heroes' allies are of limited use against the demon lords-creatures immune to many forms of attack, including nonmagical weapons. Rather than dealing with the ineffectual attacks of allies or a dozen or more additional actions each round, give characters backed up by a group of allies the following benefits.
Healing Support. A character regains 2d6 hit points at the end of each of his or her turns, provided the character has at least 1 hit point remaining.
Tactical Losses. Once each round, when a player character would be hit by an attack, a supporting ally is hit by the attack instead. The adventurers can use this option ten times before their allies are too weakened or depleted to provide assistance.
Heroic Sacrifice
Players should never have to think about sacrificing their characters, but you should be prepared for the possibility of one or more of the heroes giving up their lives in order to defeat the evil that has arisen in the Underdark. It’s up to you how to handle such a high-stakes event, but consider treating it as an extreme variation of “Success at a Cost” from chapter 8 of the Dungeon Master’s Guide. At the very least, a player deliberately sacrificing his or her character’s life in a final, selfless heroic effort - the antithesis of the selfishness and evil of the Abyss - should grant all the character’s allies inspiration. The sacrifice might not be enough to win the day on its own, but it can help turn the tide.
Rage of Demons
Once the dark heart talisman is placed and the characters signal Vizeran, there’s no turning back.
The waiting is the hard part. Time seems to drag as you remain alert, weapons drawn, every nerve singing with the tension in the air all around you.
Finally, a swirling light begins to flare in the darkness. A barely audible humming shakes you to the core, rising and falling like a vast heartbeat in the depths. The glow of faerzress gathers and brightens, creating swirling pools like holes torn in the air. A roar sounds from far away as shadows move in the depths of those pools of light. The demons are coming.
The demon lords described in appendix D of this adventure all appear in the final battle, with the following exceptions:
- If Fraz-Urb’luu was not sent back to the Abyss in chapter 9, his gemstone is hurled into the fray by Vizeran’s ritual. Unless the characters retrieve it, another demon lord steps on the gem, destroys it, and sends Fraz-Urb’luu’s spirit back to the Abyss.
- If Juiblex and Zuggtmoy were sent back to the Abyss in earlier parts of the adventure, they are not present.
- Baphomet and Yeenoghu are absent if the characters activated the Maze Engine (see chapter 14) and the 81-100 result on the Maze Engine Effects table came up.
Numerous other demons also pour through the portals. For a brief moment, all of the demons and demon lords are disoriented as they attempt to get their bearings after being pulled across the Underdark. Then as their gazes fall upon each other, they roar, bellow, or shriek with a hatred too deep for mortals to truly comprehend, and the terrible battle begins.
Option: Playing Out the Battle
Rather than focusing on the adventurers biding their time and dealing with the fallout of the titanic battle between the demon lords, you can shift focus for this part of the adventure. Consider having the players take control of the various demon lords from appendix D, then play out the conflict between them.
Assign each player an available demon lord, or allow players to choose one demon lord to control during the battle. You manage any of the remaining demon lords. If there aren’t enough demon lords for all the players, you can use balors or other powerful demons to round out their numbers.
The players control the demons in their battle to the death, with the only restriction being that they can’t withdraw from the combat. Brief tactical retreats are permissible, but Vizeran’s ritual has filled the demon lords with the rage to do battle.
The demonic victor of this battle, its hit points and other resources sufficiently depleted, is the foe that the adventurers must overcome in the final confrontation.
Demon Showdown
Ideally, the adventurers and their allies remain hidden from the battling demons, letting them fight it out among themselves. Still, there are challenges for the characters to overcome as they wait. Feel free to include as many of the following as you wish while narrating the struggle between the demon lords and their minions, keeping in mind that the characters will have no time for even a short rest before taking on the main challenge of this encounter-a fight with the sole remaining demon lord.
Demon Sortie
Rampaging lesser demons discover one or more of the characters where they wait out the battle, attacking at once. Roll a d4 to determine the demons involved.
Demon Sortie Force
| d4 | Demon Sortie |
|---|---|
| 1 | 4 barlguras |
| 2 | 4 chasmes |
| 3 | 2 hezrous |
| 4 | 3 vrocks |
Demon Thief
An invisible quasit tries to steal a small, valuable item from a party member. The target must succeed on a DC 13 Wisdom (Perception) check to notice the theft as it happens. On a failed check, the quasit makes off with the item undetected. You can make the search for the item a loose thread for the conclusion of the adventure. Alternatively, have the quasit killed during the battle, with the stolen item turning up in the aftermath.
Endangered Allies
If any of the player characters' allies are accompanying them, a demon sortie (see above) attacks the NPCs. The characters must decide whether or not to break cover to aid their allies against the demons. If they do, another demon sortie attacks them 1d4 rounds later.
Near Miss
The battle between the demon lords shifts dangerously close to the characters. Roll a d6 and consult the Near Miss table to determine the result.
Near Miss
| d6 | Event |
|---|---|
| 1-2 | Explosion. Each creature within 20 feet of a point you choose must make a DC 13 Dexterity saving throw. On a failure, the creature takes 3d6 fire damage, or half as much damage on a success. |
| 3-4 | Flying Debris. Each creature within 30 feet of a point you choose must make a DC 13 Dexterity saving throw, taking 3d6 bludgeoning damage and falling prone on a failure. |
| 5-6 | Close Call. A character you choose must make a successful DC 13 Dexterity saving throw to dodge a stray attack. On a failed save, the character takes 3d6 bludgeoning damage. |
Threatened Bystanders
If the battle takes place in a populated area such as Menzoberranzan, the characters spot bystanders under attack by lesser demons that prefer to take on easy prey rather than fighting against their own kind. A dozen dretch or manes (50 percent chance of either) attack, killing and consuming their mortal victims unless the adventurers intervene.
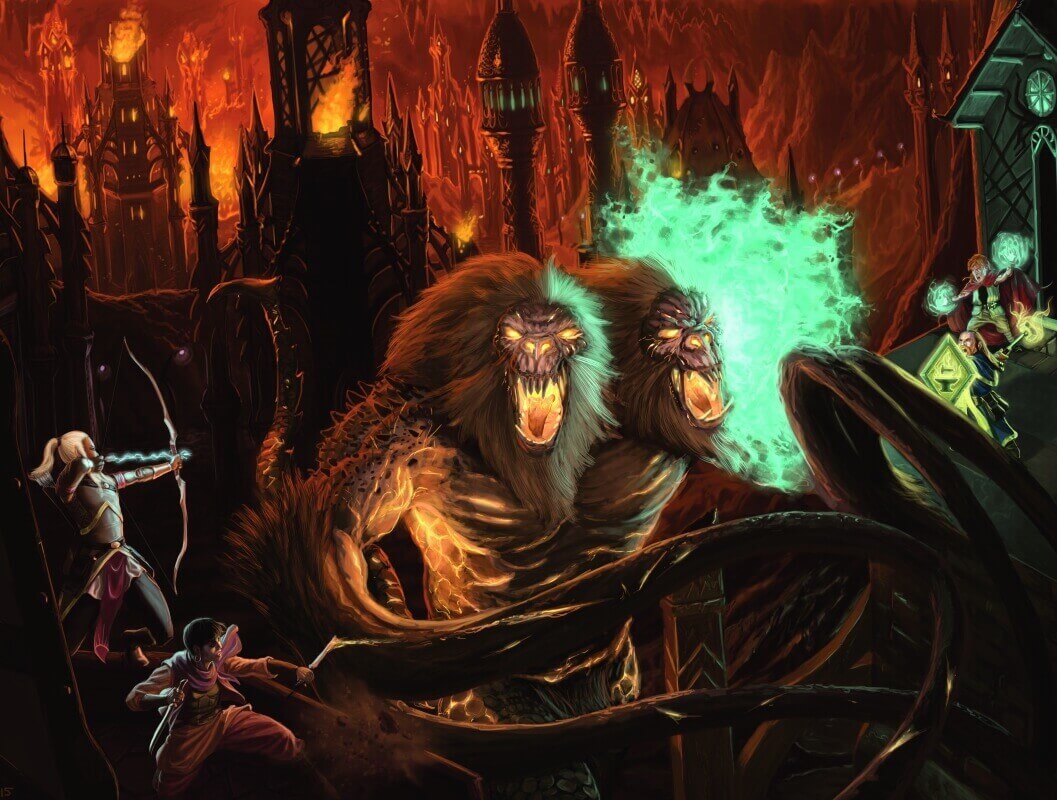
Against Demogorgon
After running any events you wish from “The Battle,” the struggle between the demon lords comes to an end as Demogorgon proves why he is known as the Prince of Demons.
The sounds of battle finally die away, the ground before you stained black and red with demonic blood and ichor. In the terrible grip of Demogorgon, even the mighty Orcus looks almost small. Tentacles hold the Demon Prince of Undeath in a crushing grip, slithering across the maggot-riddled flesh of the horned demon, as they tighten inexorably. A strangled gasp issues from the demon lord’s throat as a horrific crunching sound echoes throughout the cavern and his skull-topped wand clatters onto the floor.
Demogorgon casts aside the limp form, which melts away as Orcus returns to the Abyss that spawned him. The Prince of Demons throws back his two heads and roars his triumph. As he does, his nearer head turns, burning eyes raking across the battlefield. Filled with bloodlust and battle rage, the demon lord searches for another target.
Determine the characters' starting positions based on their actions during the battle. Demogorgon should be at least 80 feet away from them initially, unless the players specifically stated they were remaining close to the demon lord.
Demogorgon has been wounded during the fight, giving the characters an edge in the battle to come. Apply the following penalties to the Demogorgon stat block in appendix D:
- Demogorgon has 290 hit points remaining and can’t regain hit points due to the disruptive nature of Vizeran’s faerzress-empowered ritual.
- He has only one use of Legendary Resistance remaining for the day.
- His feeblemind innate spell is expended, as are all but one use each of dispel magic, fear, and telekinesis.
- With all the other demon lords banished back to the Abyss, Demogorgon becomes the focus of the disruptive power of Vizeran’s ritual. This imposes a -5 penalty to his attack rolls, ability checks, and saving throws.
Even in his weakened state, the demon lord remains a terrifying opponent, attacking the adventurers in a howling fury as battle is joined.
Alternative Showdown
If you prefer, a demon lord other than Demogorgon could be the victor of the demonic showdown and the final foe of the campaign. This is particularly appropriate if the adventurers earned the ire of a specific demon lord during the adventure (including Juiblex or Yeenoghu). Alternatively, one or more of the characters' backgrounds might be tied to a particular demon lord.
Wand of Orcus
When Orcus is defeated, he drops the
Destroying Demogorgon
If the characters reduce the Prince of Demons to 0 hit points, they disrupt and destroy his material form. Shrieking and gibbering, the Prince of Demons disintegrates as his foul essence is cast back into the Abyss, ending the demonic threat to the Underdark.
If the characters fail to destroy Demogorgon, see “Demon Lords Triumphant.”
Loose Threads
The conclusion of Out of the Abyss can be relatively quick and straightforward if Vizeran’s scheme is successful and the heroes are victorious. The survivors of the battle against the demon lords can make their way out of the Underdark to report to a grateful alliance of surface-world factions that the threat is ended.
Major loose threads left hanging at the end of the final battle include the following.
Gromph’s Grimoire
After recovering Gromph Baenre’s grimoire from Sorcere in chapter 15, the characters might think about what to do with the dark tome once the threat of the demon lords is ended. The knowledge and power the book represents are dangerous in anyone’s hands—especially Vizeran DeVir’s, given what the characters know of him. However, the drow archmage doesn’t give up the grimoire willingly.
Finding a means to get rid of Gromph’s grimoire once and for all could be the basis for continued adventures, perhaps even leading characters into the Abyss (see “Into the Demonweb Pits”). Alternatively, if you arrange for the book to be stolen from Vizeran before the characters can deal with it, they might need to recover it to ensure its powers are never misused again.
If you prefer to tie up loose ends concerning the grimoire, you can have it banished into the Abyss along with the demon lords. It might be reclaimed by Lolth or lost somewhere within the infinite depths of that plane, at least until it resurfaces again.
Lingering Evil
One or more of the demon lords might remain in the Underdark or on the Material Plane by the end of the campaign, having managed to avoid being drawn into Vizeran’s trap. Graz’zt is a good possibility. In this case, a continuing campaign might be necessary for the highlevel heroes to acquire the resources they need to take on any remaining demon lords, since the trick with the dark heart isn’t going to work a second time.
The characters' continuing adventures could involve further cooperation with Vizeran DeVir (if he survives) or delving deeper into the Underdark for legendary weapons or magic. The characters might even venture out into the other planes of existence with the aid of Araumycos or the librarians of Gravenhollow, seeking allies, lore, and resources to combat the demon lords and return them to the Abyss.
Into the Demonweb Pits
Ambitious adventurers might decide to take the fight to Lolth, seeking to punish her for what she unleashed on the Material Plane and to undo whatever her scheme might have gained her. Vizeran will be inclined to help them find a way to reach the Demonweb (Lolth’s layer of the Abyss), since the drow archmage hates the Demon Queen of Spiders and her subjugation of his race.
As they travel through the Abyss, the characters might discover that the demon lords they defeated in the Underdark are potential allies in this new quest. Those demon lords want their own revenge upon Lolth for her scheme, and it might suit their mad whims to use the adventurers as their agents to achieve it.
If and when the characters confront Lolth, they find her pregnant and surrounded by thousands of eggs-her unborn young. When the eggs hatch, the Demon Queen of Spiders plans to send her offspring throughout the Abyss, creating a new generation of demon lords under her sway. How the heroes thwart Lolth’s mad scheme remains to be seen!
Demon Lords Triumphant
In the event the heroes were not successful, a potential new campaign could take place in a Faerûn threatened—or even ruled—by demon lords with access to the surface world. In addition to their summoned armies of demons and fiendish creatures, they gather worldly forces of chaos and evil to their banners to launch a war against all civilized lands. A world under the assault or rule of the demon lords is a world in need of heroes.
Gromph Baenre
The fate of Gromph Baenre, instigator of chaos and Vizeran’s rival, remains a mystery. If he yet lives, his role in recent events earns him many new enemies. Matron Mother Quenthel Baenre handpicks a new Archmage of Menzoberranzan to replace her troublesome brother, knowing Gromph will not be found until he chooses to reappear.
Menzoberranzan
If the City of Spiders is the site of the demon lords' battle, it is damaged even more than it was by Demogorgon’s arrival. Word of the city’s misfortune spreads throughout the Underdark, with other races and factions trying to claim some of the power long held by the drow.
Despite Vizeran’s best efforts, not all drow believe that Lolth is responsible for the disaster, instead blaming a lack of faith in the Demon Queen of Spiders, as well as the power of the wizards. Chaos and agitation for change embroil the city, forcing the already weakened ruling houses to put down challenges to their power even as they make concessions to their rivals.
A civil war between the drow isn’t likely to remain contained within Menzoberranzan-or even the Underdark-as different sides look for resources and advantages. The adventurers could get involved on either side of the conflict, or might aid surface-world factions intent on containing the war in the Underdark until it eventually winds down.
Gauntlgrym
Even if the heroes eliminate the threat the demon lords represent to Gauntlgrym, the Underdark remains in a state of chaos. The defenders of Gauntlgrym need aid to rebuild and strengthen the city’s defenses, and to remain vigilant for new threats gathering in the dark depths of the world. King Bruenor might offer the triumphant heroes noble titles and positions of power in his kingdom in the hope of enlisting their aid against the troubles to come. The adventurers might get the opportunity to earn those titles all over again when an Underdark army marches on the dwarf kingdom, determined to claim Gauntlgrym and the power of the primordial bound within its Great Forge.
Vizeran DeVir
Although he’s nominally the party’s ally during much of this adventure, Vizeran DeVir can’t be underestimated. Once the immediate threat is dealt with, the drow archmage turns his attention to other goals-claiming what he considers his rightful place of power among the drow, and overthrowing the tyrannical rule of Lolth and her priestesses. Vizeran might start a civil war among the dark elves-one that could easily drag in the other civilizations of the Underdark and parts of Faerûn as well.
Although Vizeran won’t immediately turn against his former allies, the adventurers would be fools to trust him. He seizes any opportunity to increase his own power and prestige, including holding on to Gromph’s grimoire and any ritual components or trinkets the adventurers might have acquired for him.
If the adventurers thwarted Vizeran’s revenge scheme by placing the dark heart talisman somewhere other than Menzoberranzan, they earn the drow archmage’s enmity. Vizeran’s plots expand to include the adventurers as well as his own people, and the next great challenge the heroes face might come from the archmage as he plans his revenge.