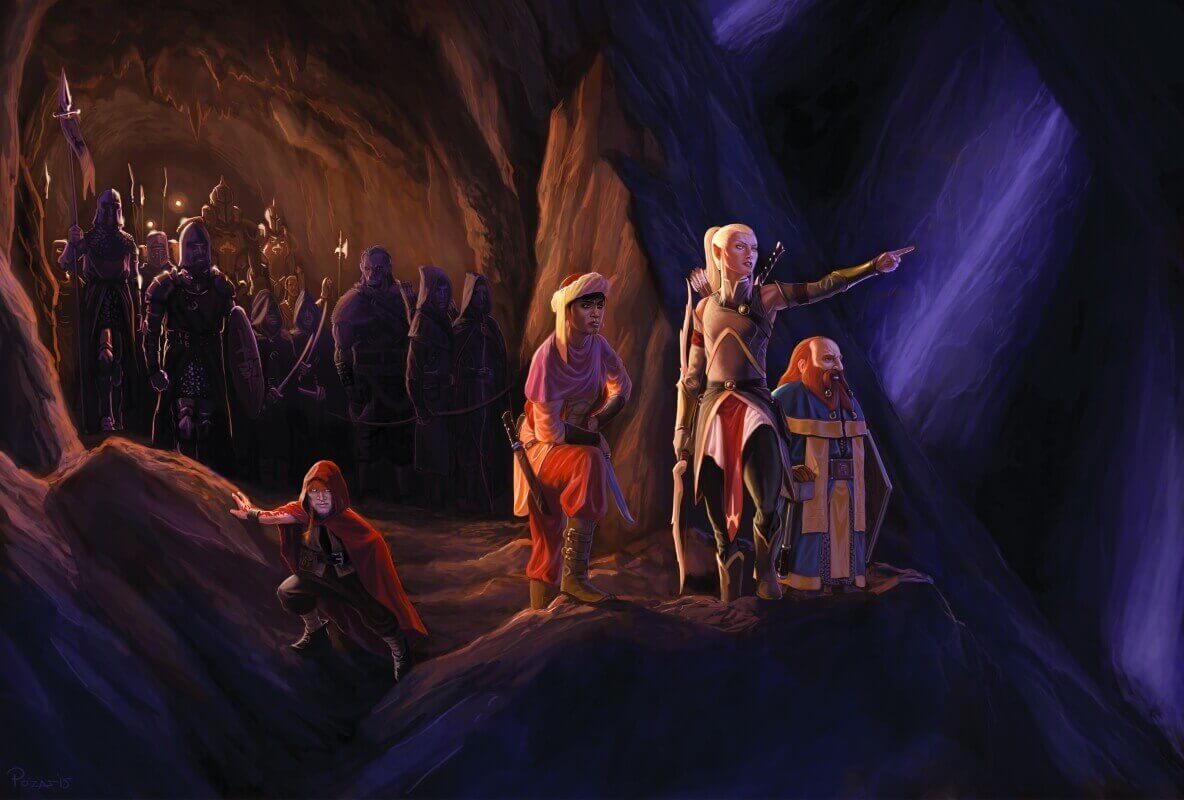
Having survived Mantol-Derith and obtained Ghazrim DuLoc’s ring, the adventurers and their allies continue on into the Underdark. This time, rather than escaped prisoners looking for a way out, they are at the head of an expeditionary force ready to challenge whatever the Underdark has to offer.
Much of this middle section of the adventure is freeform, dictated largely by the characters' decisions and tactics. The adventurers' immediate destination is the legendary library of Gravenhollow (see chapter 11), where they gain information that likely takes them to the tower of Araj, home of the mysterious drow archmage Vizeran DeVir. However, the characters are free to explore and visit different places before and after they explore Gravenhollow and unlock its secrets.
The events described in chapters 13 through 16 can be interspersed among the material in this part of the adventure, as the characters work to fully understand the new menaces that have appeared in the Underdark, seek new allies and information, and ultimately attempt to create a plan to end the demon lord threat.
Character advancement through this section of the adventure is important. The journey from Mantol-Derith to Gravenhollow should involve sufficient encounters and challenges for the characters to reach 10th level by the time they visit the stone giant library. As the characters travel from place to place, check for random encounters as normal (see chapter 2), but swap out the creature encounters with ones presented in this chapter. Ideally, the characters should be 14th level by the time they crash Zuggtmoy’s wedding (chapter 16, “The Fetid Wedding”), and 15th level for the final showdown against the demon lords (see chapter 17, “Against the Demon Lords”).
Random Encounters
| d20 | Encounter | Secondary Encounter |
|---|---|---|
| 1-13 | No Encounter | |
| 14-15 | Terrain Encounter | |
| 16-17 | Creature Encounter | |
| 18-20 | Terrain Encounter | Creature Encounter |
Fellow Travelers
The characters initially traveled through the Underdark as a small group, perhaps joined by a few of their fellow prisoners from Velkynvelve and other allies they met along the way. Now, they return to the subterranean realm at the head of a group of allies that might outnumber the adventurers four-to-one, depending on how many NPCs were recruited from the factions in Gauntlgrym (see chapter 8). This changes some of the conditions described in “Underdark Travel” in chapter 2.
Marching Orders
The tunnels and passages of the Underdark aren’t easy routes through which to lead a large group of NPCs. When the characters set out, have the players describe how their expeditionary force is arrayed while traveling in single file, two abreast, and in open formation in wide-open spaces. Also ask the players if any of the NPCs are scouting ahead or serving as a rear guard (see “Scouting,” below) or if the larger party remains in close formation at all times.
The marching order affects where and how different encounters might occur, particularly if they happen while characters are marching single file or two abreast. A threat approaching from above, below, or the flank could strike the middle of the expanded party, making it difficult for the characters at either end to reach it. Likewise, spellcasters must be aware of the allies around them at all times when casting area spells that don’t solely target enemies.
Travel Pace
The pace of Underdark travel remains as outlined in chapter 2, and the characters move no slower for traveling with a larger party. Although a portion of the expeditionary force might be mounted on giant lizards, the lizards travel at the pace of the rest of the party unless they move out ahead.
As noted in chapter 2, a fast pace makes it harder for characters to spot ambushers or items of interest, and prevents characters from foraging. A slow pace improves chances of foraging. However, even while traveling at a slow pace, the characters and the NPCs can’t use stealth, since they are too large a group to go unnoticed. Stealth is an option only for a smaller scouting party traveling away from the main force (see “Scouting”).
Navigating
While traveling as part of a larger group, the characters have an easier time navigating their way through the Underdark than they did during their initial escape. The characters' own experience, plus that of their followers, along with maps and other information they might have acquired in Gauntlgrym or elsewhere, give all members of the expanded party advantage on any Wisdom (Survival) checks to avoid becoming lost (see chapter 5, “Adventure Environments,” of the Dungeon Master’s Guide).
Scouting
A portion of the expanded party can break off in order to travel some distance ahead, scouting for the right path while remaining on the lookout for potential hazards. A smaller group might also lag behind, serving as a rearguard watching for threats coming up behind the characters as they travel. NPCs can serve as scouts or members of a rearguard as the players wish. Some of the adventurers might choose to do so as well.
A smaller scouting group can make use of stealth to travel unnoticed. If a random encounter occurs during the journey, characters in the scouting party discover it first and can choose whether to avoid or deal with the encounter. If characters in the scouting party notice the encounter without being seen themselves, they can retreat back to the main force to inform the other characters. Similarly, if a random encounter escapes the scouting characters' notice, the encountered creatures can lie in wait for the rest of the characters in order to ambush them.
In Command
No longer a ragtag band of survivors and prisoners, the adventurers are now in command of a dedicated force of NPC followers. In addition to the advantages that brings, the characters must assume leadership roles as they deal with allies who might not entirely trust or respect them-or each other. Add in the dangers of the Underdark, along with the unpredictable influence of demonic madness, and the characters have several new challenges that must be faced.
Personalities
Although the NPCs the characters lead are ostensibly allies, many belong to different factions, and old grudges and differences in ethos aren’t easily set aside. Personality conflicts might arise among the followers in the expanded party, and the adventurers would be well advised to head off potential trouble. For example, having Lords' Alliance troops acting as scouts while keeping Zhentarim mercenaries close at hand will help keep those factions from fighting.
Heart of Darkness
In this phase of the campaign, the characters are moving toward the demon lords and their influence rather than away from it, even as the Underdark sinks deeper into madness and chaos. The characters will make saving throws against acquiring levels of madness, as called for in different encounters and whenever you feel it is appropriate. (See chapter 2 of the adventure for more information on madness.)
The NPCs following the characters into the Underdark are just as vulnerable to demonic madness. However, rather than make saving throws or track madness levels for each individual NPC, use the Random Events table in this chapter to determine when madness appears among those followers.
When madness appears among the NPCs, use it not just for its mechanical effects but to create real complications for the adventurers. For example, if the Random Events table indicates that one member of the expanded party suffers long-term madness, you might decide to bestow extreme paranoia on that NPC. In addition to the effect of Wisdom and Charisma checks, that character might believe that the adventurers are actually agents of the demon lords, and are intent on leading the NPCs to their doom.
Loyalty
Having the adventurers leading an expanded party gives you the opportunity to use the optional loyalty rules in chapter 4, “Creating Nonplayer Characters,” of the Dungeon Master’s Guide. You can track the loyalty scores of groups of NPCs, such as those belonging to each faction, rather than having to track NPCs individually. The characters must balance the goals and bonds of their followers in order to maintain and improve their loyalty.
Provisions
The factions in Gauntlgrym see to it that the expeditionary force is well provisioned with whatever the characters' expeditionary force can carry. Food and water aren’t easy to come by in the Underdark, as the characters know all too well, and supplies must be managed and safeguarded.
If the expeditionary force needs to supplement or replace supplies while traveling, the amounts that characters are able to find become more important with a larger group to support. See “Foraging” in chapter 5 of the Dungeon Master’s Guide, as well as the guidelines in chapter 2 of this adventure.
Treasure
Just as they must ensure sufficient supplies for all the NPCs, the characters need to think about how best to share the spoils of encounters and adventures with their followers. Although the NPCs all accompany the adventurers out of loyalty to their factions-and on orders from their superiors in Gauntlgrym-the characters' treatment of the NPCs influences the loyalty of those followers during the mission into the Underdark.
The characters should come up with some means for dividing any treasure taken on the expedition between the NPCs. As long as the division is reasonably fair, most of the followers will be content. However, the NPCs will complain if all the choice pieces of treasure go to the adventurers.
The characters might also need to contend with the problem of theft, whether NPCs stealing from spoils not yet divided, stealing from the adventurers, or stealing from each other. Such theft might be driven by sheer greed, or it could be a manifestation of madness. A bout of long-term madness could easily lead to obsession with particular items of treasure-especially magic items-with an obsessed NPC willing to steal or even kill to obtain them.
Maintaining Order
The adventurers are in command of their NPC followers, and that means they are responsible for welding together disparate forces and maintaining discipline. The characters have a bit of an advantage in this regard, in that the NPCs placed under their command are all well-trained faction operatives, not raw recruits or mercenaries. However, some of these seasoned personnel might question the right of a ragtag band of adventurers to command them, even if their superiors seem to trust the player characters. Likewise, though the individual factions are typically disciplined within their own ranks, members of any faction might bristle at having to work alongside (much less take orders from) members of other factions.
Chain of Command
In addition to deciding how the expeditionary force is organized and distributed (see “Marching Orders”), the players must also institute a clear chain of command. One or more of the adventurers might be the field commanders of the expanded party, while others serve as lieutenants. Likewise, the adventurers might appoint some of the NPCs to command positions. Without a clear chain of command, information might not go to the right people, and decisions might not get made quickly enough-or at all. Adding to the challenge of maintaining discipline is the ever-present threat of demonic madness growing among the ranks, creating problems even for seasoned and professional troops (see “Heart of Darkness”).
If the expeditionary force is made up of diverse factions, the players also need to decide how much latitude to give those factions. For example, Zhentarim mercenaries might be eager to torture prisoners for information unless the characters put a stop to it, and members of the Emerald Enclave might place a higher priority on maintaining the balance of nature in the Underdark than on political struggles.
Attacking in Force
When dealing with combat between large groups of creatures-either the adventurers' allies or their foes-you might wish to use the guidelines under “Handling Mobs” in chapter 8 of the Dungeon Master’s Guide. In some cases, you can simply match forces on one side with those on the other and assume they neutralize each other—for example, a band of shield dwarves fighting for the adventurers against a band of orcs. During such combat, the force on the losing side is wiped out while the winning force suffers a few casualties-anywhere from 10 to 50 percent-based on how difficult you judge the combat was for them.
Splitting the Party
You can change up the feel of these later chapters of Out of the Abyss by allowing the players to take on the roles of their faction allies as well as their regular characters. This can range from letting each player control the overall actions of the NPCs in a single faction, to creating multiple subgroups so that characters can split off and have their own adventures. While this involves a good deal more coordination among the game group, it can add a lot of detail, intrigue, and interaction to the campaign.
Random Events
The adventurers must contend with a variety of events as they lead their forces through the Underdark. Every other day of travel or camping in the Underdark, an event automatically occurs. Roll a d20 and consult the Random Events table, or choose a suitable event. For the rules on madness, see chapter 2 of this adventure and chapter 8, “Running the Game,” in the Dungeon Master’s Guide.
Random Events
| d20 | Event |
|---|---|
| 1-2 | Battle aftermath |
| 3-6 | Creature encounter |
| 7-9 | Demon encounter |
| 10-11 | Discipline problem |
| 12-13 | Disease |
| 14-15 | Madness |
| 16-17 | Poisoned NPCs |
| 18-19 | Spoiled supplies |
| 20 | Vanishing NPCs |
Battle Aftermath
The party stumbles upon the remains of one or more creatures slaughtered by rampaging demons. Roll a d10 and consult the Corpses table to determine what they find. A thorough search of the area yields no treasure.
Corpses
| d10 | Corpse Present |
|---|---|
| 1 | 1 dead behir |
| 2-3 | 1d4 dead drow and 1d4-1 dead giant lizards |
| 4-5 | 3d8 dead giant fire beetles (their glands are no longer glowing) |
| 6-7 | 2d4 dead gricks |
| 8-9 | 2d4 dead kuo-toa |
| 10 | 1 dead purple worm |
Roll a d6 and consult the Scavengers table to determine what scavengers, if any, are feasting on the remains.
Scavengers
| d6 | Scavengers |
|---|---|
| 1-2 | 1d3 black puddings |
| 3-4 | 1d4 carrion crawlers |
| 5 | 1d6 gnolls and 1d6 hyenas |
| 6 | 1 otyugh |
Creature Encounter
Roll on the Creature Encounters table in chapter 2 or the Darklake Creature Encounters table in chapter 3, depending on where the party is traveling.
Creature Encounters
| d20 | Encounters |
|---|---|
| 1-2 | Ambushers, reroll this encounter if the characters are resting |
| 3 | Carrion Crawler |
| 4-5 | Escaped Slaves |
| 6-7 | Fungi |
| 8-9 | Giant Fire Beetles |
| 10-11 | Giant “Rocktopus” |
| 12 | Mad Creature |
| 13 | Ochre Jelly |
| 14-15 | Raiders |
| 16 | Scouts |
| 17 | Society of Brilliance |
| 18 | Spore Servants |
| 19-20 | Traders |
Darklake Creature Encounters
| d12 | Encounter |
|---|---|
| 1 | 1 Aquatic Troll |
| 2 | 2d4 Darkmantles |
| 3 | 1d4+2 Duergar in a Keelboat |
| 4 | 1 Green Hag |
| 5 | 1 Grell |
| 6-7 | 1d6+2 Ixitxachitl |
| 8 | 1d4 Kuo-Toa in a Keelboat |
| 9 | 1d4 Merrow |
| 10 | 3d6 Stirges |
| 11 | 1 Swarm of Quippers |
| 12 | 1 Water Weird |
Demon Encounter
Roll a d20 and consult the Demon Encounters table to determine what appears. If the characters stumble upon Juiblex and flee immediately, the demon lord doesn’t pursue or attack them.
Demon Encounters
| d20 | Encounter |
|---|---|
| 1-4 | 1d4 barlguras |
| 5-8 | 1d4 chasmes |
| 9-10 | 1d2 hezrous |
| 11-14 | 1d4 shadow demons |
| 15-18 | 1d3 vrocks |
| 19-20 | Juiblex |
Discipline Problem
A discipline problem is revealed among the NPCs. Roll a d6 and consult the Discipline Problems table to determine what transpires.
Discipline Problems
| d6 | Problem |
|---|---|
| 1-2 | A loud argument that has a 50 percent chance of attracting nearby monsters (roll on the Creature Encounters table in chapter 2) |
| 3-4 | Theft or dispute over the division of spoils |
| 5-6 | Brawl or other outbreak of violence |
Disease
One or more NPC party members contract a disease. Roll a d4 to determine how many NPCs are affected, then roll a d6 and consult the Diseases table to determine which disease is contracted. See in chapter 8, “Running the Game,” in the Dungeon Master’s Guide for descriptions of cackle fever, sewer plague, and sight rot.
Diseases
| d6 | Disease |
|---|---|
| 1-2 | Cackle fever |
| 3-4 | Sewer plague |
| 5 | Sight rot |
| 6 | Zuggtmoy’s spores (see chapter 5, “Neverlight Grove”) |
Madness
One NPC party member goes mad. To determine the kind of madness, roll a d6 and consult the Madness table below. To determine the madness effect, roll percentile dice and consult the appropriate table in chapter 8 of the Dungeon Master’s Guide.
Madness
| d6 | Madness |
|---|---|
| 1-3 | Short-term madness |
| 4-5 | Long-term madness |
| 6 | Indefinite madness |
Poisoned NPCs
One or more NPC party members are poisoned for 1d10 × 10 hours by eating tainted food or poisonous Underdark mushrooms. Roll a d12 to determine how many NPCs are poisoned in this way.
Spoiled Supplies
The party’s provisions become infested with Underdark vermin or infected with spores that render them poisonous. Unless the characters have access to purify food and drink or similar magic, the party must dispose of 3d6 days of rations.
Vanishing NPCs
One or more NPC party members go missing and are never seen again. Roll a d4 to determine how many NPCs vanish in this way. Efforts to find them or magically contact them turn up no trace.
Underdark Outposts
Characters can clear out Underdark areas and create defensible outposts where they and their followers can store supplies and take refuge. To ensure that an outpost isn’t overrun and looted, guards must be assigned to the outpost while the characters are away.
Outposts not only allow scouts to easily backtrack through the Underdark, carrying messages and information to the characters' allies, but also allow additional supplies and reinforcements to reach the expeditionary force with relative ease. Characters without outposts must rely on magic to send messages or receive supplies and reinforcements once their expeditionary force is more than a tenday’s travel away from Mantol-Derith.
New Downtime Activity: Establish an Outpost
Establishing an Underdark outpost is a new downtime activity available to characters in this adventure. An outpost requires a total of 150 hours of work to build, assuming its location is clear of creatures and hazards. Multiple characters can combine their efforts to reduce the completion time.
Each Underdark outpost is basically a fortified encampment. It can take one of the following forms:
- A small cave, roughly 20 feet square, with one or more gated or barricaded exits
- A walled compound, up to 20 feet square, within a much larger cavern
- A island with boats or rafts
- A hard-to-reach ledge, pinnacle, or promontory accessed by ladders and/or ropes
Retracing Steps
This section addresses what happens if the characters visit places they skipped during their escape from the Underdark, and what might have changed or shifted in their absence.
Blingdenstone
If the adventurers encountered the Pudding King and uncovered evidence of Juiblex’s presence near Blingdenstone, they might want to return there to confirm that the svirfneblin settlement remains safe from the demon lord’s influence.
Alternatively, if the characters didn’t previously visit Blingdenstone, news of the challenges faced by the deep gnomes can reach them while they travel through the Underdark. Deep gnome merchants headed to Mantol-Derith bring word of oozes infesting the settlement, giving the characters an opportunity to face off against the Pudding King.
At some point after the Pudding King is dealt with, Juiblex and its servants make their way toward the caverns of Araumycos to crash Zuggtmoy’s wedding (see chapter 16, “The Fetid Wedding”). If the Pudding King is among the survivors, he leads the mad march to confront Zuggtmoy and her fungal followers.
Reinforcements
The deep gnomes of Blingdenstone are valuable allies. In gratitude for the adventurers' aid, they offer to reinforce the party’s expeditionary force with twelve deep gnomes. Chief Dorbo Diggermattock can also be persuaded to lend additional aid and troops, if the heroes present a compelling case. Use the information in chapter 6 to guide any negotiations or arrangements the adventurers attempt to make with the svirfneblin.
The Darklake
To move their expeditionary force across the Darklake, the characters must build rafts or coracles from Underdark materials, or seek out duergar or kuo-toa ferries for hire. Each ferry they find can transport up to eight members of the expeditionary force.
Chapter 3 contains information on navigating the Darklake. If the expeditionary force splits up, check for random encounters with each group separately.
Fallen Sloobludop
If the characters visit Sloobludop, they find the kuotoa community in ruins. Demogorgon smashed and crushed many of the structures of the settlement, killing about half the kuo-toa community in the process. The survivors have fallen prey to madness and the predations of Underdark monsters in the time since.
Obscene altars and shrines are everywhere, many of them depicting elements of Demogorgon’s twisted iconography-spirals and “Y” shapes, two-headed creatures, manta rays, and tentacles. Other shrines show the influence of other demon lords, including piles of skulls and bones, strange maze patterns, spore clouds, and fetid pools of ooze. Conflicts are rapidly rising between the various “sects” that have formed.
If Shuushar the Awakened (see chapter 1) was not killed in a previous chapter of the adventure, the characters find him among Sloobludop’s survivors. He is the sole point of calm and reason in the ruined settlement, and the various factions of the kuo-toa show him respect. Shuushar mediates disputes between the kuo-toa and supervises the allocation of their dwindling resources. Even so, the kuo-toa monk isn’t sure how long he can sustain his people and keep them from destruction.
Gracklstugh
If the characters visited Gracklstugh previously, the duergar response to their return is dictated by the gray dwarves' prior experience with the characters. The duergar are cautious-if not downright alarmed-at the sight of an armed expeditionary force from the surface world at their gates. They likely refuse entry to the full party, allowing only a select few characters into the Darklake District. Invisible duergar guards keep watch on characters in the city at all times, and might even infiltrate the expeditionary force, attempting to eavesdrop on conversations to learn the adventurers' intentions.
Chaos in the City
The influence of the demon lords grows ever stronger in Gracklstugh. Paranoia and fear are rampant, with duergar barricading themselves in their homes and strongholds, afraid to venture out into the streets-even invisibly. Rumors abound of creatures active in the Darklake, and of secret rituals and offerings made to the dark waters to appease them. A number of foreigners have disappeared, and incoming trade to the city has slowed as outsiders depart or stay away.
Conflict between the Keepers of the Flame and the Gray Ghosts thieves' guild comes to a boil. Each side blames the other for recent happenings in the City of Blades and believes it can use the situation to its advantage. Keepers turn up dead, murdered by mysterious assailants, while agents of that order use increasingly brutal methods to ferret out and eliminate the Gray Ghosts-or anyone believed to associate with them.
Whether due to the intervention of the adventurers, the recent events in the Underdark, or both, Themberchaud the Wyrmsmith knows that the Keepers are deliberately oppressing him, and he plots to thin their ranks and weaken their power. Though the dragon knows that he is effectively trapped in the caverns of Gracklstugh even if he wins his freedom, he hungers for it nonetheless, just as he hungers for revenge against those who oppose him.
Dark Plots
If the characters spend much time in Gracklstugh, they become caught up in a rush of destructive events. A secret alliance of factions within the Council of Savants and the Keepers of the Flame, driven by demonic madness, comes to the conclusion that Gracklstugh’s salvation lies in eliminating Themberchaud before he becomes a bigger threat. In the process, both factions plan to acquire a new and far more powerful patron.
The duergar and derro hatch a scheme to sacrifice Themberchaud as an offering to Demogorgon, drawing the demon prince to their city and pledging themselves to the Prince of Demons. A few of them even have delusions that they can somehow bind or influence the demon lord’s power, or that the demon lord will lead them in conquering the whole of the Underdark. Meanwhile, rumors mount that the drow of Menzoberranzan are behind the demonic incursion. Tales range from the drow raising a mighty army of demons to a summoning spell gone terribly wrong. A demonic rampage is said to have nearly destroyed the City of Spiders, and characters with knowledge of the situation in Menzoberranzan are of great interest to all the factions of Gracklstugh. Any evidence that the drow are responsible for the presence of the demon lords stokes the already blazing embers of animosity against the dark elves, with the more militant factions of Gracklstugh calling for a renewed war of vengeance against Menzoberranzan.
Menzoberranzan
The characters might decide to visit Menzoberranzan before heading to Gravenhollow, either to learn what the drow know about the arrival of the demon lords or to assess their involvement in recent events.
March on Menzoberranzan
If the characters advance their expeditionary force toward the drow city, word of their approach reaches Menzoberranzan two days before their arrival, and the drow dispatch a well-armed defense force to destroy the surface dwellers. Racing ahead of this drow force is a high elf from Silverymoon named Khalessa Draga. A deep cover agent of the Lords' Alliance, Khalessa has been spying on the drow for years-so long, in fact, that her superiors are beginning to wonder if she’s a defector. Khalessa is a loyal alliance spy with the following statistical modifications:
- Khalessa’s alignment is neutral.
- She has darkvision out to a range of 60 feet.
- She speaks Common, Elvish, and Undercommon.
- Khalessa’s fey ancestry gives her advantage on saving throws against being charmed, and magic can’t put her to sleep.
- She can cast the dancing lights cantrip at will.
- She owns a hat of disguise, which she uses to appear as a female drow while in the company of drow, and she wears a piwafwi.
Khalessa urges the characters to turn back. If they don’t, she fears that the drow force will overwhelm them. Having blown her cover to warn the characters, she asks to stay with them until they reach Gauntlgrym or an alliance settlement.
The leaders of the drow force are a female drow elite warrior named Ryzliir Symryvvin and her consort, a male drow mage named Velgor Zolond. They are joined by a prisoner in manacles-an unarmed and unarmored male human knight of the Order of the Gauntlet named Aljanor Keenblade. Sir Aljanor was captured during a surface raid months ago, and the drow have beaten him such that he has only 3 hit points remaining. Members of the order traveling in the party’s expeditionary force recognize Sir Aljanor instantly and are surprised; they assumed he had been killed.
Ryzliir vows to execute Aljanor unless the characters withdraw their expeditionary force immediately. Under no circumstances will she willingly release her prisoner. If the characters refuse to turn back, Ryzliir kills Aljanor and orders her own force to attack. If the characters leave Aljanor behind or allow him to die, members of the party’s expeditionary force in league with the Order of the Gauntlet who make it back to Gauntlgrym report the incident to Sir Lanniver Strayl (see chapter 8).
Ryzliir and Velgor are mounted on giant riding lizard, and Aljanor rides behind Velgor. Ryzliir commands a force of six drow warriors, twelve bugbear slaves, and sixty goblin slaves. If all the drow are killed, the goblinoids flee as their morale breaks.
Sir Aljanor has made his peace with Tyr and expects to die. He is disappointed if good lives are lost in a foolish attempt to rescue him. If he survives, he accepts any offer to join the party’s expeditionary force and is quick to assume a leadership role.
Neverlight Grove
If the characters return to Neverlight Grove, myconids loyal to Sovereign Basidia (including Stool and Rumpadump if they remained behind) try to intercept them before their arrival and warn them off. The myconids say that matters have become grave, and that the characters should avoid the grove at all costs.
If the adventurers don’t leave immediately, six myconid adult, four quaggoth spore servant, and four awakened zurkhwood loyal to Sovereign Phylo cut off their retreat. They surround the characters and their followers, offering to escort them to Phylo as the sovereign’s honored guests.
Sovereign Phylo is friendly and offers all visitors food and drink; however, his offerings are poisoned. Each creature that consumes the food or drink must succeed on a DC 13 Constitution saving throw or become poisoned for 8 hours. The creature is also unconscious while poisoned in this way. Any creature that remains unconscious in the grove for 1 hour or more is afflicted by Zuggtmoy’s spores, as described in chapter 5.
If the characters take Basidia’s advice and turn back, the myconid sovereign promises to contact them again when “the time is right to oppose Zuggtmoy” (as described in chapter 16, “The Fetid Wedding”).
Velkynvelve
If the adventurers return to the drow outpost where they were imprisoned, they find Velkynvelve under the command of a drow mage named Servan Llarabbar. Six male drow report to him, while three more male drow and one female drow elite warrior have been locked in the slave pen. The prisoners are afflicted with various forms of indefinite madness (roll on the Indefinite Madness table in chapter 8 of the Dungeon Master’s Guide). Even Servan is beginning to show heightened megalomania and paranoia, seeing enemies everywhere. He has delusions of grandeur and fantasies about declaring Velkynvelve independent of Menzoberranzan, rallying followers to his side and eventually toppling the matriarchs of the great houses.